
DIY wood Christmas tree
If you live in a small apartment or simply don't want to deal with the hassle of getting a natural Christmas tree this unconventional fabric covered DIY wood Christmas tree is the next best alternative.
Yield: 2 trees
Equipment
- saw
- scissors
- glue gun
Materials
- strips of plywood for "branches"
- strips of wood for "thunk"
- Christmas themed fabric scraps I used red fleece, cotton, organza and burlap
- fabric glue make sure it works for wood too
- glitter spray
Instructions
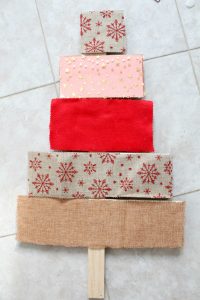
- Decide on how high you want your trees to be and how many "branches" and cut the plywood according to your measurements. I wanted to have a small tree and a medium one and cut 5 and 6 strips of plywood.
- Arrange your "trees" and decide how long the wood strip that'll hold the "branches" will be and cut by your measurements.

- Cut fabric the width and height of your plywood pieces, using your pinking sheers. This will not only stop the fabric from fraying but it adds a bit of interest too.
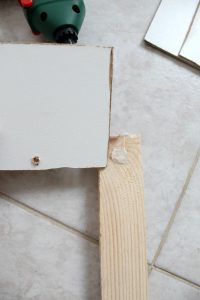
- Use your glue gun to attach the plywood strips (the branches) to your wood strip (the trunk). I tried using my drill but the trunk almost broke so I decided to use my glue gun. I applied glue on the wood strip, then immediately pressed the plywood so that the glue sits in the middle of the plywood; this will give it a stronger hold.
- Spread glue on plywood and immediately attach the fabric strips (don't be lazy as me and iron your fabric first). Do one plywood strip at a time. Leave to completely dry.
- Spray some glitter directly on the fabric. Leave to dry.

- That's it! You've got yourself a pretty fabric covered Christmas tree in no time! I am personally more pleased with the smaller tree, I think it's cuter than the larger one and the branches look more put together.