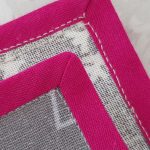
How to sew double fold bias tape around corners
Create beautiful mitered corners with bias tape! Learn how to achieve flawless finishes and add a professional finish to your sewing projects!
Yield: 1 corner
Equipment
- Fabric marker or chalk pencil
- Matching thread (I used contrast for the purpose of this tutorial)
- pressing iron
Materials
- 1 Piece of fabric in square or rectangular shape
- Double fold bias tape
Instructions
- Start by pinning and sewing your bias tape on one side of the square, somewhere in the middle, as indicated in this tutorial.
- As you approach the corner, stop sewing, lift the presser foot and remove the fabric.
- Mark 1/4" away from the corner on the bias tape.
- Draw a line from this mark to the corner.
- Put the fabric back under the presser foot and continue sewing until you reach the 1/4" mark.
- Stop at the mark, leave the needle down into the fabric, lift the presser foot up and pivot the fabric so the needle is level with the line you drew to the corner.
- Lower the presser foot down and continue sewing until the needle reaches the corner.
- Remove the fabric and fold the bias tape to a side, over the little seam you've sewn in the corner.
- Press the bias right at that seam with your pressing iron.
- Fold the bias tape down, towards the other side of the square. The fold in the bias tape should be level with the edge of the fabric.
- Press well, right along the edge.
- Pin the bias tape to the second side of the square.
- Sew the bias to the second side, starting right near the edge of the fabric, in the corner you just mitered.
- As you reach the next corner, repeat all the steps above.
- Continue in the same manner until all corners are done.
- When you get to the end of the bias tape, follow the same tutorial I mentioned in the beginning of these instructions to attach the bias ends.
- Push bias tape up, on all sides and give it a light press along the seam you've just finished sewing.
- Then fold the bias to the back of the fabric, smoothing out and folding the corners until they shape like mitered corners.
- Once you are happy with the look, pin the bias to the back of the fabric and stitch in the ditch on the right side of the fabric to attach the bias to the back of the fabric. The above tutorial also shows this method.
- Give your project a good press along all sides and corners and you're done!
- I hope you found my tutorial easy and instructive and you've already decided to give this