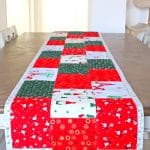
Quilted Christmas table runner
Get in touch with your creative side and explore the art of sewing a gorgeous quilted Christmas table runner. This stunning piece has an elegant charm that captures the enchanting spirit of the holiday season.
Yield: 1 table runner
Equipment
- walking foot
- scissors
- pressing iron
Materials
- quilting cotton fabric for the bricks I cut mine into 6 1/2" by 9 1/2" blocks; if you're using fat quarters it will get you 4 blocks per fat quarter. For my quilted Christmas table runner I used 33 blocks, 11 blocks per row.
- Bias binding
- Batting
- matching or contrast thread
Instructions
- Firstly, ensure you have prepared your fabric by pre-washing and ironing it to eliminate any creases or shrinkage. Once your fabric is ready, lay it flat on a clean and spacious work surface.
- Using your scissors or rotary cutter, carefully cut out the blocks of your table runner from the fabric. Take your time to ensure precise and clean cuts, as this will impact the overall appearance of your finished table runner.
- Next, it's time to arrange the blocks in 3 rows and mix and match the fabrics until you reach the desired pattern.
- Sew the blocks together. Place one block right side up and top with the second block wrong side up. Sew along one of the sides using a 1/4" seam allowance. Continue in this manner until you finish one row then proceed in the same manner for the 2 remaining rows.
- With your pressing iron on steam, press all seams open.
- Next sew the rows together. Place one row right side up and top with the second row wrong side. The blocks shouldn't match, instead the seams of one row should be in the middle of the blocks on the other row, like so.
- Sew on one of the long edges, using a 1/4" seam allowance. Repeat for the third row.
- Press all seams open.
- Trim the sides of the quilt top.
- Cut out the batting and the backing fabric in the same size of your quilt top fabric.
- Place the backing fabric wrong side up, spray with basting spray and immediately add the batting to adhere.
- Repeat the steps to adhere the top fabric to batting. Alternatively, you can use pins or safety pins to keep the layers together while quilting. But for larger quilts I found it easier and safer to use a basting spray instead.
- Allow to dry then sew all three layers together. This is where your quilting experience comes into action as you have a variety of options to quilt this table runner. I opted for keeping my blocks free of stitching and instead I wanted to sew inside/over the long seams and along these seams to keep all three layers together. Then I added decorative stitches to the small seams between the blocks.
- When you're done quilting the table runner, trim off any excess fabric and batting from the edges. This will give it a clean and polished look and will help you sew the bias binding neatly.
- Then it's time to finish off your table runner by adding the bias binding to the raw edges. I wanted a wider rim for my runner so I cut 4" bias binding using this method. After sewing the bias binding in place I ran a line of decorative stitches over the edge of the bias binding, on the right side of the table runner.