How to sew single fold bias tape
Bias tape binds both straight and curved edges and sky is the limit when using it to finish edges! Here's how to sew single fold bias tape!
Yield: 1 armhole
Equipment
- scissors
- pressing iron
Materials
- fabric strip
- single fold bias binding
- matching or contrast thread
Instructions
- In this tutorial I chose to use an armhole for sewing single fold bias tape. The principles are the same for any kind of project using single fold bias tape.
- Line up one edge of the bias with the edge of the fabric, right sides together. Pin carefully, especially around the curve, to avoid puckering and pleating in the fabric. To do that, try and pull the curve into a straight line as much as possible and then pin bias tape. If you're a beginner you might find this step pretty challenging so be patient if this is your first time sewing bias tape for arm holes.
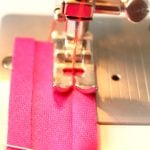
- Sew down the fold line in the bias binding. Backstitch both at the beginning and the end.
- Clip the seam and fold bias to the wrong side of the fabric (towards inside). Clipping will make sewing around the armhole a lot easier as the fabric won’t be pleating that much and the seam will also become more flexible.
- Press and pin the bias again. At this point there shouldn't be any raw edges visible as they are encased in the binding.
- Starting at the underarm seam, sew the binding to the inside of the armhole all the way around. Backstitch at the beginning and the end.
- To the right side of the fabric, edgestitch around the armhole for and extra decorative touch and for helping the bias lay flat against the fabric