How to embroider with a sewing machine
Learn everything there is to know about how to embroider with a sewing machine, with the help of this easy yet comprehensive guide!
Yield: 1 embroidery
Equipment
- embroidery hoop
- free motion foot or darning foot
- fine point embroidery scissors
- Seam Ripper
- darning plate
- pressing iron
Materials
- cotton fabric
- embroidery design
- embroidery backing
- matching thread
Instructions
- Start by transferring the embroidery design onto the right side of the fabric.
- Add the backing as instructed on the package. Make sure the backing covers the entire design!
- Place the fabric in the embroidery hoop. You need to set up your hoop in this order: inner hoop, fabric wrong side up, outer hoop. When embroidering on your sewing machine, the right side of the fabric should be inside the hoop (in the hole/hollow of the hoop).
- Make sure the design is center in the hoop and that you have ample room for sewing inside the hoop. If the design is larger than the hoop, work in small sections. Once a section is done, remove the fabric and set the hoop in a different section. And so on until the entire design is embroidered.
- Remove the old presser foot and preferably the needle too (it will allow you more freedom to work).
- Install the free motion foot, following the instruction for your particular foot and sewing machine.
- If you removed it above, return the needle to its position and thread it.
- Look for a button/switch on your sewing machine that allows you to push the feed dogs down. My computerized Brother machine has a switch in the back, behind the presser foot, while my rudimentary Singer machine doesn't have one. For my Singer machine I install a darning plate.
- Keep your machine on a straight stitch and test the length and width on a piece of fabric (you need to stabilize this fabric too). Play with the width and length until you reach the desired settings. Take a piece of paper and write down the settings for your straight stitch. Repeat for a zig zag stitch that you will need to use to fill the embroidery design. When you're ready to start sewing, proceed to the next step.
- Grab the presser foot handle and lift it as much as it lets you then slide the embroidery hoop under the needle, with the right side of the fabric up.
- Lower the foot and using the sewing machine wheel, lower the needle a little until it catches the bobbin thread. Keep spinning the wheel until the needle is up the fabric. Using your scissors or a ruler, push the thread away from the needle making sure the thread is under the presser foot, not above it.
- Lower the needle again and start sewing. Using a straight stitch, outline your design first. Sew slow and move the hoop slowly under the needle.
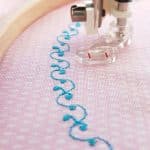
- Change the stitch to a zig zag stitch and fill the design, again moving slow with both sewing and the hoop.
- If you were using tearaway backing, remove it at this point.
- Grab the fine scissors and remove all extra threads.
- Press the fabric on the wrong side, with the iron on steam and you're done!