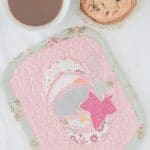
Applique pumpkin mug rug
No need to go to the pumpkin patch for a cute gourd! Just sew a fabulous quilted pumpkin mug rug with this easy tutorial!
Yield: 1 mug rug
Equipment
- seamstress scissors
- quilting clips or large pins
- embroidery or monogramming foot or quilting/darning foot
- pressing iron
Materials
- small fabric scraps for the pumpkin template
- fabric scraps for the front mug rug and the backing
- batting scraps or fleece
- pumpkin applique template
- double sided interfacing
- embroidery interfacing
- matching thread
Instructions
- Using craft scissors, cut the template pieces for the pumpkin and leaf.
- Cut fabric for the outer side of the mug rug and the backing.
- Cut the batting or fleece the same size as the fabrics.
- Place the pumpkin templates over the fabric scraps and trace around templates with the fabric marker.
- Cut out using the sewing scissors.
- Repeat for the double sided interfacing.
- Interface the back of the fabric pieces.
- Remove the paper from the double sided interfacing and place the pumpkin pieces on the outer fabric piece of the mug rug.
- Iron press to set the pieces in place.
- Apply embroidery interfacing (highly recommended! I skipped this step for this project as I couldn't find any interfacing at that time and I had a hard time stitching the applique nicely).
- Install an embroidery foot, a quilting/darning foot and using a zig zag stitch, sew around the raw edges of each template piece. I used my darning foot, a small zig zag stitch and small tension and length. I'd advise you test your settings first on a scrap piece of fabric the same texture as the fabric used for the project and change the settings until you're happy with the stitch. Once you're happy with the settings move onto the actual project.
- When all the pumpkin pieces are done, apply the leaf in the same manner as above then stitch the edges.
- Draw the curl and sew using a tight zig zag stitch.
- Place the backing fabric wrong side out, top with the batting and then add the outer fabric (the one with the pumpkin applique), right side out.
- Pin through all three layers or clip the sides with quilting clips to keep all layers together.
- Do some free motion quilting all around the pumpkin and between the pumpkin pieces.
- Place the mug rug on the cutting mat and using a quilting ruler and a rotary cutter, trim the edges to perfectly square the mug rug.
- Round the corners a little.
- Apply double fold bias tape or bias binding.