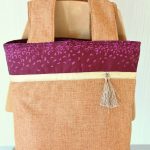
The Ultimate Guide to Sewing the Perfect Burlap Tote Bag!!
Make a gorgeous and practical burlap tote bag with this easy and quick tutorial! This pretty color block tote bag makes a great project for beginner sewists and is perfect as an every day bag or a shopping tote!
Yield: 1 tote
Equipment
- scissors
Materials
- 1/2 yard of burlap fabric
- 1 yard of upper and lining fabric
- 1-2 yards of ribbon
- matching thread
- 2 small tassels
- iron on interfacing or wadding
Instructions
- Cut your pieces of fabric, like shown below. Cut interfacing or wadding to match the exterior fabric panels and the handles (so you'll have 2 for upper fabric, 2 for lower fabric and 2 for handles). If you want a super sturdy bag, you can add interfacing to the lining fabric too.
- Iron on your interfacing or wadding to the fabric. You'll have to use interfacing only on 2 of the handle panels.
- Grab one of your upper fabric pieces and place it together with one of the lower fabric pieces, right sides together. Line up the upper edges and sew them together, using a 1/2" seam allowance.
- Open it up and iron flat. Repeat with the other upper and lower fabric pieces.
- Line up the ribbon just where the upper and lower fabric pieces join and pin in place. Sew along the top and bottom edge of the ribbon. Repeat for the other panel.
- Place the two panels right sides together and make sure you are matching the upper edges together. Then, peek at the sides and match up the ribbon pieces, so that they line up perfectly.
- Sew along the sides and the bottom, using a 1/2" seam allowance.
- Grab one of the bottom corners and pull the front fabric away from the back fabric and fold it flat, making a nice, pointy tip by lining up the front and the back seam. Iron it flat.
- Measure in 3" from the pointy corner (not the excess fabric but the corner inside of the seam) and mark with a pin. Sew a straight line perpendicular with the other seam, right at that 3" mark.
- Repeat with the other corner.
- Turn the the fabric right side out and iron the side seams flat and each corner so that the bottom will stay boxed out. Try and flatten out the bottom seam too without making additional creases in your fabric.
- Repeat the process with the lining fabric, making sure you use the 18" dimension from side to side and the 18 1/2" from top to bottom.
- Grab one of the handle panels with the interfacing and one without interfacing and place them together with right sides together, and sew along each side, using a 1/2'" seam allowance. Do the same with the other handle pieces. Leave both ends open on both handles.
- Turn each handle right side out, and press flat.
- Sew along the edge, on the sides, as close to the edge as possible.
- Make additional stitches inside the handles, for added design if you wish.
- Grab one handle and place each end 4" from each side seam. Pin both ends in place. Do the same on the other side of the bag with the other handle.
- Sew each handle end in place, using a 7/8" seam allowance.
- Slide the outer bag fabric - right side out, inside of the lining fabric - inside out.
- Match up the top seams and the side seams and pin in place.
- Sew around the top edges, using a 1" seam allowance. Leave an opening between the handles on one side so you can turn the bag right side out.
- Then, pull the outer bag fabric out, through the opening that you just left, until all fabric is right side out.
- Place the lining inside the bag.
- Tuck the edges of the opening towards the inside, 1" and iron flat.
- Close the opening by sewing all along the upper edge of the tote, where the outer fabric meets the lining fabric. I added an extra stitch, 1/4" below the upper stitch as added design and to give the handles extra strength.
- Now you can embellish your bag with tassels, stitched to the ribbon, a fabric flower or anything that might strike your fancy.