

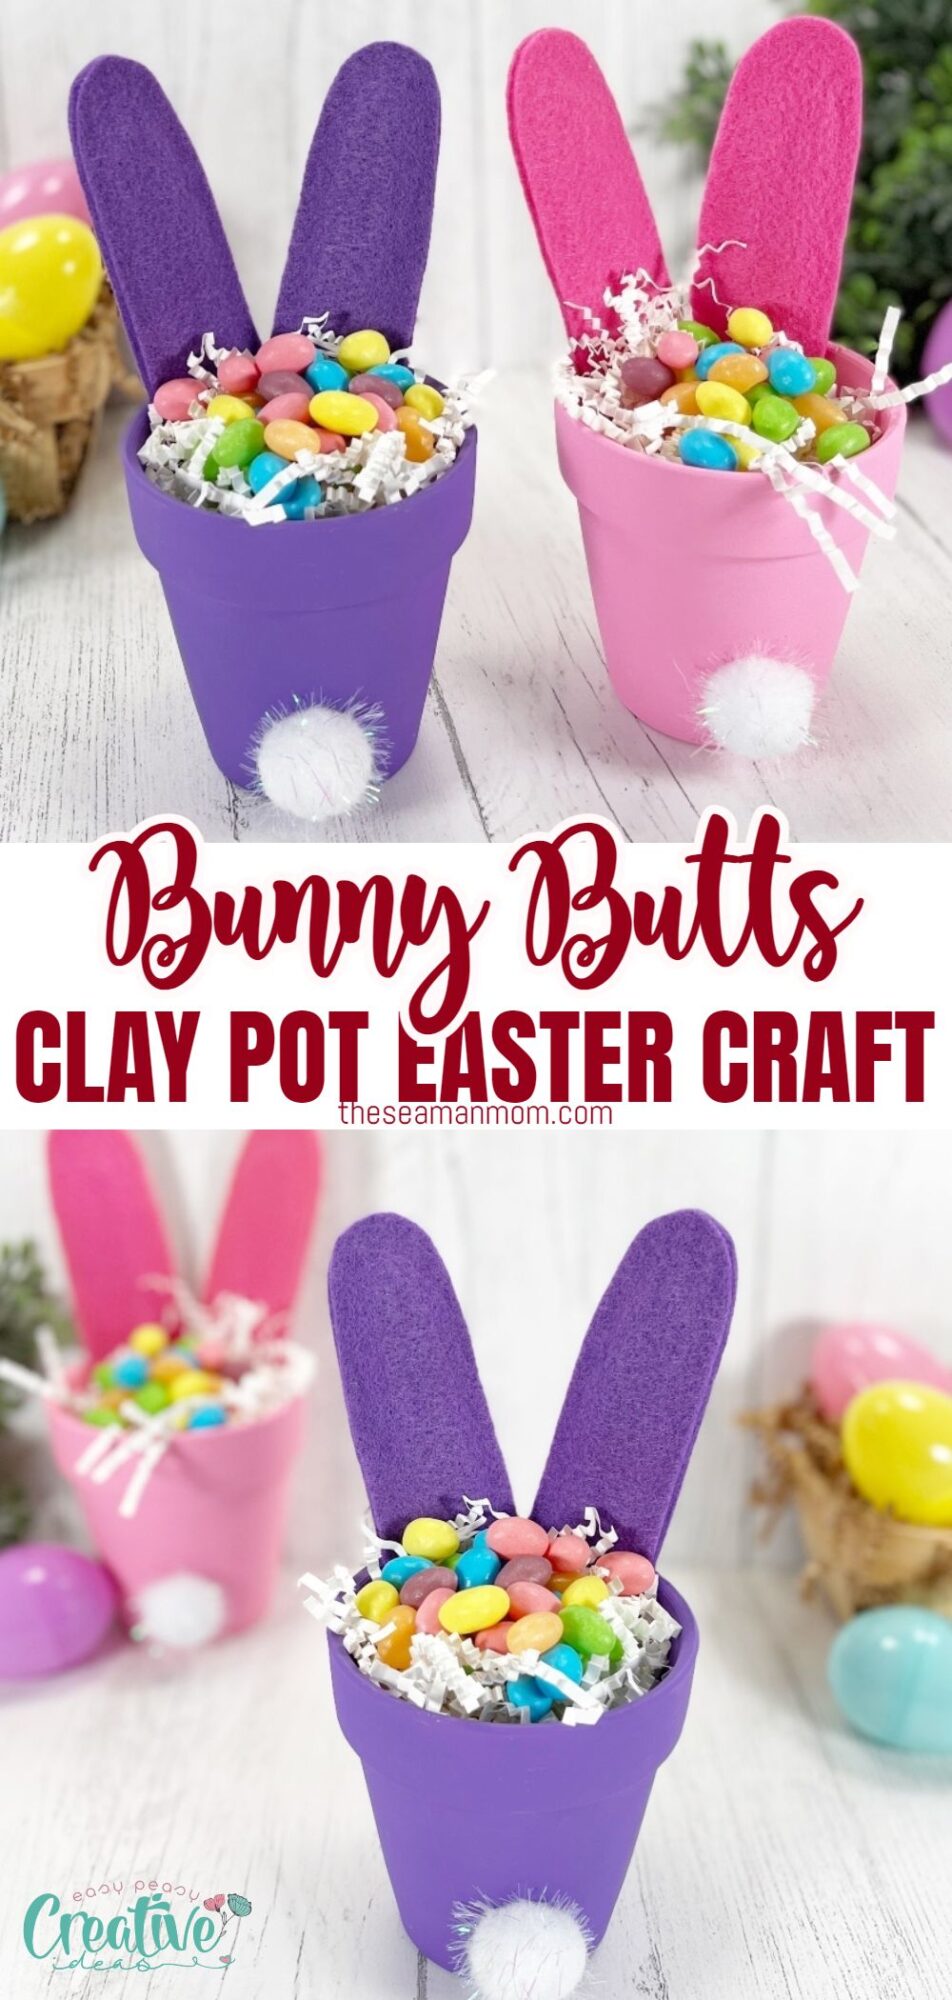
Crafting cuteness: Easter bunny butts, clay pot craft idea
Wanna make unique Easter crafts? Here you’ll find inspiration on how to create whimsical Easter bunny butts with small clay pots. Get ready to bring a smile to everyone’s face with these adorable Easter-themed crafts.
If you’re yearning for craft ideas that will bring a smile to everyone’s face, in this article, we’ll dive into the world of Easter bunny butts. Made with clay pots, these adorable, easy crafts help you create charming decorations for the holiday.
From painting techniques to charming details, we’ve got you covered. So, let’s hop right in and discover how to craft cuteness with these delightful Easter-themed creations.
How to make Easter bunny butts
Materials for bunny butts
To bring these adorable bunny butt clay pots to life, let’s first gather all the materials needed. Stocking up on the right supplies ensures a smooth crafting process and allows you to fully enjoy the creative experience. Here’s a list of everything you’ll need to get started:
1. Clay pots
Choose pots in various sizes, depending on your preference. They will serve as the bodies for your cute bunny butts and provide a sturdy base for your creations.
2. Acrylic paint
Select an array of pastel colors to give your bunny butts a soft, Easter-inspired palette. Think delicate pinks, blues, yellows, and greens.
3. Paintbrushes
Invest in a set of small to medium-sized brushes with fine bristles. These will help you achieve the intricate details and fine brushstrokes on your clay pots.
4. White pom-poms
These fluffy balls of cuteness will be used as the cotton tails for your bunny butts. Make sure to get enough pom-poms to match the number of clay pots you plan to decorate.
5. Craft glue
A reliable adhesive is essential to securely attach the pom-poms to the back of the clay pots. Look for a glue that dries clear and provides a strong bond such as hot glue.
6. Construction paper
This is optional if you don’t have craft felt or if you want to add bunny feet to your craft. Get a few sheets of colored construction paper in coordinating hues to create the bunny ears and feet. Pastel shades like pink, blue, or white work well for an Easter-inspired touch.
7. Scissors
A sharp pair of scissors will come in handy for cutting out the bunny ears and feet from the construction paper. Make sure they are comfortable to hold for precise cutting.
8. Pencil or marker
Having a pencil on hand allows you to lightly sketch out your designs before gluing them to the clay pots. It helps to plan and visualize the placement of the bunny features.
9. Optional embellishments
If you want to take your bunny butts craft to the next level, consider adding some extra touches. Ribbon, mini bows, or even small Easter-themed trinkets can add a delightful finishing touch.
With all these materials at your disposal, you’re now ready to dive into the instructions.
Instructions to make the Easter bunny butts
Preparing the Clay Pots
Before we can bring these adorable Easter decorations to life, it’s essential to ensure that the clay pots are ready for painting and embellishment. This initial step sets the foundation for the creativity and cuteness to come, making it a crucial part of the process.
Begin by gently wiping down the surface of each clay pot with a soft cloth or sponge. This step eliminates any dust or debris that may have accumulated, ensuring a smooth and clean surface for your design. A clean canvas is essential for optimal paint adhesion and overall visual appeal.
Next, if needed, sand the clay pots lightly to create an even texture. This step is particularly important if your pots have a glossy or rough finish. By gently sanding the surface, you create a slightly roughened area for the paint to adhere to, allowing for better coverage and durability. Remember to wipe away any residual dust from the sanding process before moving on.
Painting the Base
Once your clay pots are clean and prepped, consider applying a primer. While this step is optional, using a primer can provide a solid base for the paint, helping it adhere better and preventing chipping or peeling later on. Apply a thin, even layer of primer using a small paintbrush or foam brush, paying attention to fully cover all surfaces. Allow the primer to dry completely before moving on to the next step.
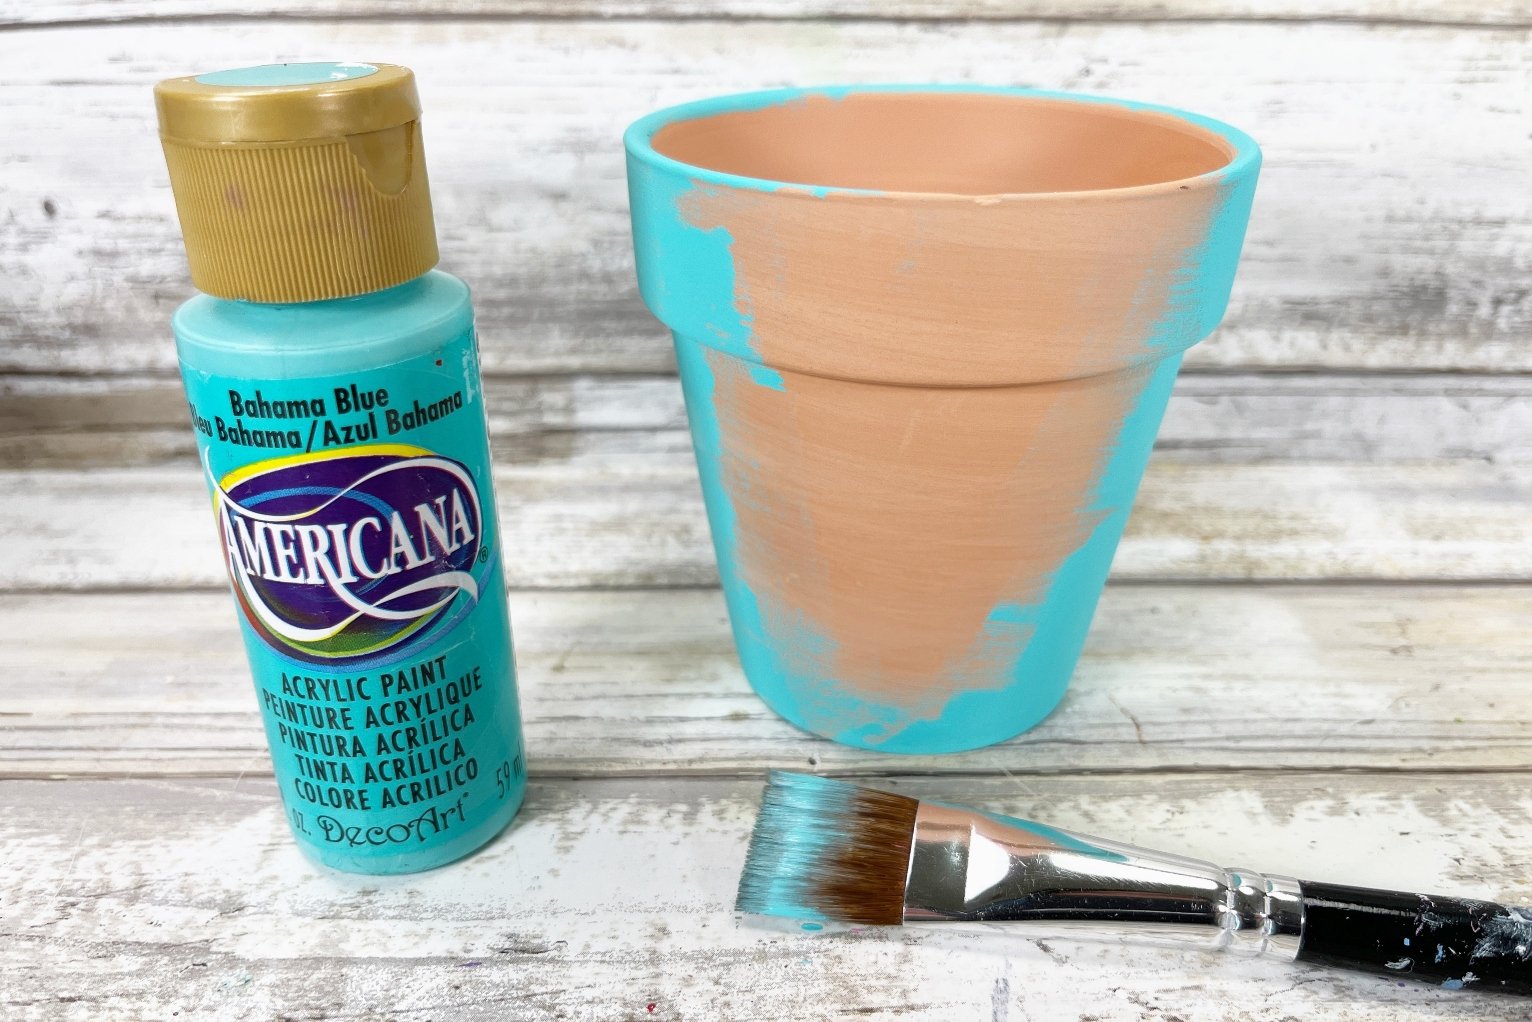
Now that you have a smooth and primed surface to work with, you can start adding color to your clay pots. The choice of colors is entirely up to you, but pastel shades like baby blue, pale pink, and mint green are popular options for creating adorable bunny butts. You can also opt for bright and vibrant colors for a fun twist!
Using acrylic paints specifically formulated for use on terracotta, start by selecting a base color for your pots that complements the overall aesthetic you’re going for. Whether it’s a soft pink or a cheerful yellow, the base color will provide a backdrop for the other decorative elements you’ll add later. Apply the paint evenly, using a small paintbrush or foam brush, making sure to cover all surfaces of the pot.
Allow the base coat to dry completely before moving on to the next step. Depending on the type of paint you’re using and the weather conditions, this may take anywhere from a few hours to overnight. Patience is key here, as rushing could lead to smudges or streaks in your bunny butt design.
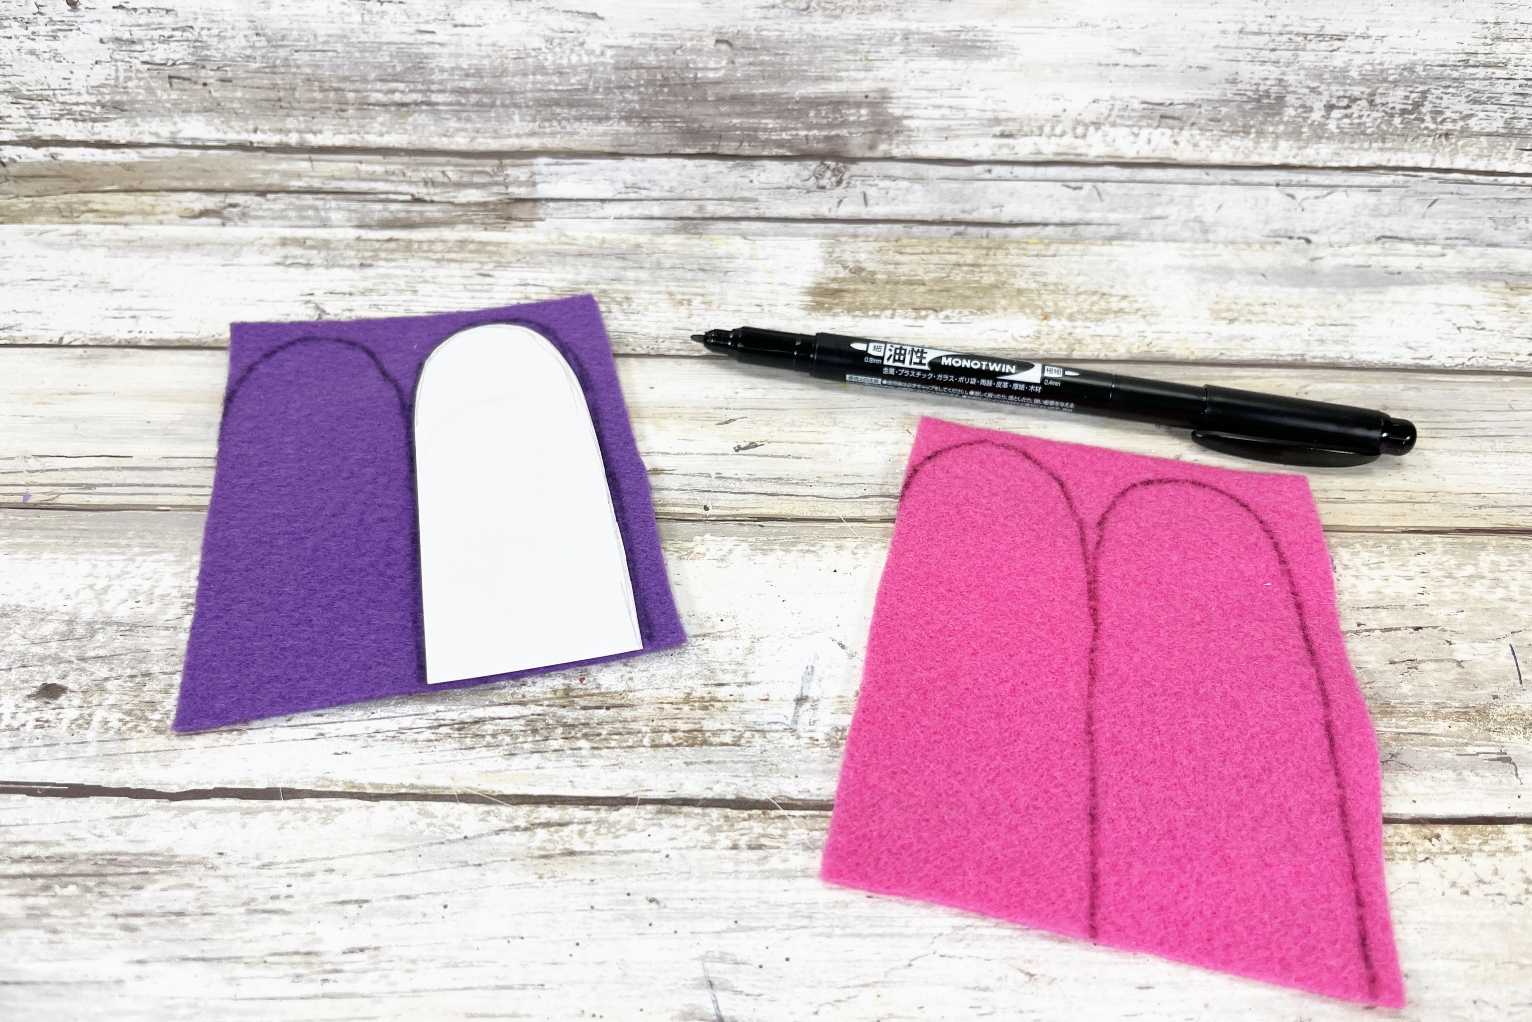
Prepare the ears
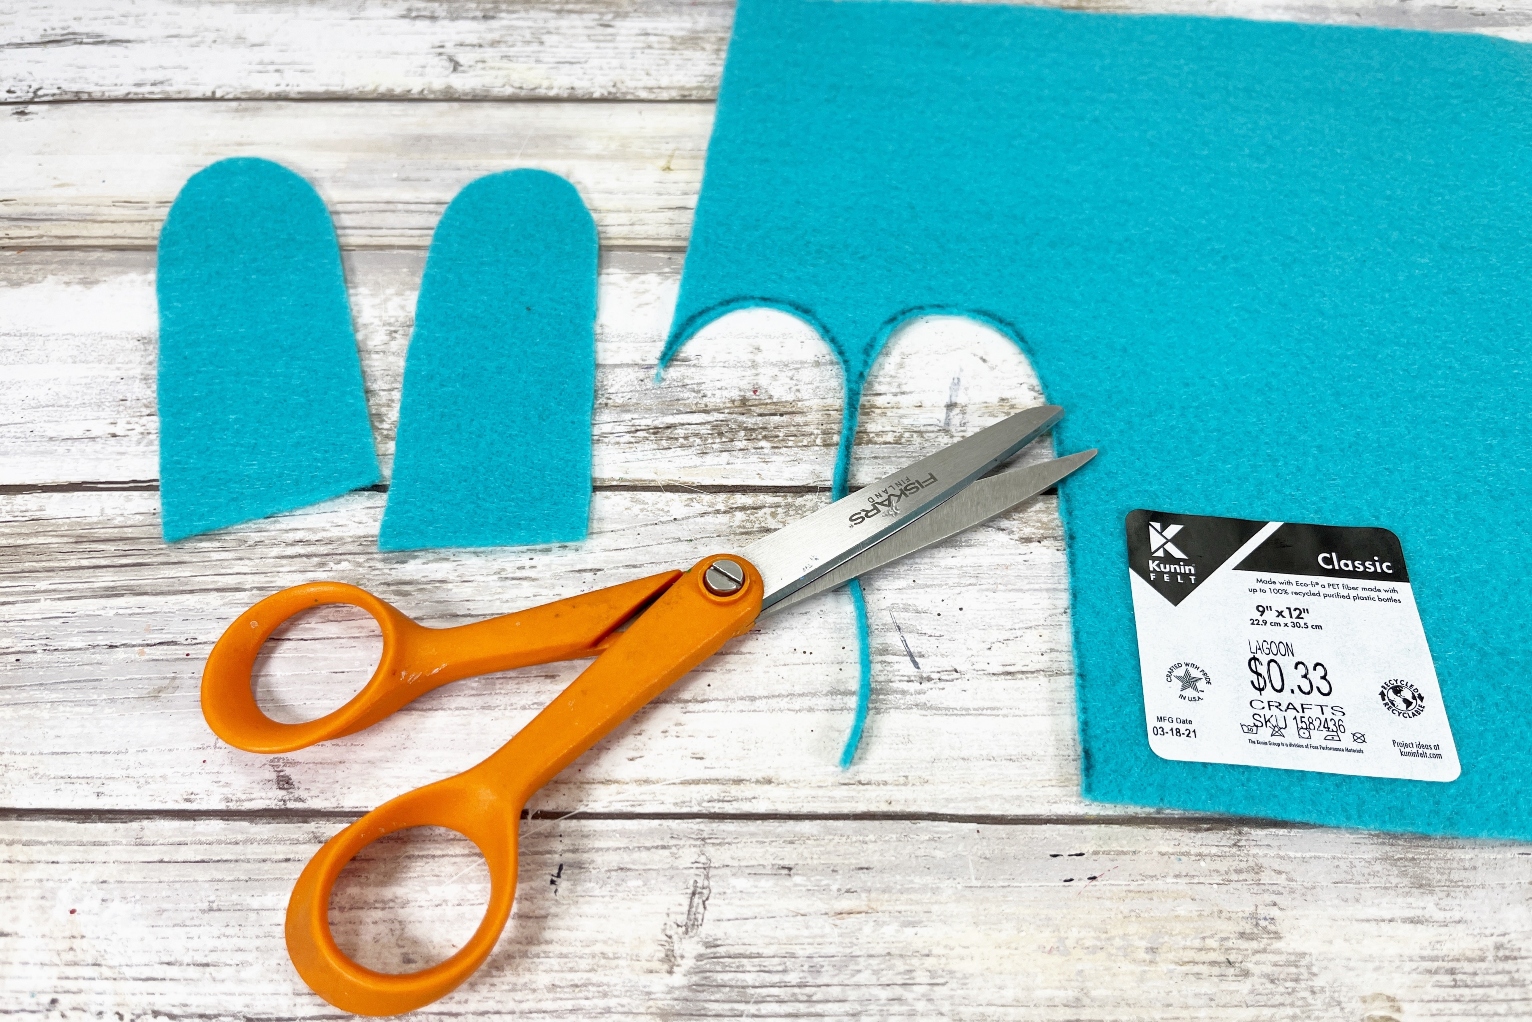
Print the CLAY POT BUNNY PATTERN on paper. Cut out the ear pattern with scissors. Trace the ear pattern onto blue, pink, and purple craft felt four time each.
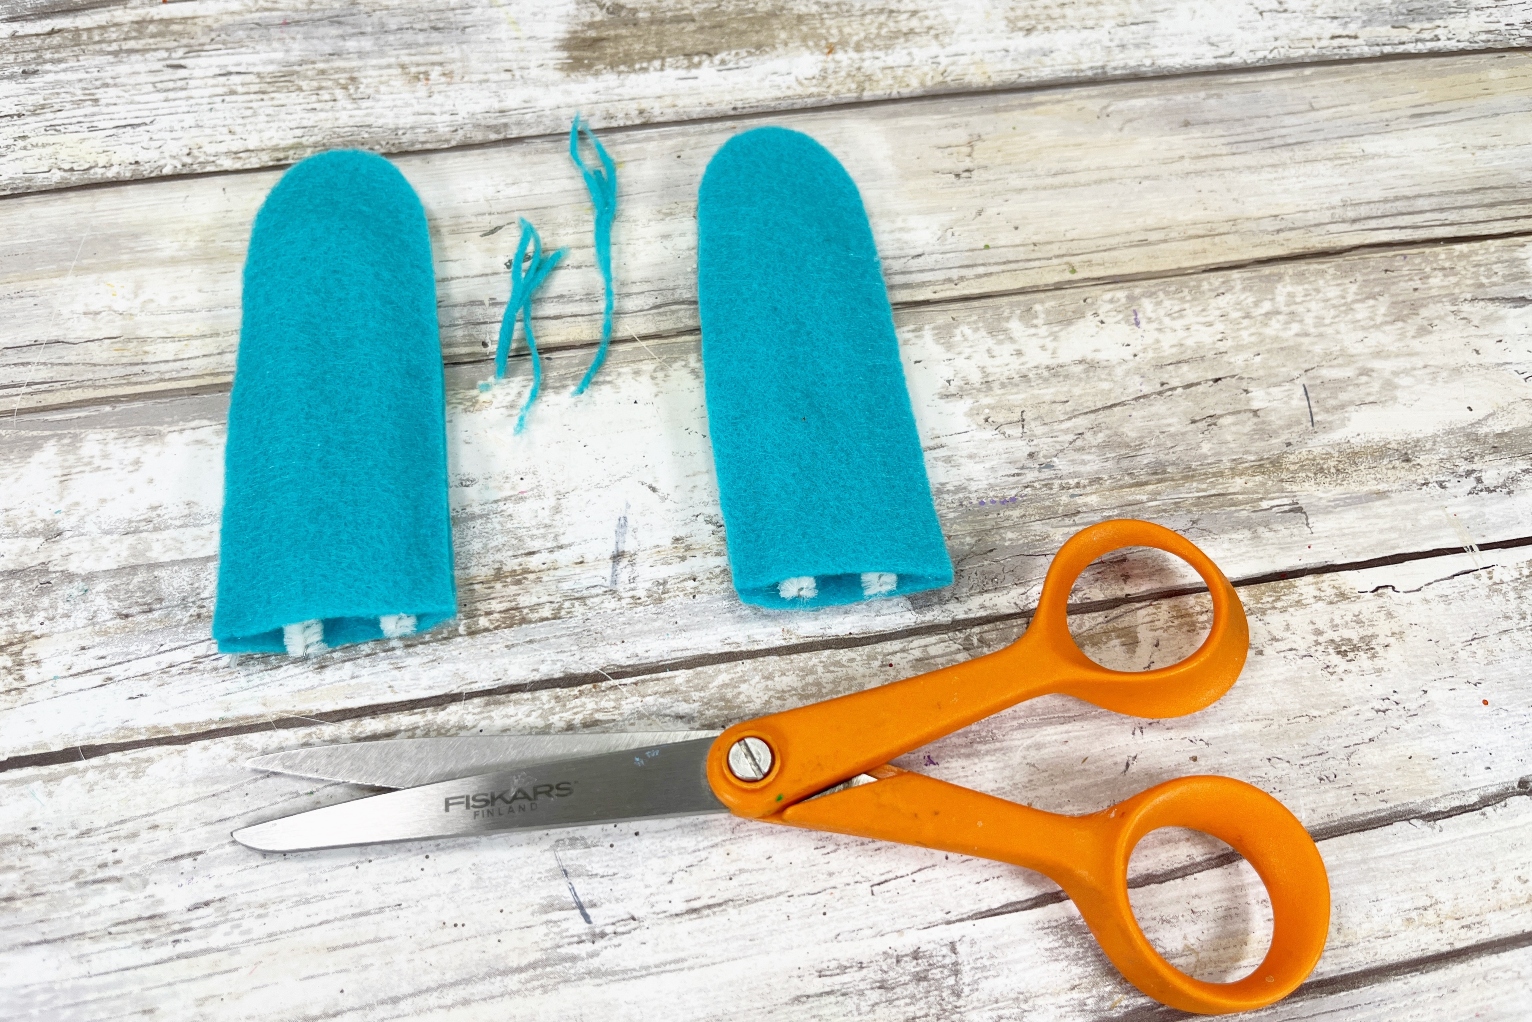
Cut out all ear patterns with scissors. Make sure to cut inside the raced lines, so you end up with a clean, finished project.
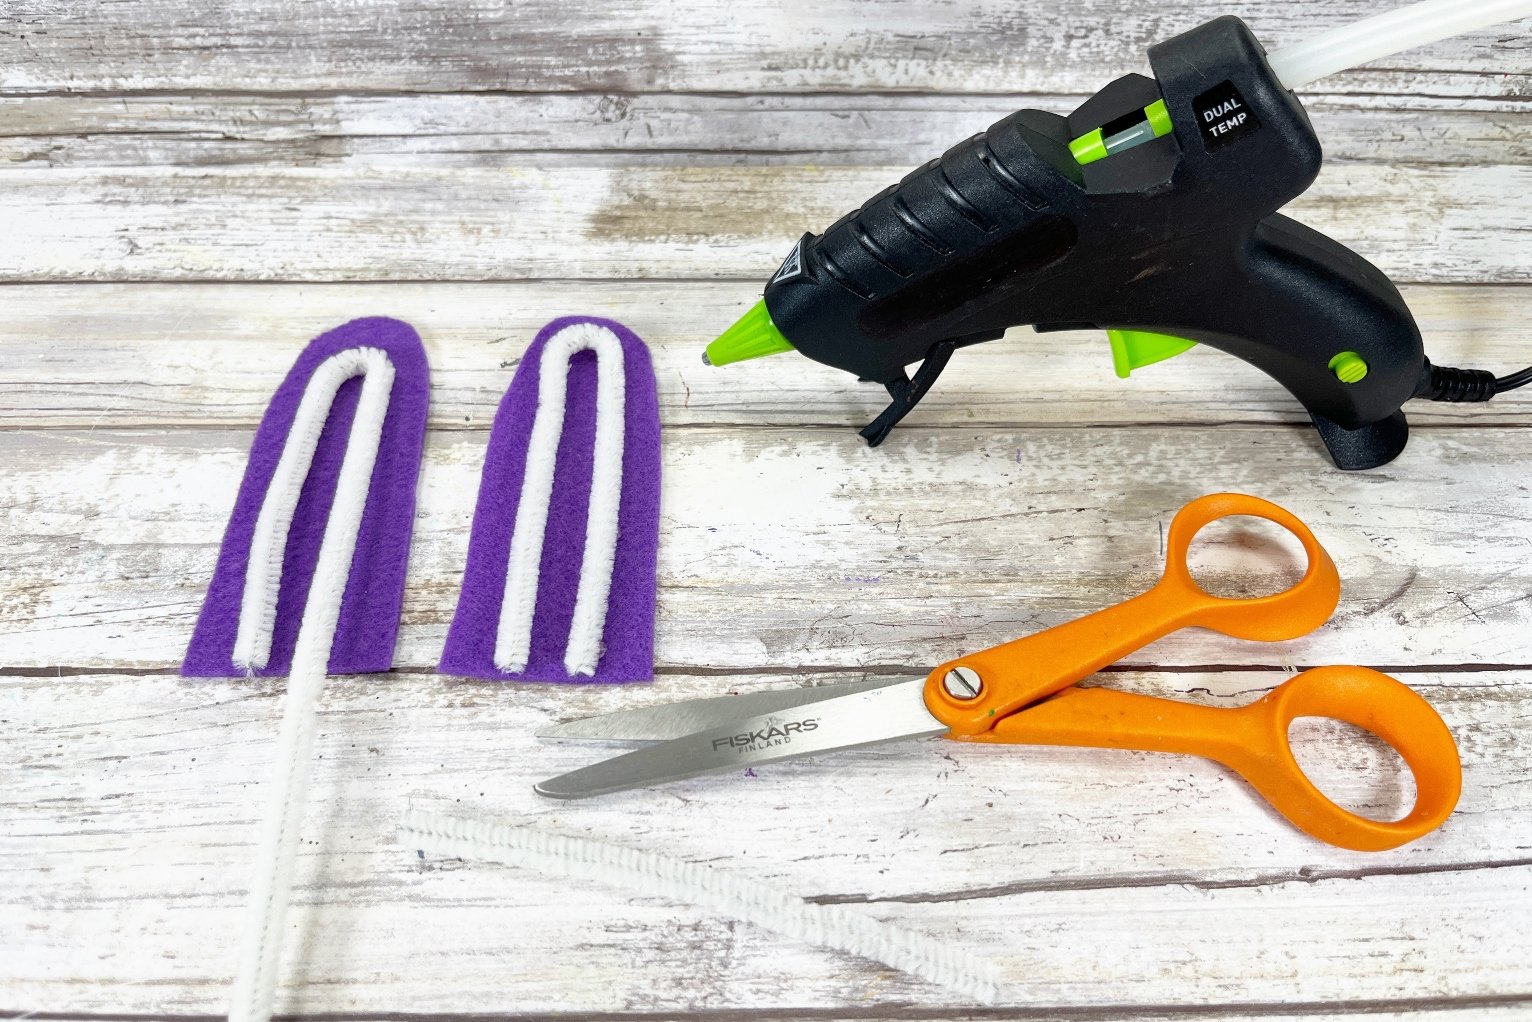
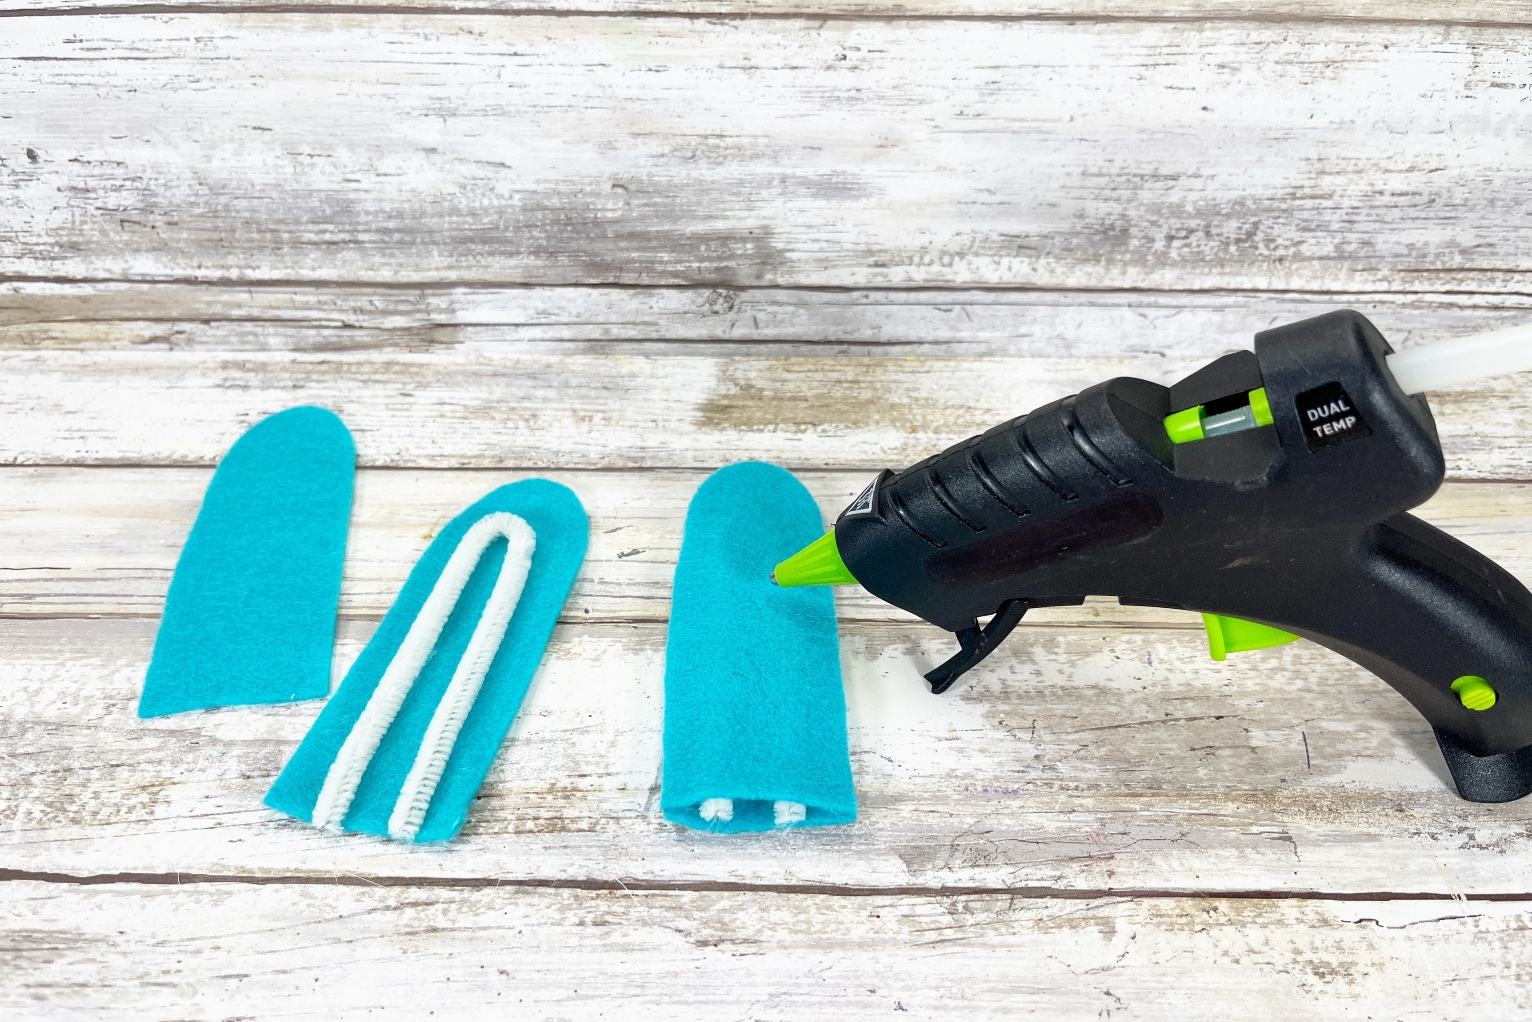
To create the bunny ears, bend a white chenille stem into a “U” shape and attach to the craft felt ear with a glue gun and glue sticks. Trim the ends of the chenille stem with scissors. Repeat for the second ear.
TIP: Craft foam or cardstock would also work for this project, use what you have on hand.
Attach the top of the ear to the base of the ear by gluing around the edge with a glue gun and glue sticks. Repeat for the second ear. Trim any edges of craft felt that don’t match up.
TIP: You can use liquid craft glue for this project, but you would have to wait for it to dry.
Adding Bunny Butts
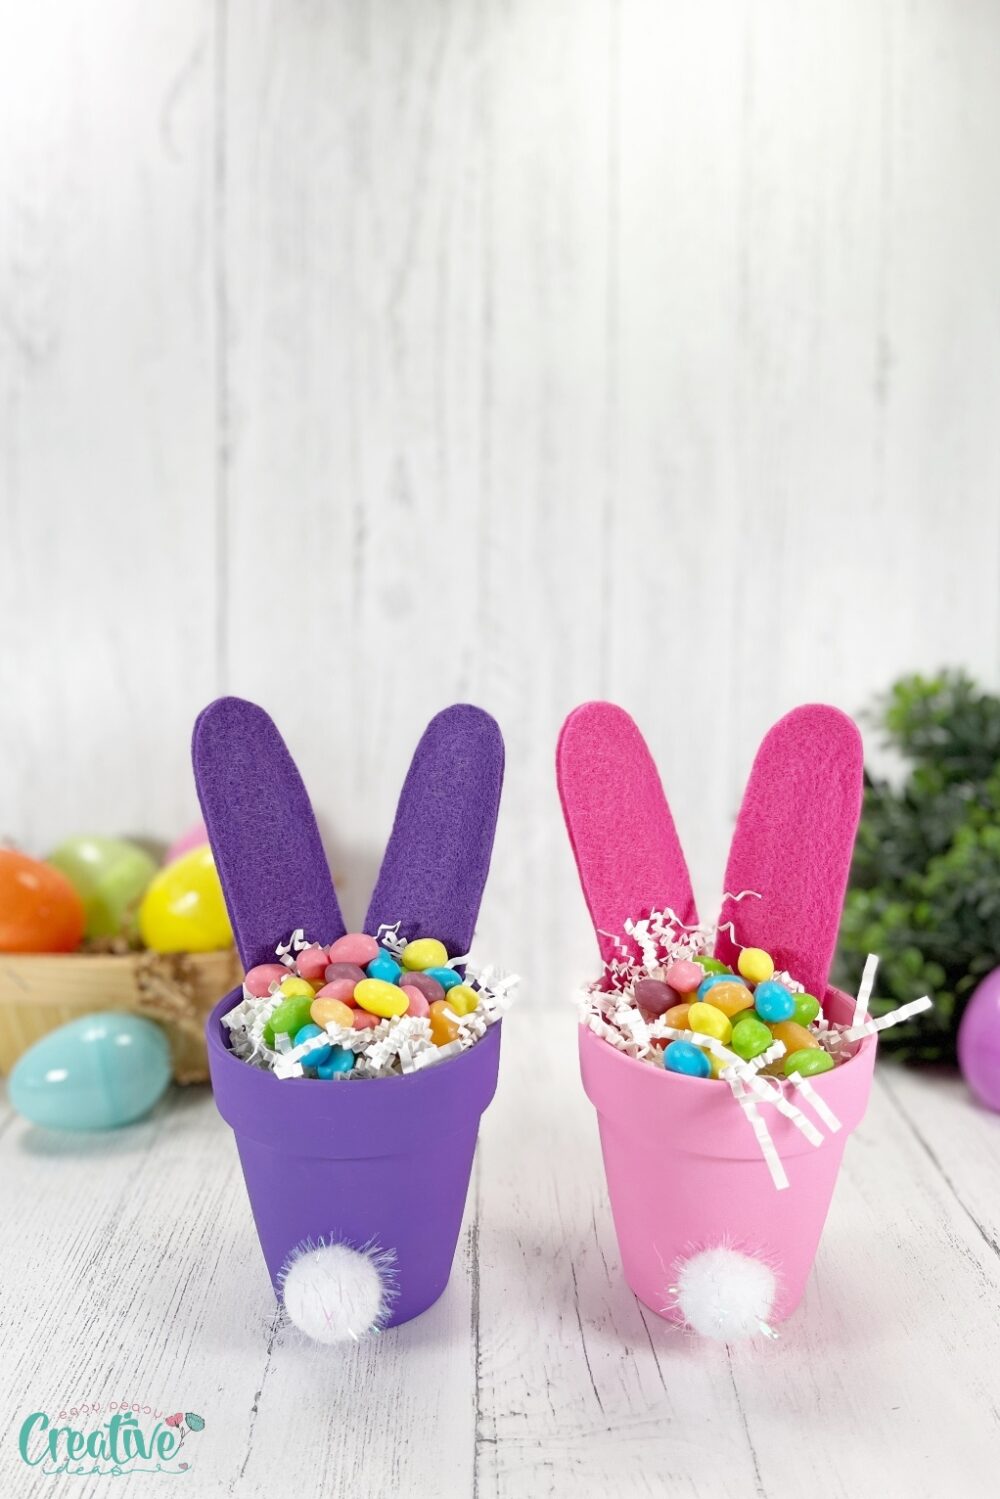
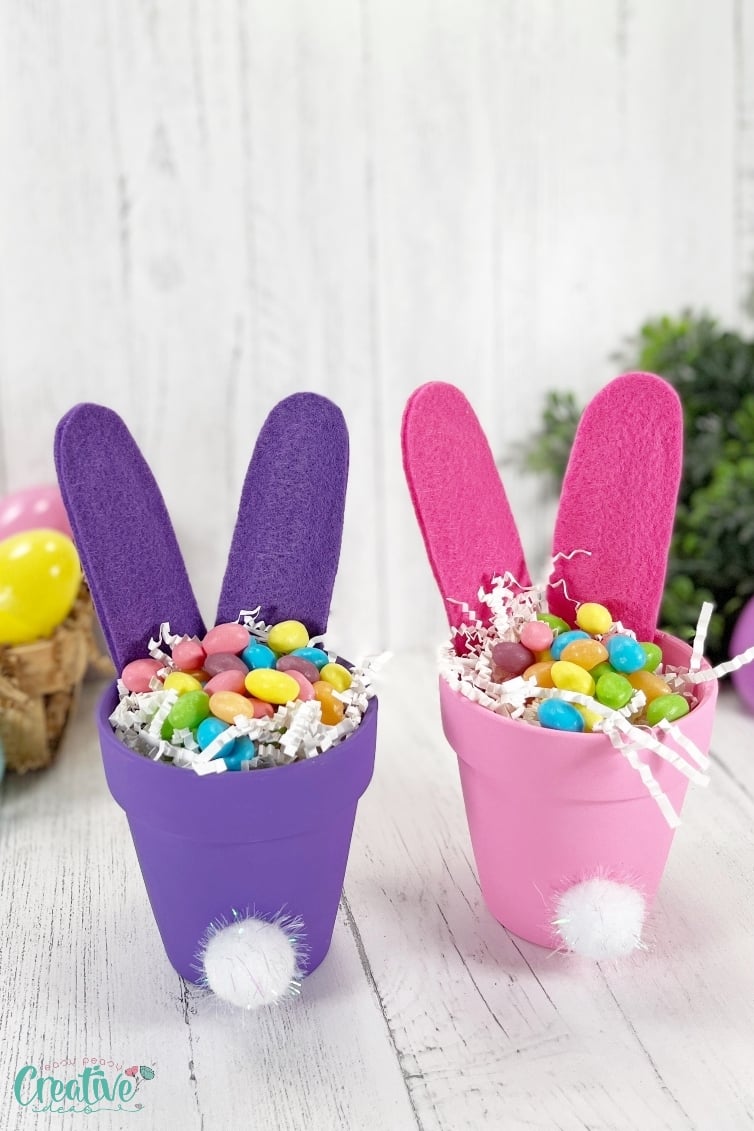
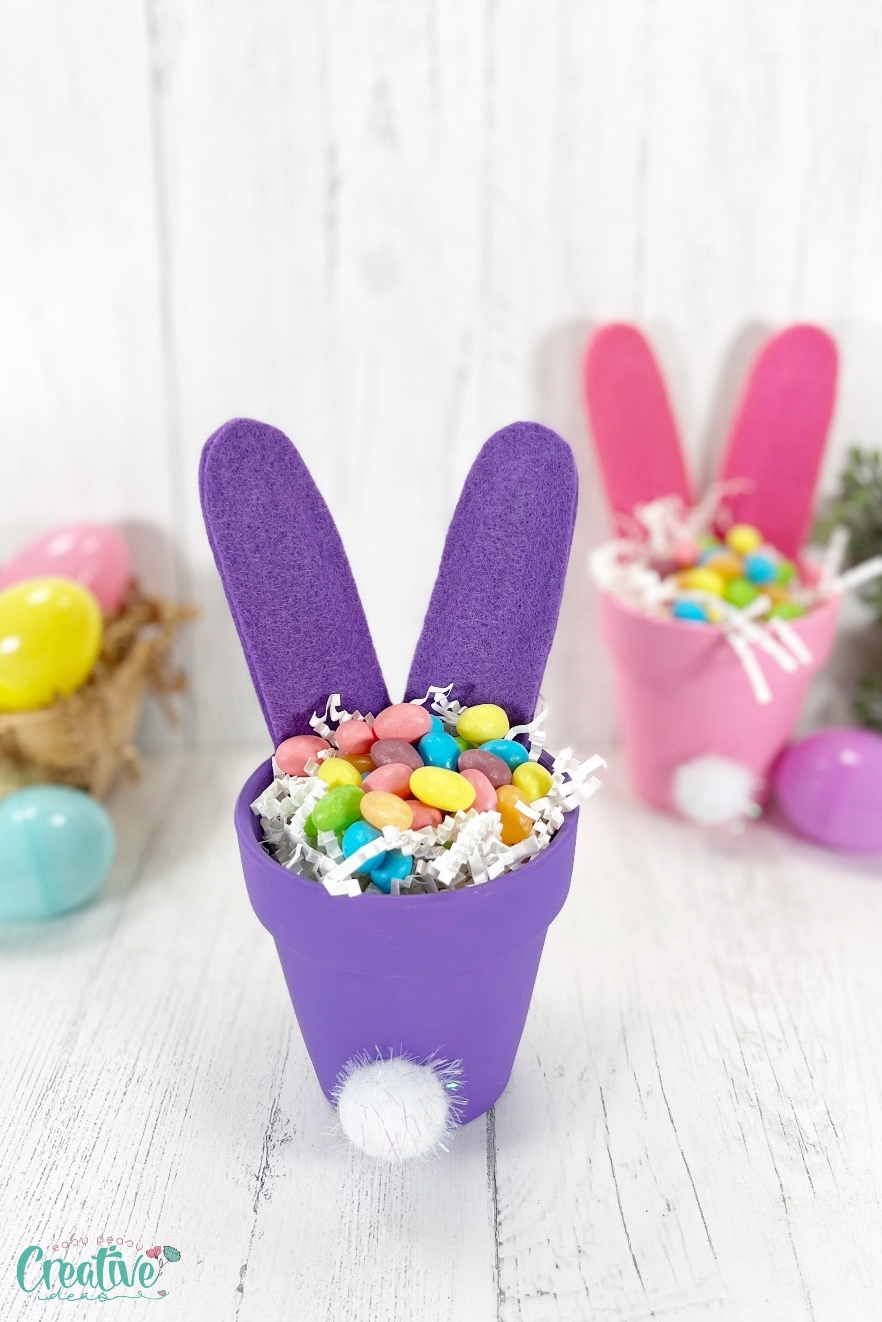
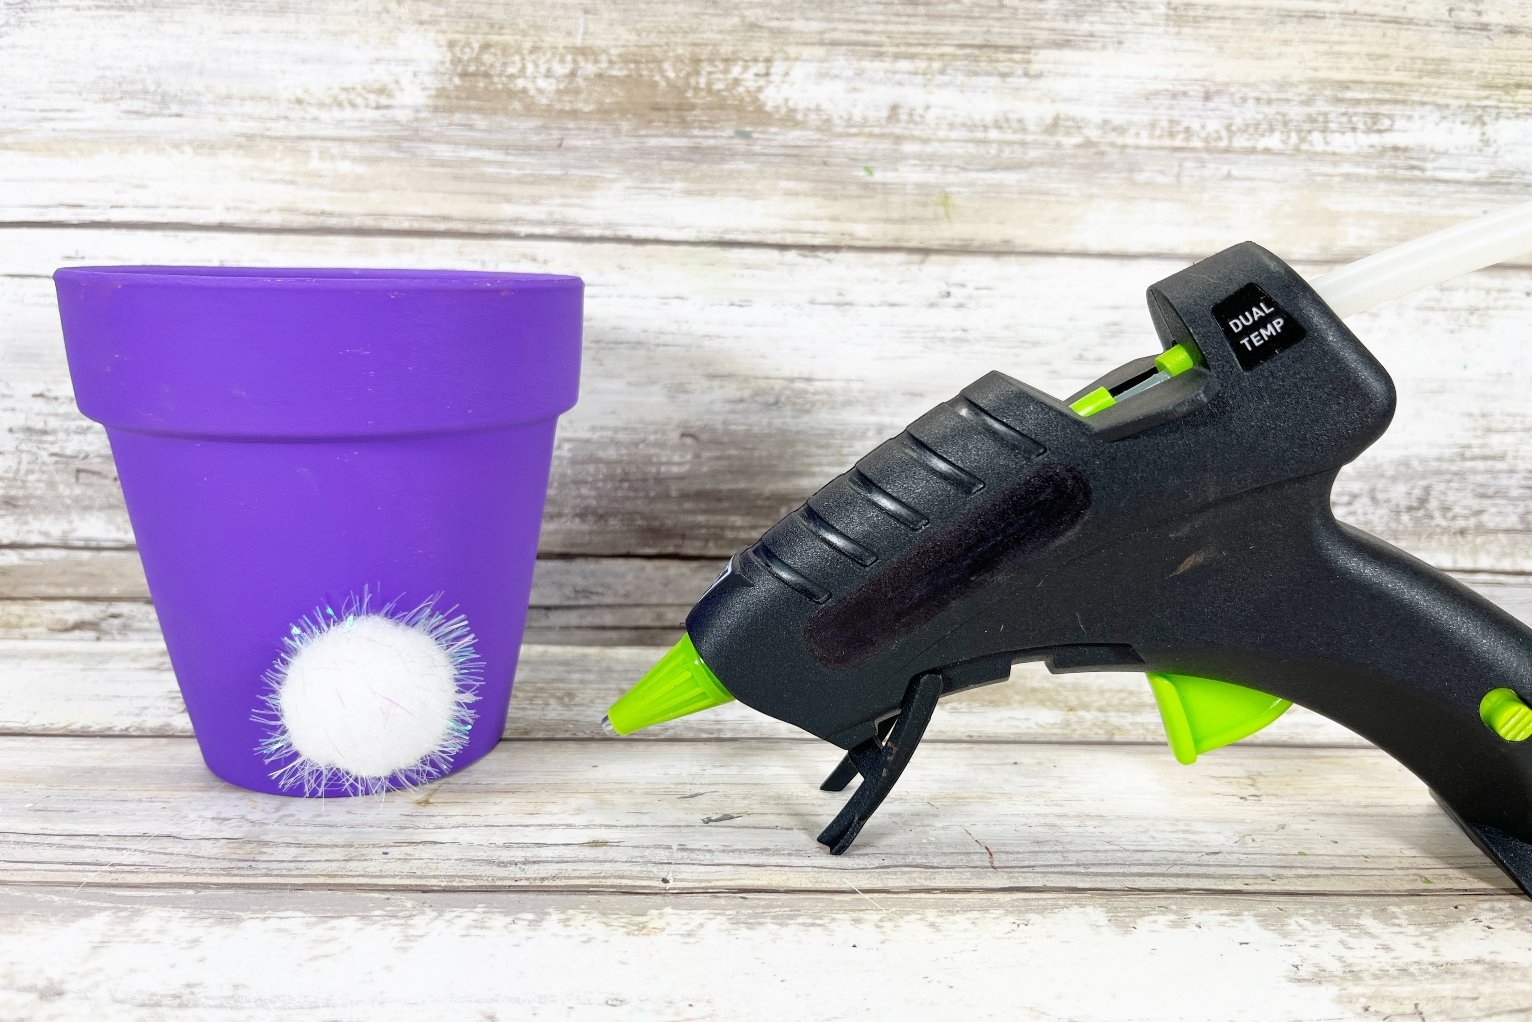
Now, the fun part begins. To create the bunny butts, start by selecting a contrasting color for your fluffy tails. White is a classic choice, but feel free to get creative with pastel shades or even a pop of color.
Glue the white tinsel pom pom to the center of the bottom of the clay pot to become the bunny tail.
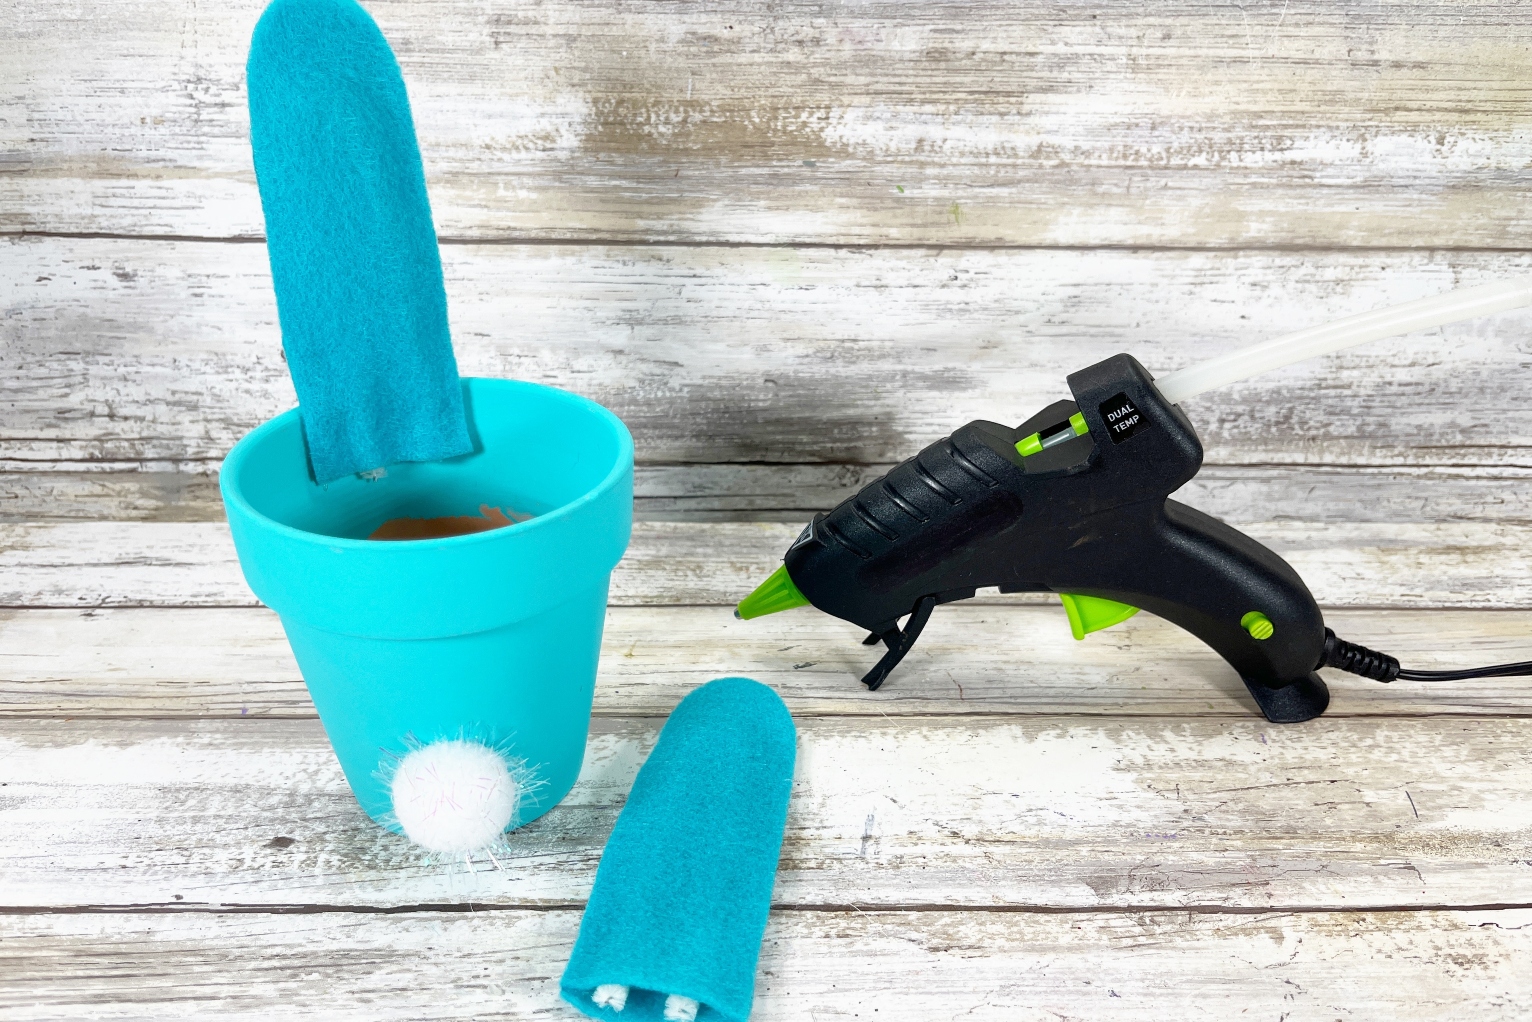
Once you’ve added the bunny butts to all of your clay pots, attach the completed bunny ears to the top inside edge of the clay pot with a glue gun and glue sticks.
To finish the clay pot bunny treat cups, fill with paper shred and a tasty treat such as candy, small cookies or any other small Easter treat your little ones enjoy.
Adding Charming Details
Now that you’ve brought your bunny butts to life, it’s time to add those charming details that will truly make them special. Adding charming details is where you can really let your creativity shine. Think about the little touches that will elevate your clay pots from cute to irresistible.
One idea is to paint on delicate flower patterns or dainty polka dots around the rim of the pot. This will add a touch of springtime elegance and make your bunnies even more enchanting.
Another charming detail that you could incorporate is the use of ribbon or twine. Wrap a thin ribbon or twine around the pot and tie it into a bow. This not only adds a delightful finishing touch but also gives your bunny butt clay pot a more polished look. You can choose ribbons in pastel colors to keep with the Easter theme or go for bold, vibrant hues for a more playful vibe.
Additionally you can add cute bunny feet cut out from cardboard.
These tiny embellishments will add an extra layer of cuteness and make your clay pots truly unique. With the addition of these charming details, your bunny butt clay pots will be ready to steal the show this Easter.

Can you make this Easter craft with the kids?
Absolutely! In fact, involving your children in this creative project can be a fun and memorable way to spend quality time together. Plus, it’s a fantastic opportunity to nurture their imagination and develop their fine motor skills.
So gather the whole family around the craft table, provide them with their own clay pots and a variety of accessories, and let their creativity run wild. Encourage them to come up with their own unique bunny butt designs and experiment with different colors and textures.
By making this Easter craft with your kids, not only will you create adorable bunny butt clay pots, but you will also create cherished memories that will last a lifetime. And who knows, maybe one day these pots will become a treasured part of your family’s Easter traditions
Not only will your little ones feel a sense of pride in their creation, but they’ll also learn valuable skills like hand-eye coordination, fine motor skills, and patience. It’s a win-win situation where they get to have a blast crafting adorable Easter decorations while developing their cognitive abilities.
Furthermore, involving kids in the creative process fosters their self-expression and boosts their confidence. They can personalize their bunny butt clay pots with their own unique touches, whether it’s adding colorful designs, using different textures, or even giving their bunnies quirky accessories. Encouraging their individuality will make the final results even more special and meaningful.
Want more Easter décor ideas?
- Super simple sock bunny
- Printable Easter bunny basket
- Sheep craft with craft sticks
- Foam dice chicks
- Easter bunny cups
Crafting Easter bunny butts from clay pots is a delightful way to add whimsy to the holiday season. So, gather your materials and get ready to impress with your adorable bunny butt clay pot creations.

Easter bunny butts craft
Materials
- Clay Pots 2.5” in diameter
- Acrylic Craft Paint Blue, Pink, Purple
- Craft Felt Blue, Pink, Purple
- White Chenille Stems
- White tinsel Pom Poms
- Paper Shred
- Candy
Tools
- Glue Gun and Glue Sticks
- scissors
- Marker - Black
Instructions
- Gather all materials and then remove the packaging and labels. Basecoat the inside and the outside of the 2.5” clay pots with blue, pink, and purple acrylic craft paint. Let the paint dry and then apply a second coat, if necessary.

- Print the CLAY POT BUNNY PATTERN on paper. Cut out the ear pattern with scissors. Trace the ear pattern onto blue, pink, and purple craft felt four time each.
- Cut out all ear patterns with scissors. Make sure to cut inside the raced lines, so you end up with a clean, finished project.
- To create the bunny ears, bend a white chenille stem into a “U” shape and attach to the craft felt ear with a glue gun and glue sticks. Trim the ends of the chenille stem with scissors. Repeat for the second ear.
- TIP: Craft foam or cardstock would also work for this project, use what you have on hand.
- Attach the top of the ear to the base of the ear by gluing around the edge with a glue gun and glue sticks. Repeat for the second ear. Trim any edges of craft felt that don’t match up.
- TIP: You can use liquid craft glue for this project, but you would have to wait for it to dry.
- Glue the white tinsel pom pom to the center of the bottom of the clay pot to become the bunny tail.
- Attach the completed bunny ears to the top inside edge of the clay pot with a glue gun and glue sticks.
- To finish the clay pot bunny treat cups, fill with paper shred and candy.

Article may contain Amazon & affiliate links. As an Amazon Associate I earn from qualifying purchases at no additional cost to you.

Love your ideas and especially the free instructions! THANK YOU! 😊
Thanks for your lovely comment, Linda! 🥰
I love the clear instructions step by step from the beginning to the end. Thank you.
Marva A. Holmes