

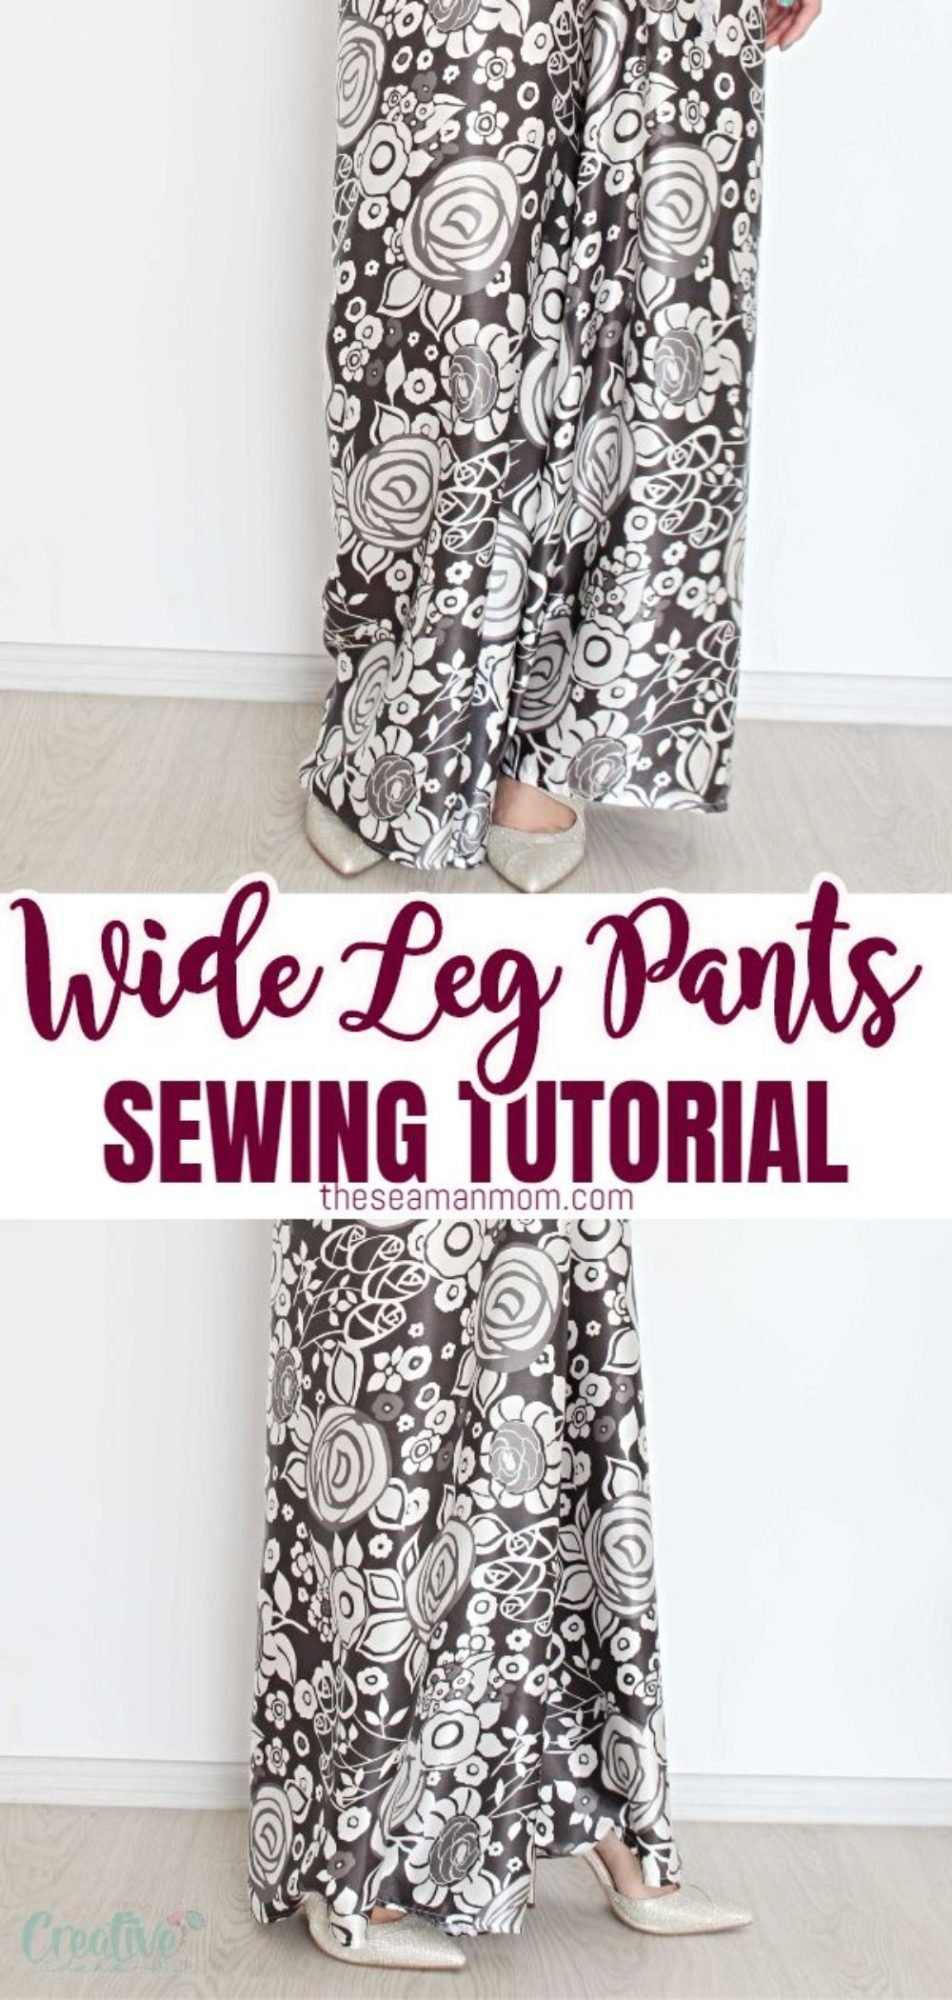
How to sew flowy wide leg pants
Don’t have the sewing skills to make your own pants? No worries! This wide leg pants pattern is beginner-friendly, requiring minimal experience. With easy drafting, cutting, and sewing steps, these DIY wide leg pants are perfect for those new to sewing.
Wide leg pants pattern

Need a new addition to your wardrobe? Look no further as I’ve got the perfect idea for you! This wide leg pants pattern is perfect for beginners and experienced sewists alike. The relaxed fit and flare style of these pants make them versatile for any occasion, whether it’s a casual day out or a fancy event.
Wide leg pants are a great way to add some extra style and comfort into your wardrobe! But, they can be difficult to make if you don’t know what you’re doing. Don’t know how to make wide leg pants? Luckily for you, I’ve put together this tutorial with easy step-by-step instructions so that anyone can create their own wide leg pants pattern and sew a fabulous pair!
The best part is that these are super versatile – wear them with heels or flats, dress them up or down for any occasion. And they look great on everyone! No more wasting money on expensive pairs at the store when you can just make your own instead!
I am a pretty experienced sewist but making pants has never been my priority. However, after trying out this wide leg pants pattern I can confidently say that it is perfect for beginners too! The instructions are clear and easy to follow, making the process stress-free and enjoyable. Plus, the end result is a stylish pair of pants that you can proudly say you made yourself.
Need more sewing for women ideas?
- DIY bubble skirt tutorial
- Gathered waist dress pattern
- 30 minutes skirt
- Half circle skirt with lining and zipper
- V neck dress pattern
- DIY tulle skirt
I started working on this wide leg pants pattern having absolutely no idea where the journey will get me! Seriously! To be honest I’m not sure what got me to work on these DIY pants. I don’t feel like I’m meant to sew pants following a complicated pattern (and they all look like rocket science to me!) But the beauty of this wide leg pants pattern is that you can customize it to your own measurements and preferences, making it less intimidating for beginners.
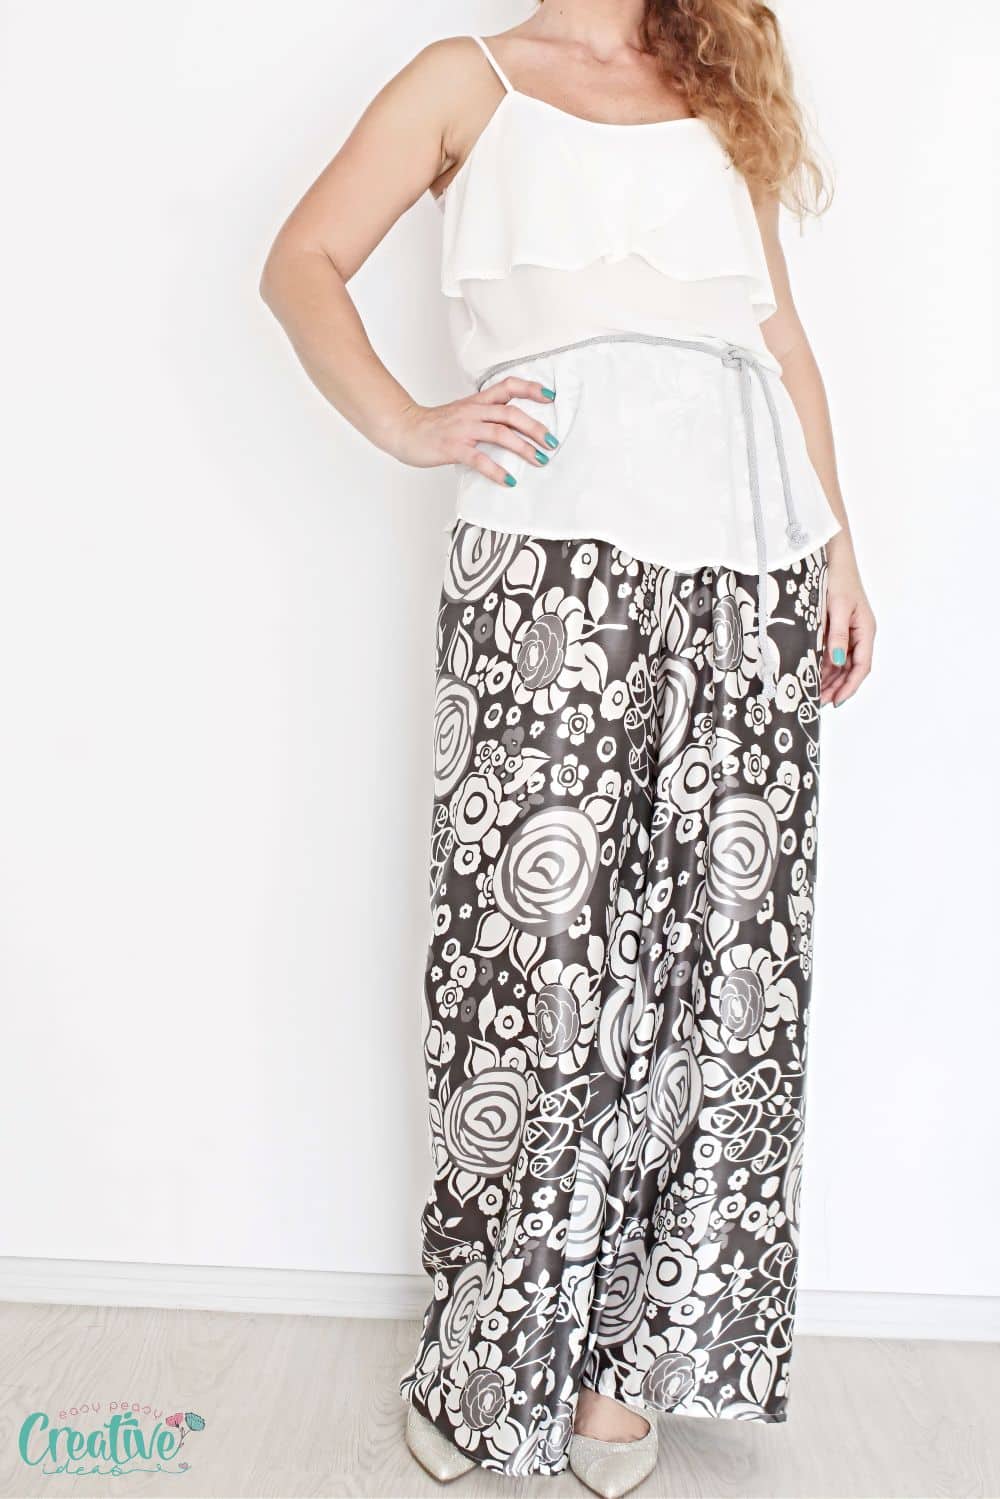
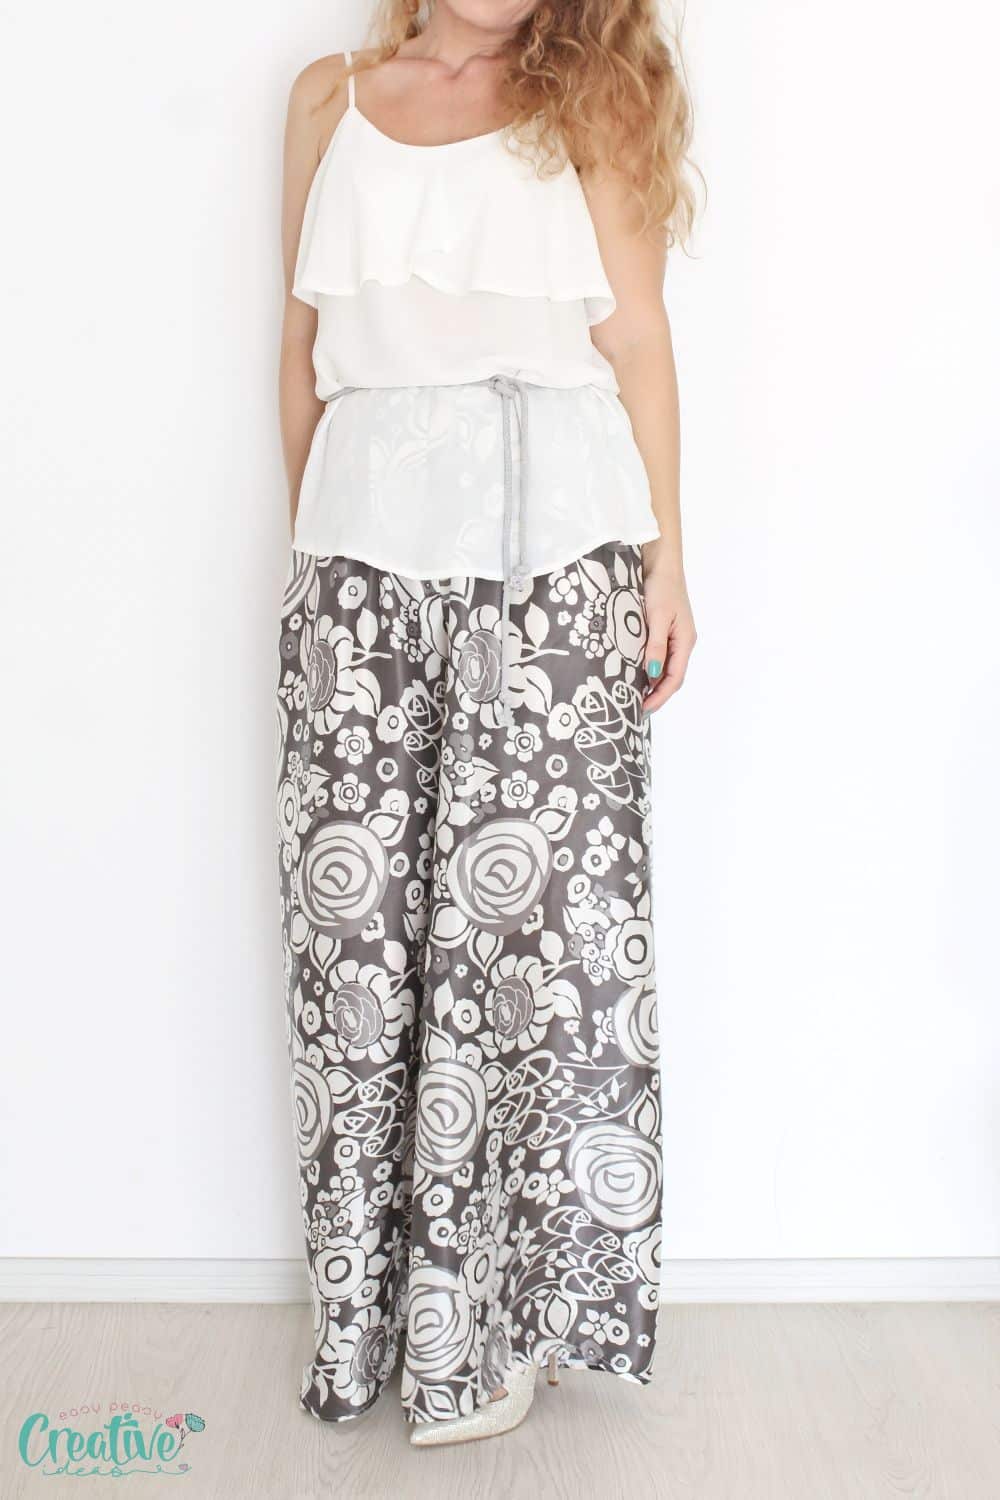
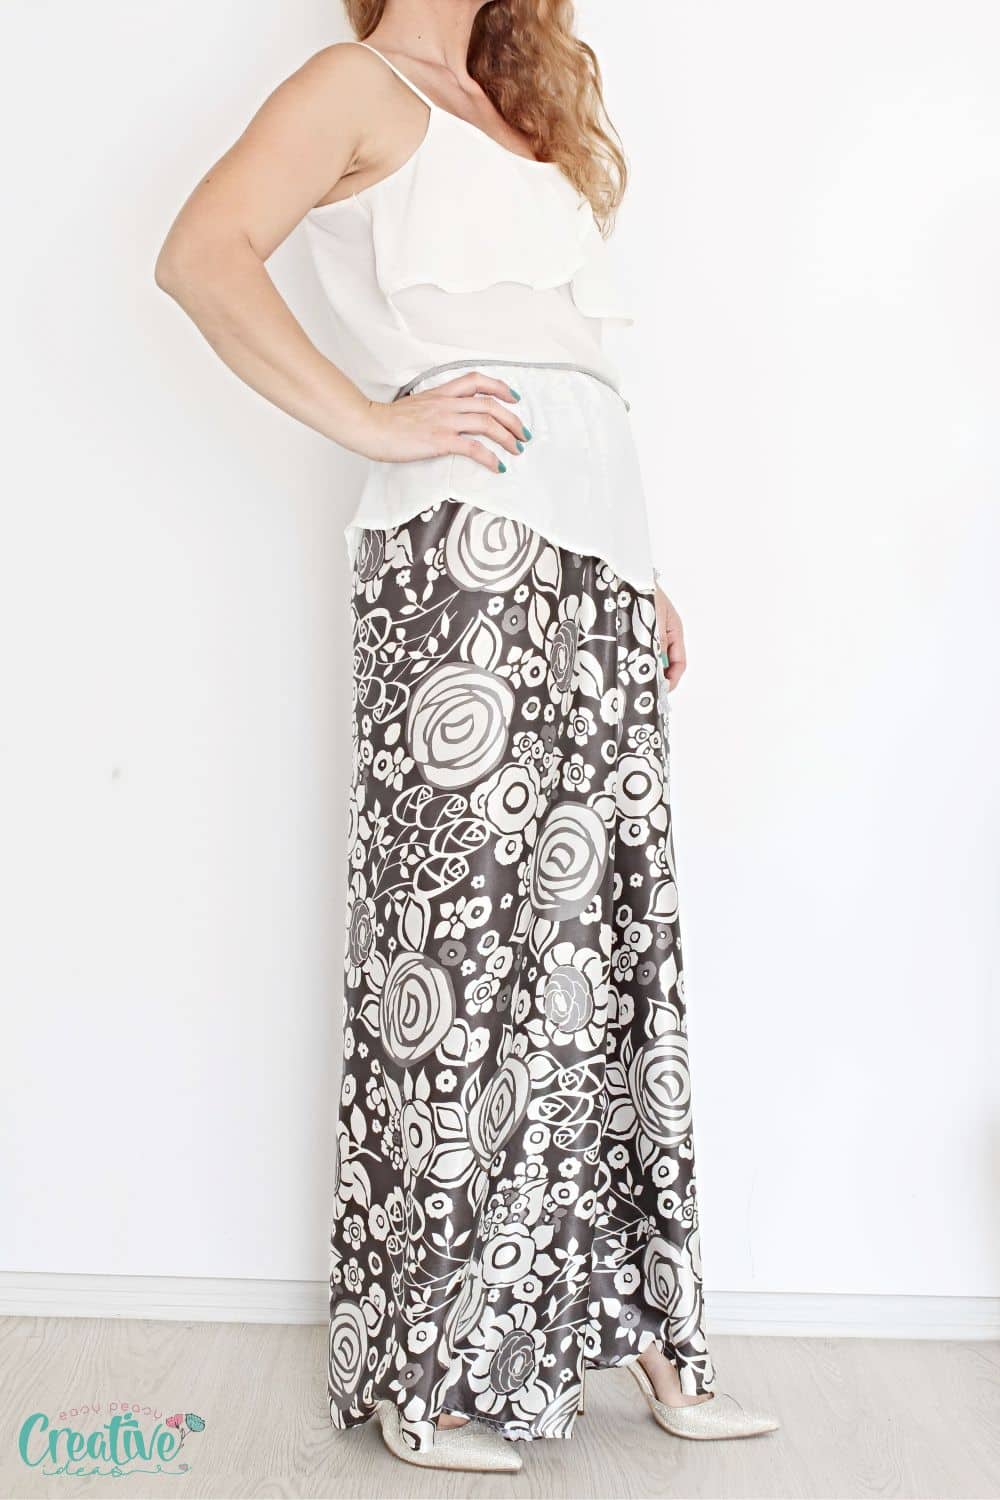
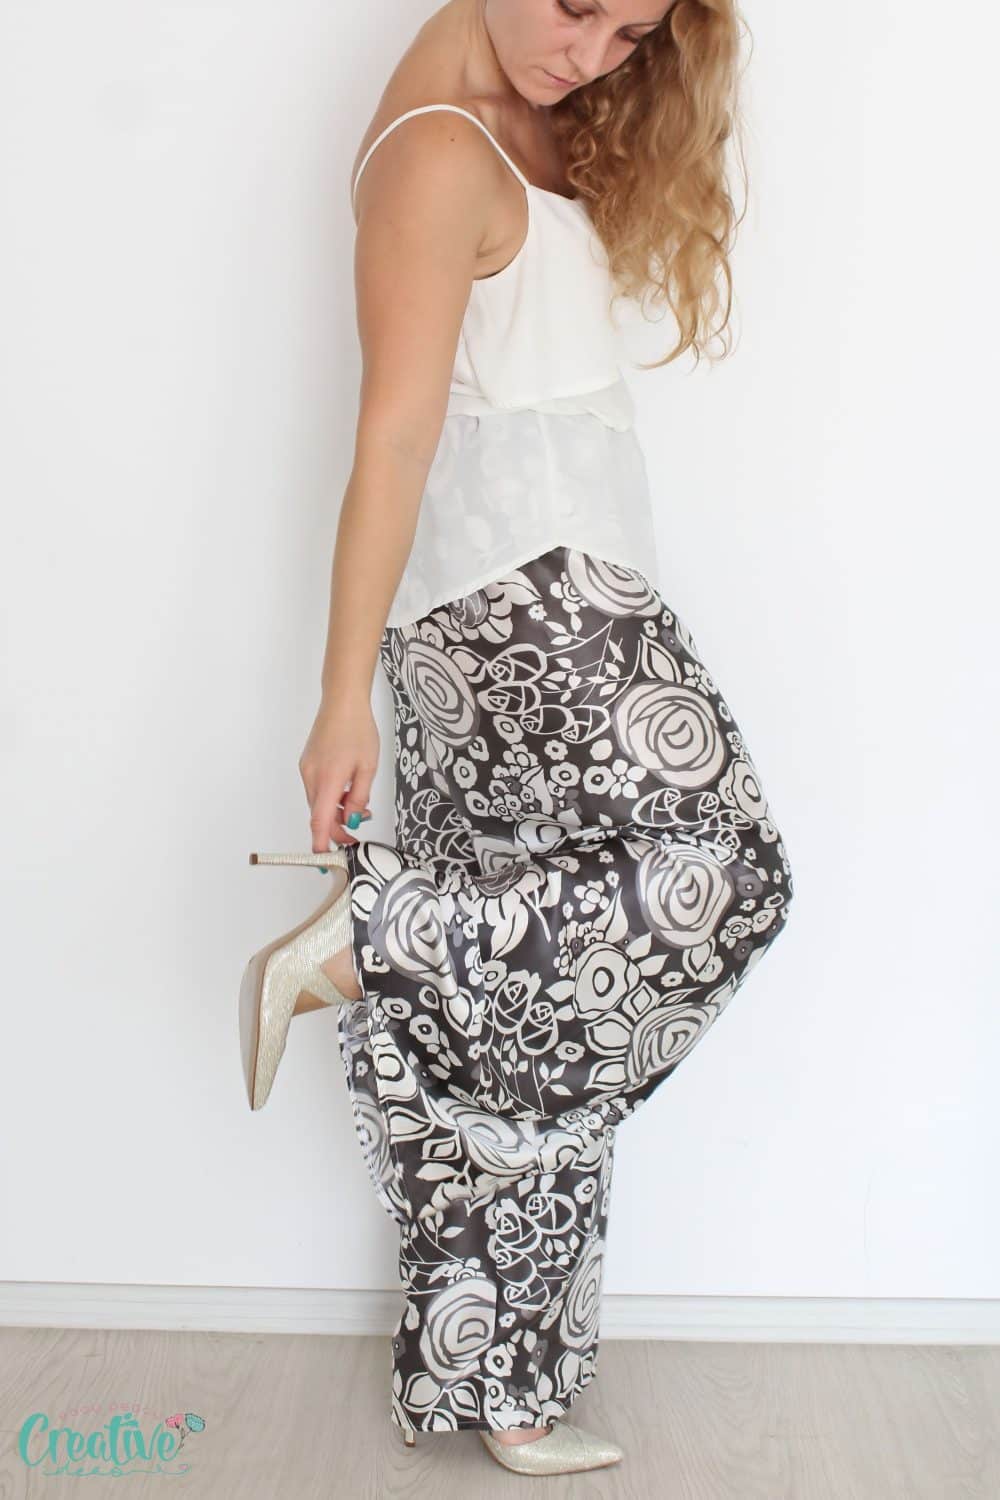
The only thing I know is that I’m in front of my big pile of fabric wondering when am I ever going to go through this pile, when this lovely satin fabric (I cannot swear it’s satin but totally looks and feels like it) in gray with floral pattern caught my attention. And I thought a pair of ladies wide leg pants with a loose fit and a nice flare would look so good in this light as a feather, flowy fabric!
What are the fabric requirements for these wide leg palazzo pants?
Choose a flowy and lightweight fabric that drapes well, such as rayon, cotton lawn, cotton lycra, linen, or silk. If you sew them for the colder season, you might be able to get away with some medium weight fabrics such as wool or add lining to your pants. Avoid stiffer fabrics like denim or corduroy as they will not give the desired relaxed look of the wide leg pants.
If you want to make a tight fit to the waist area you can add some pleats or darts and insert a closure such as a zipper in one of the side seams or in the back of the pants. The pleats/darts will add more body to the pants from the hips down and will make the fabric more flowy. But that would complicate the project which is not the purpose of this tutorial.
How to sew wide leg trousers?
I didn’t have a wide leg pants pattern and I basically had no clue of how to make one! But after squeezing my brain for a couple of minutes I realized these are actually super easy pants to figure out!
To make my elastic waist wide leg pants pattern I decided to use a pair of wide leg pants I already had. But I wanted my new wide leg pants a lot larger so I made a super big pattern that is wider and longer than my original pants. So this easy peasy wide leg trousers tutorial doesn’t offer a pattern but teaches you how to make a DIY trousers pattern yourself. Which I think it’s best because your pattern will fit YOU perfectly!
If you don’t have a pair of wide legs pants, just use a straight one and make it larger, just like I did with this one. Not sure about the width? Leave some extra allowance and you can always make them larger if you don’t like the initial look.
Reasons to make yourself a pair of wide leg pants:
- These wide legs pants go great at the office if made of a more formal fabric, or at the beach when made of a light, flowy fabric. In fact, this pattern is great for every occasion and you only need to choose the right fabric to give them the desired look.
- This pattern also helps elongate your legs, so if you are shorter, this is perfect for you.
- How about leaving about half of the side seam open? You will have a bit of your calf showing for an extra-sexy look. You could even wear them for salsa or other latin-themed parties with a crop top and pair of elegant high heels.
- This project doesn’t require much sewing skills and it doesn’t have to be super precise because the pants are so big and drape so nicely that a little mistake won’t even get noticed. Bonus – it’s not time-consuming at all!
- These pants are so comfortable to wear and so light and look great on many body shapes, hiding some of those mid area flaws and making your legs look a mile long!
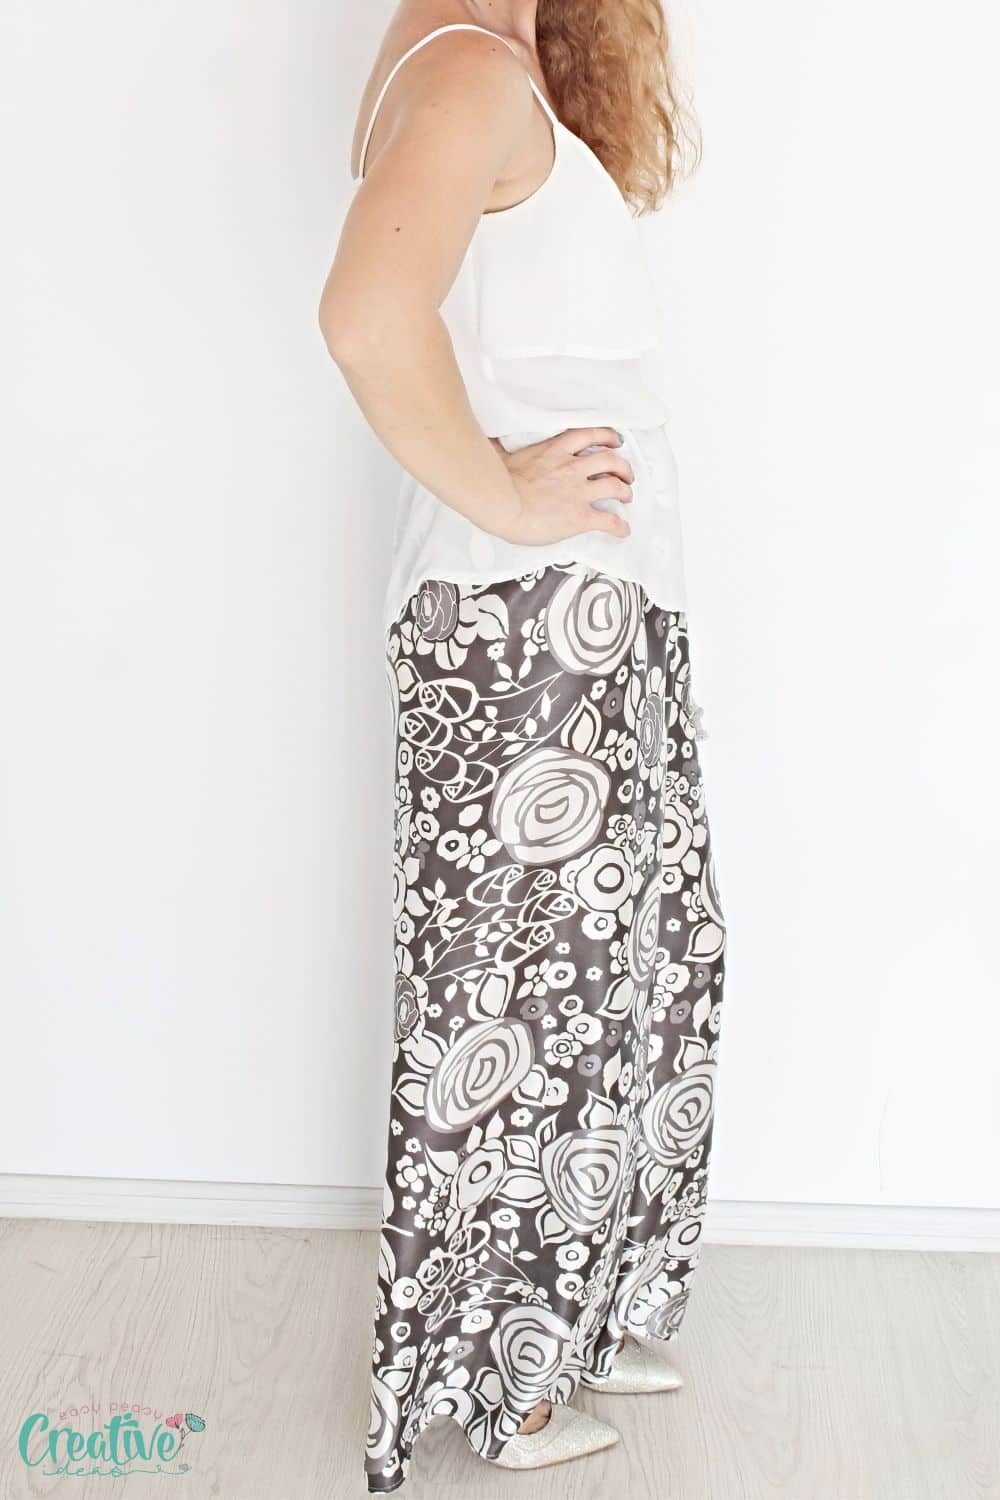
The reason I made this wide leg pants pattern so big is because I plan to wear these beauties at special events, holidays or/and New Year. So I wanted something with a dramatic look that will be a great pair to my high heels and my camisoles.
Mine are high-waist, but you can also make them low-waist if that makes you feel more comfortable. This way, they will be great as casual or beach attire, but I’m not sure about the office look. Either way, just make sure you don’t make them too low!
How to add variety to your wide leg trousers
- To make them look extra dramatic, you can go the extra mile and add a few gussets so that they look like a wide skirt. This requires some advanced sewing skills, though, so be careful if you’re a beginner.
- You can also achieve that salwar look by gathering the legs at the bottom with elastic or a cord passed through the hem. The advantage of a cord is that you can wear them either wide or gathered, so you can have two different looks.
- As this pattern is so versatile, you don’t need to make them long like mine. Mid-calf length or knee length for the wide leg culottes style also look nice, and it saves up some fabric! Also, just above the ankle is still trendy, but only goes well on taller people. You can use this pattern to make shorts as well, as you already have the template. (And maybe clean up the stash a bit?)
- If your geometry is good, try flaring the pattern to achieve a retro look. Remember those 70’s wide pants? They seem to be coming back in style, so why not give them a try?
- Depending on the style of your pants, you can either use elastic like I did, a waist tie, zippers, a button closure, a cord, a belt or a fancy sash to secure the pants at the waist. Add a wide waistband if your waist is a bit fuller and you fear you may get a muffin top.
Ready to make your own wide leg trouser pattern? If you’re a fan of the palazzo pants trend, this is the perfect project to make today!
Wide leg pants sewing pattern
Materials:
- about 2 yards of fabric that is flowy and has a nice drape (like silk, chiffon, Georgette, rayon etc)
- pair of old wide leg pants
- scissors
- fabric marker
- pins
- elastic that fits your waist
- matching thread
- sewing machine
- serger – optional
- pressing iron
How to make wide leg pants:
Note on the waistband: if you feel the way I constructed the waistband on this pants will make your waist look too bulky for you, use a wide elastic instead to make an elastic waistband. I love elastic waists, they’re so comfortable! Measure your waist and cut the elastic just about 1/2″ shorter than your waistline. Join the ends of the elastic with a zig zag stitch and when the pants are ready, attach the elastic to the top of the pants. Adjust the depth of the waist accordingly.
Or simply add some darts to the waistline, if you’re more experienced or an advanced beginner. Or you can add some decorative front or back pockets.
Note on the pockets: if you want to add pockets, make a seam on both sides of the trousers, after you’ve made and cut the pattern.
Drafting your pattern directly onto fabric
- For safety you can make the pattern pieces on a large piece of paper first and if all looks good then transfer to your fabric and cut. I felt like this is an easy project that I won’t mess up. So I trusted my guts and I worked directly onto fabric.
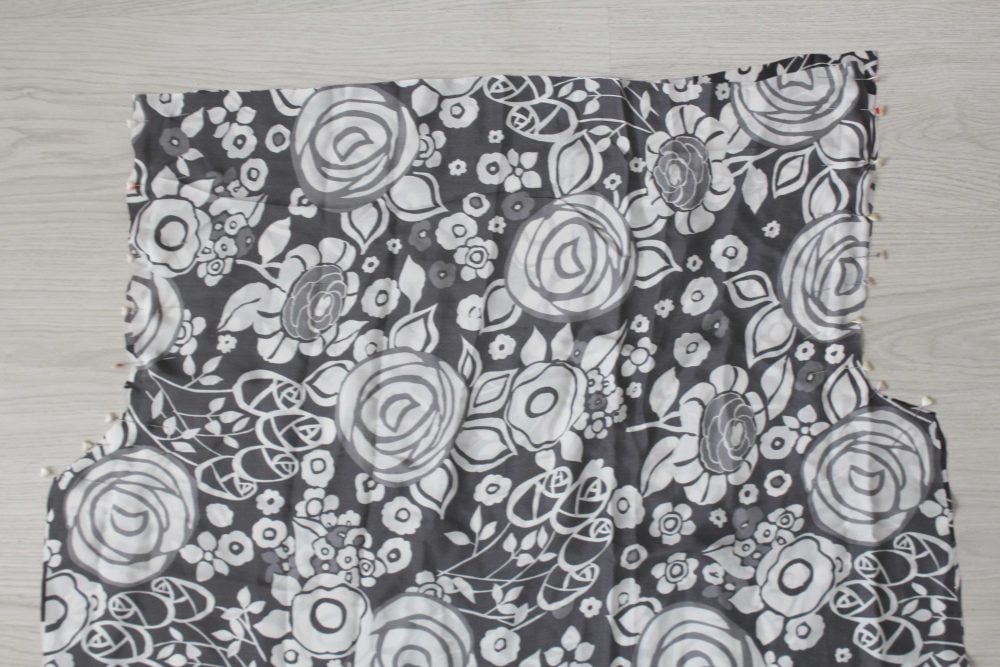
- Cut your fabric into two pieces lengthwise and place right sides together. Place a few pins to keep them in place if the fabric is very slippery.
- Fold both pieces in half.
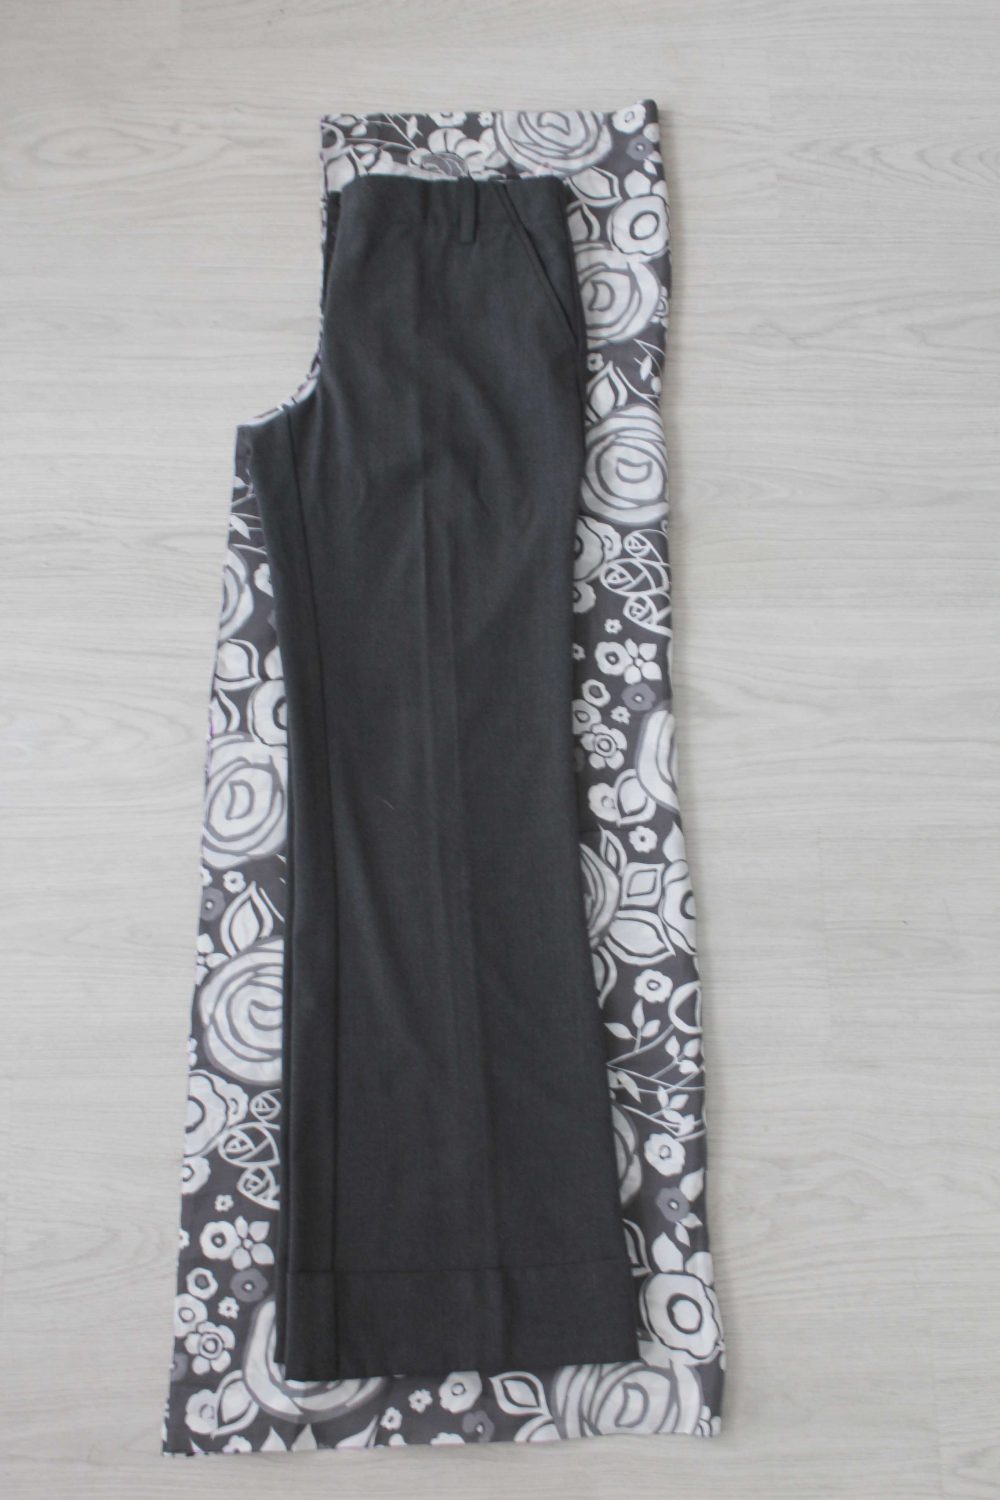
- Place the old pants on the fabric, the long side of the pants aligned with the fold in fabric (in my case, the fold is on the right hand side; because I wanted to make the new pair a lot larger than the old ones, I placed my pants away from the fold)
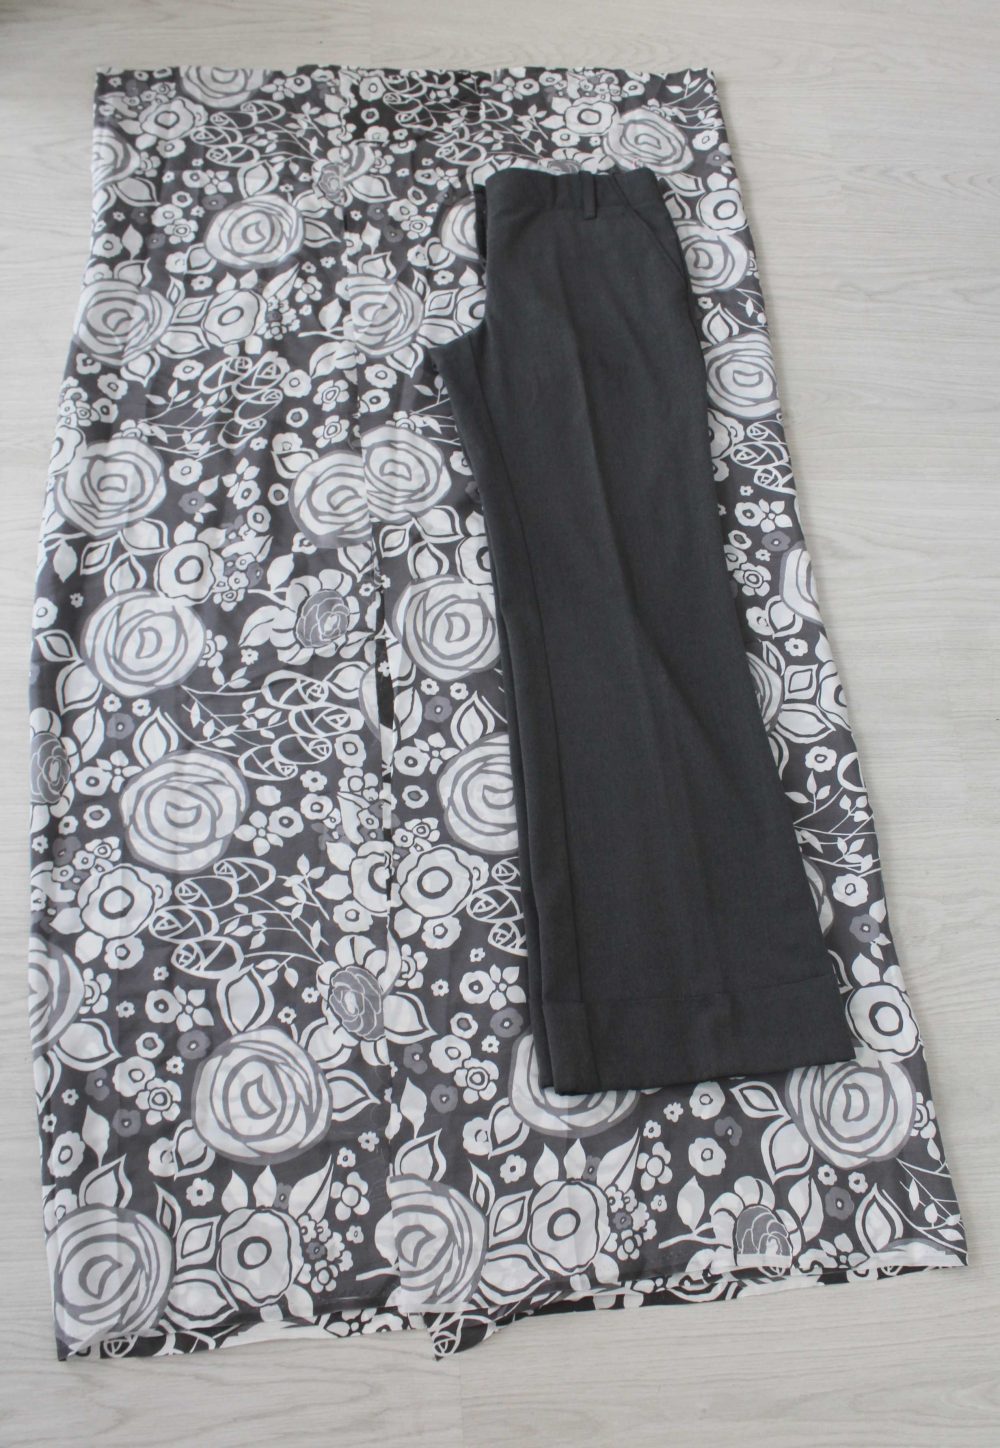
- Mark around the bottom and sides using a fabric marker. Remove the pants, place a few pins inside the marked pattern if the fabric is slippery and cut the pattern out.
Sewing the leg pieces together
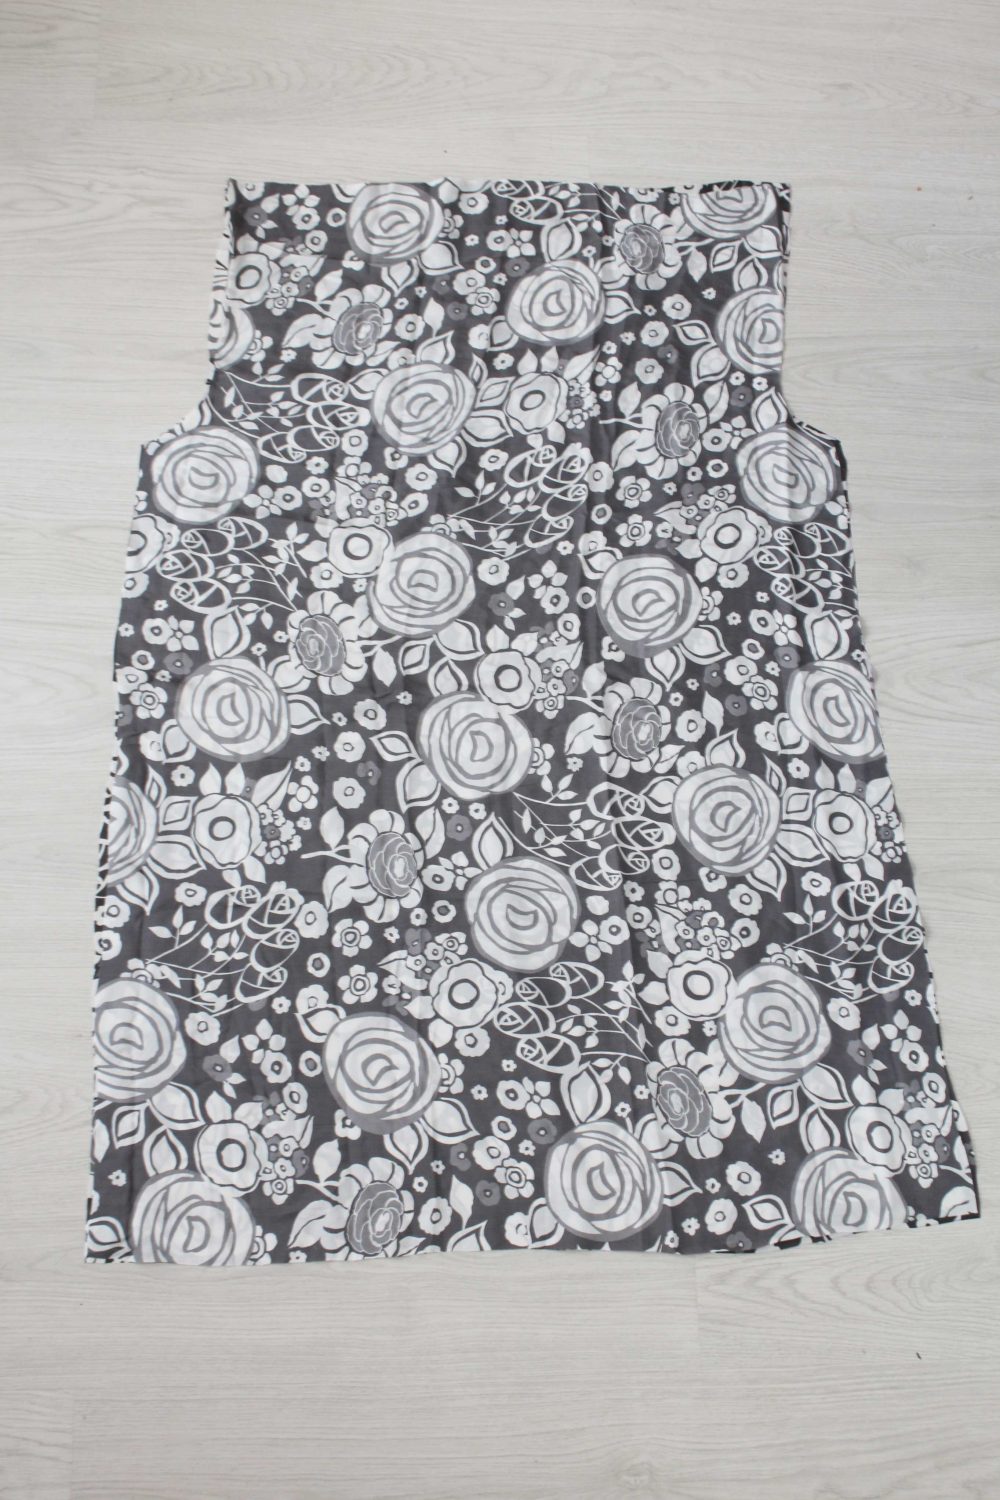
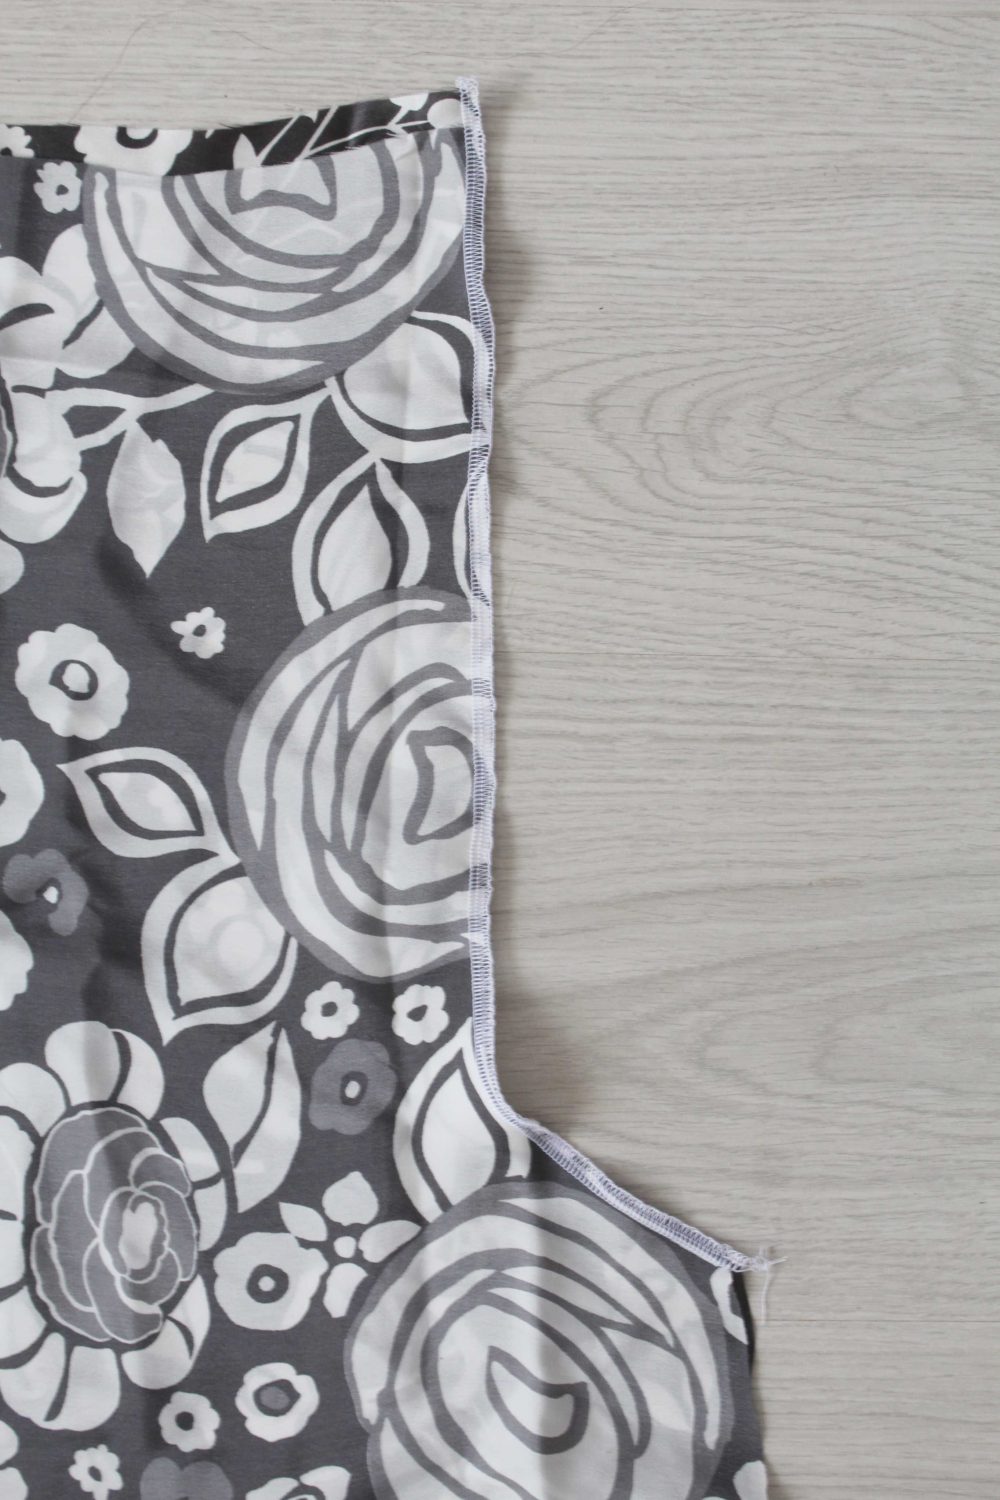
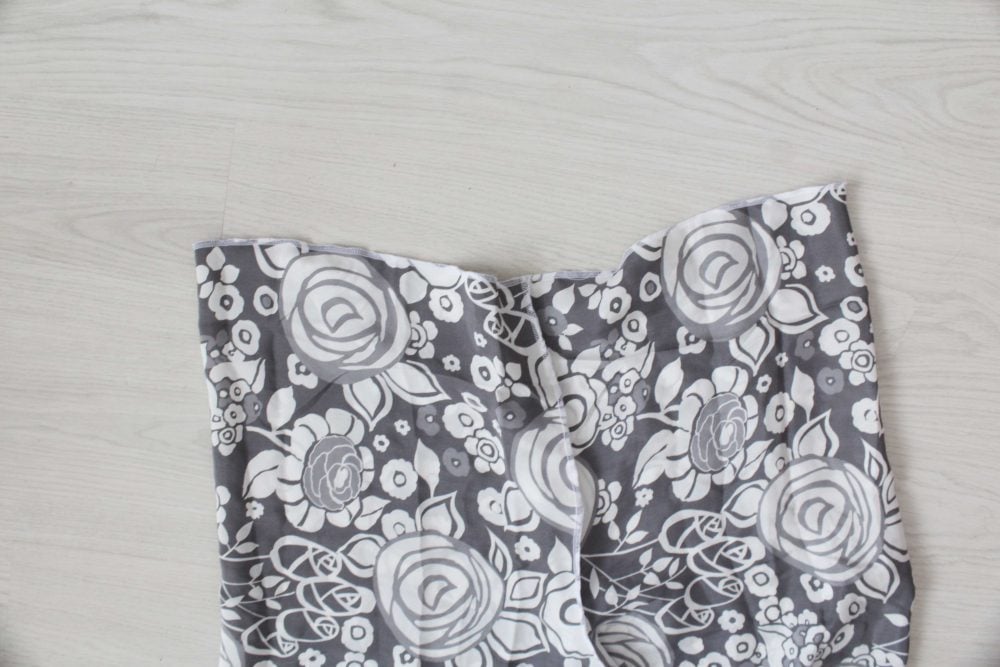
- Open the fabric at the fold (in my case to the right side) and your trousers now look like this. The crotches are to the right and left (the curved edges)
- Match the crotches. Pin together and sew down. I used my serger so I won’t have to finish the seam allowance later but if you don’t own one, sew a normal stitch then finish the seams with a zig zag stitch.
- Pinch the fabric in the middle at the top and bring the crotches to the middle so your pants will take the normal shape as illustrated below.
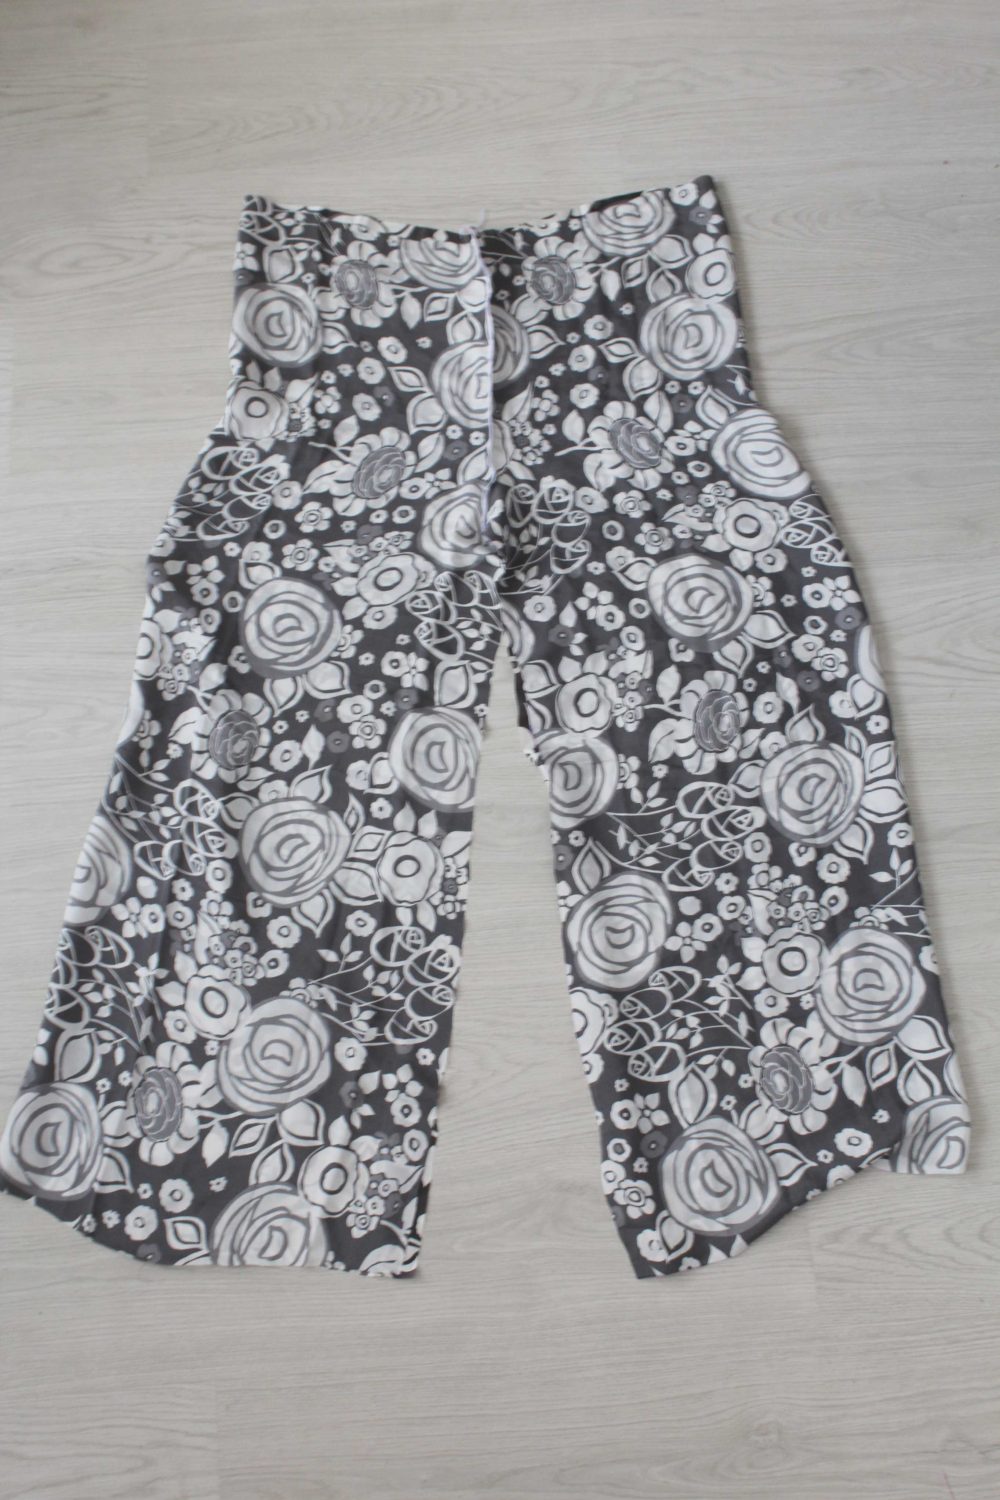
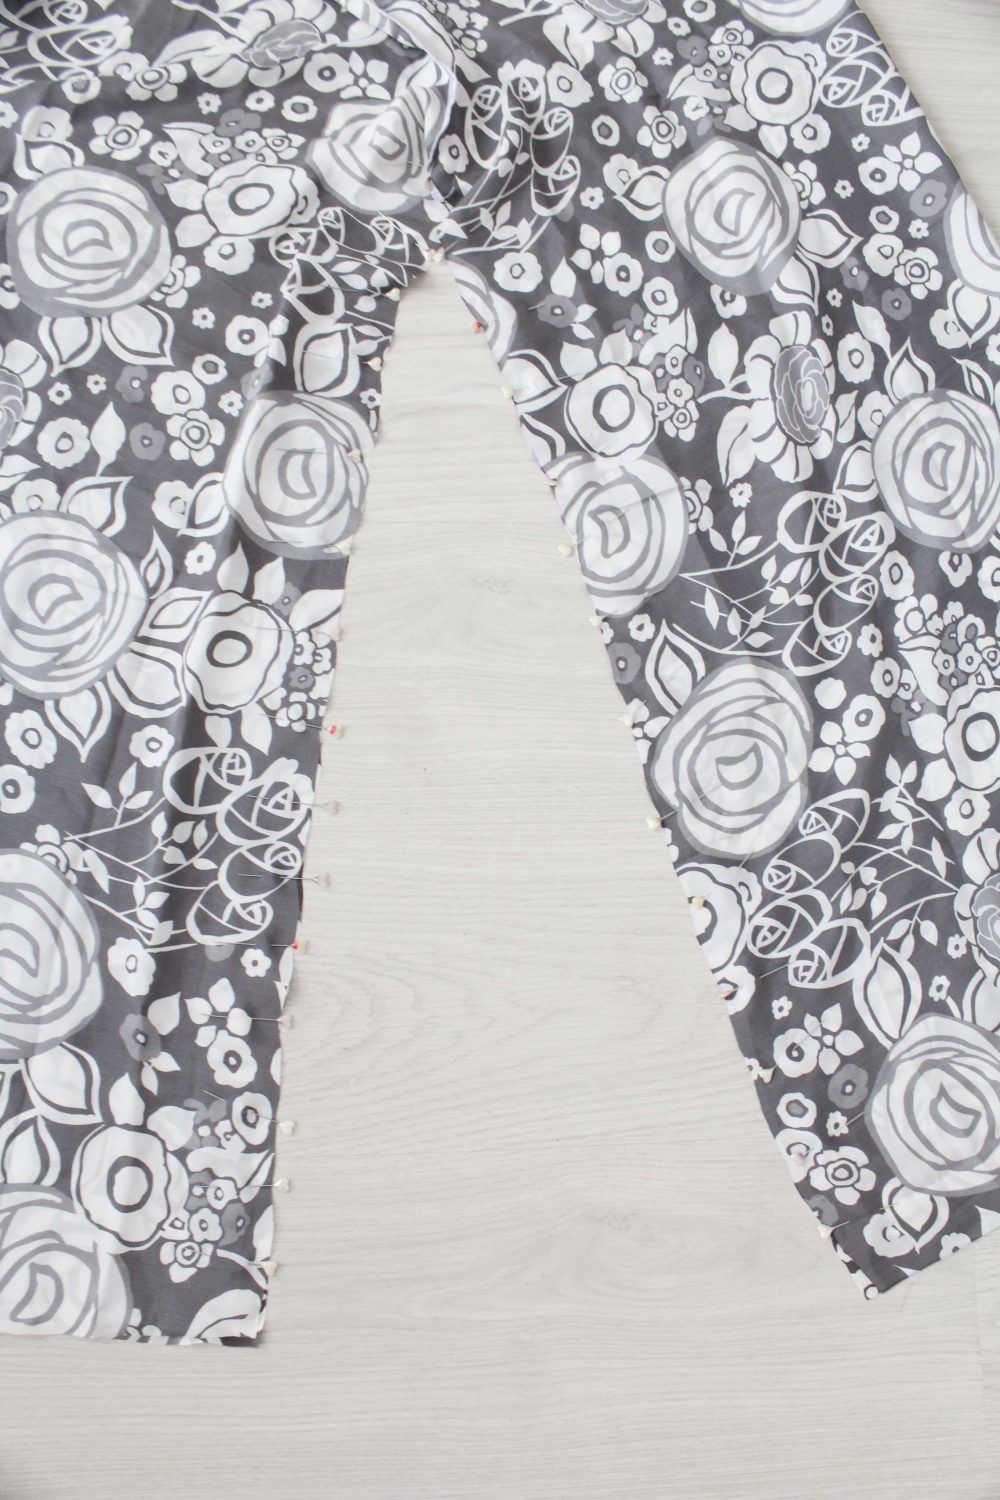
- Match the front and back crotch and pin.

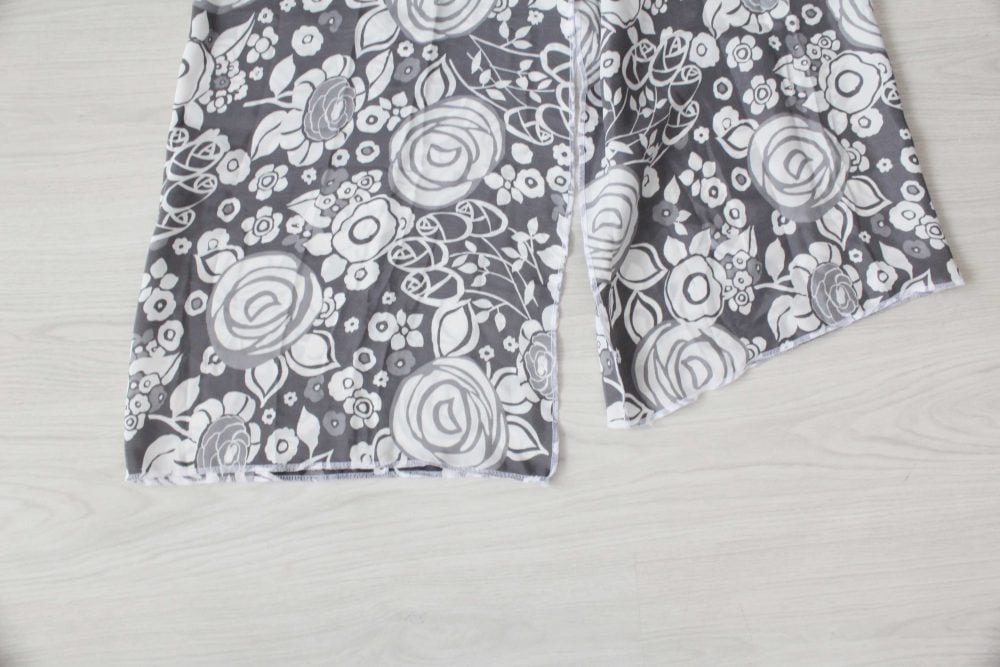
- Pin the legs at the inside seams and sew down. I used my serger.
Finishing the pants
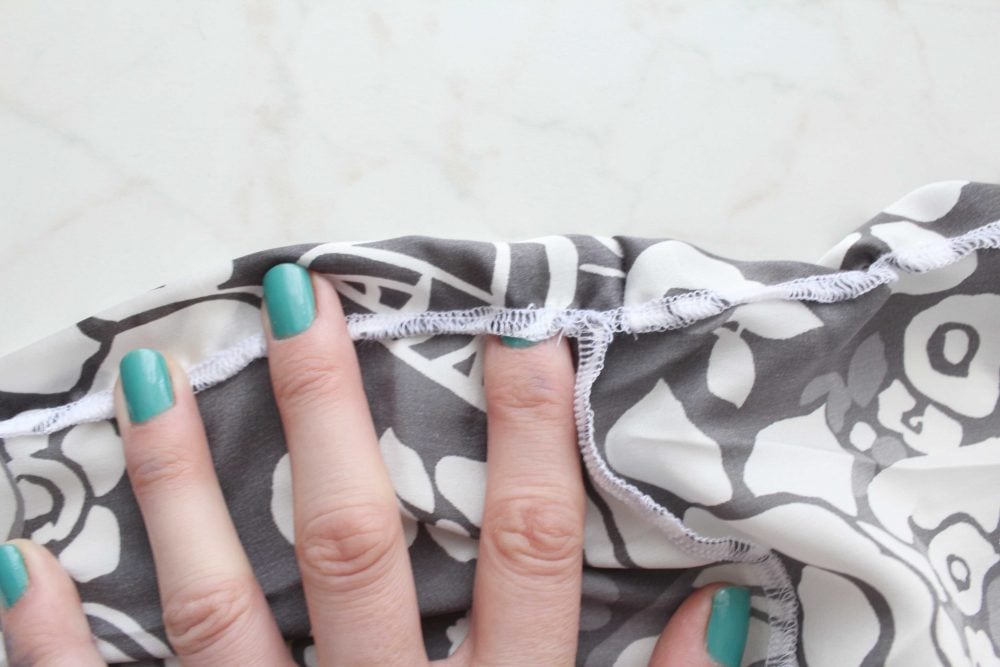
- Serge the top of the pants and the hems on legs. If you don’t have a serger fold the fabric inside twice.
- To finish the waist, make a casing for the elastic. Simply fold the serged top towards the inside of the pants. Then sew with a regular stitch, leaving a small opening to thread the elastic through.
- After inserting the elastic, sew the ends of the elastic together and close the opening in your casing with a regular stitch.
- To finish the hems, fold the hems inside and sew with a regular stitch.
- Give your pants a nice press and you’re ready to wear them! Enjoy!
I love to use my old clothes to make patterns and I suggest you do the same. This way, your wide leg pants pattern will fit perfectly! How awesome is that?
If you liked this tutorial I’d love to know your thoughts in the comments below.
Pin to save for later
Most popular sewing projects:
- Tips for sewing a round hem
- Corded bag handles
- Flutter sleeve dress pattern
- How to laminate cotton fabric


Article may contain Amazon & affiliate links. As an Amazon Associate I earn from qualifying purchases at no additional cost to you.

Thank you. I will use this soon. 😊
Would this pattern work for the male wide leg pants that’s in style now? If not what would you suggest? I can’t seem to find the pattern I need for male.
I am a plus size 77 year old and I still try to dress with taste. Your site gave me the desire to create a smooth looking pair of pants. Thank you so much. kate
Thanks for your kind comment, Kate! I’m happy I was able to offer you some inspiration with my tutorial. Have fun making yourself a lovely pair of pants!
Hi Petro; This pattern is great, definitely going to try it….do you have a pattern for the top, I really like it and it goes so well with the pants?
Thanks, Bertha! I don’t have a pattern for this blouse but I made a camisole with a gathered top & a flounced hem that might interest you. Tutorial is here https://theseamanmom.com/camisole-pattern/
Hermoso…
Do we have to take the grainline into consideration, when placing the pattern or old pants.??
Hi, what about finding the grain of the material, so the pant legs fall straight??
It depends on the fabric type, Rosetta. I didn’t have to take the grain line into consideration with this fabric and I had no problems with the pants falling straight.
Thank you, I’ve tried following you tube videos on making these trousers but found that the part of changing the back and front crotch a bit mind blowing, also even though they show the measurements a d then adapt to yourself a little beyond my math brain capability … I can’t wait to try this way. I’m self taught too, unfortunately I have health issues that can cause me to forget how to do things if I leave things for a day or so.. anyway thanks for making it easier to continue sewing basics. Xx
So grateful for your site. You make these “britches” look so easy to put together. thanks so much. mjl PS…..you are so pretty. Now, if you could design a pattern for men’s boxer shorts w/front opening I would be so grateful. My husband of 56 1/2 yrs. is VERY TALL & needs to be longer for his skinny legs. I enjoy doing nice things for him. thanks again–please let me know!
I’m so glad I found your site! I’m going to try these pants…after I learn some sewing basics! LOL. I love that you say they can be mad low-rise because that is what I want.
Brenda, remember to be patient w/yourself.
Sooooo cute and versatile! These would be nice in many different fabrics and could be worn at the beach, dress-up night on a cruise, casual wear, etc. I think I would add pockets as that is my thing. Thanks so much for sharing your great design!
Hi, Becki! So happy you loved my idea! These are super versatile indeed, great for any occasion! And so comfortable!
I cant wait to try this looks simple. I may put a couple of darts in the front as someone here suggested but Ill see how it turns out and maybe I wont have to. Thank you for the tutorial!!
Thanks, Deidre! If you gave a small waist & use soft lightweight abric, you will probably be fine without darts as myself. Let me know how yours turn out!
I’m going to have to read the layout part 3 or 4 times before I ever cut. It sounds easy but I’m a nervous Nelly. I will make some wide leg pants to wear at home this summer and practice. You are very good at your sewing.
I love wearing trousers pants jeans etc as I find them easier to wear and I tend not to look as fat in them 🤪iv tried many different patterns But never been able to get the wide leg look right so I’m going to try this way using my favourite pair I already own. I do have to say that when im sewing the crotch area I find it easiest to put one leg inside the other but that’s because I struggle with very fine things due to disability. Now I’m off to try to make these iv got just the perfect fabric a nice satin / silk hopefully il have enough
P.S
I am completely self taught never had a sewing lesson I. My life I started with turning tea towels into shopping bags and now 2years later I’m making my own clothing and handbags.
Hi, Emma! You’ll have so much fun making these pants, they’re so easy and quick! I’m also a self taught sewist :)
Thank you for sharing. They look fabulous. I love wide-leg (or palazzo) pants. they always look elegant and dressy. I will give this a go. The only thing I will change though is to use a wide elastic in the waistband and stitch it in place, so it doesn’t twist. Love your fabric too!
when you cut out the second cutting, do you fold the old pants the other way? Or are both cuts the the exact fold of the old pants? does that make sense?
Hi Katherine. I’m not sure I get what you mean but I didn’t flip the pants, both sides of the pant are the same.
I think it’s not clear you are cutting both sides at once. You didn’t say which way you folded the pants, but I assume you used the back crotch seam. Won’t that make the front crotch baggy?
Thank you. Tried this pattern out and it was great. Loved that it was so easy and didn’t take too long.
Hi, Lizelle! Thanks so much for letting me know! So happy to hear my tutorial was easy to follow and helped you achieve great results in your project!
This sounds great – except I don’t have any wide legged pants to use as a base! Most of my jeans and good pants are quite fitted! What would you suggest please?
Hi Debra. It doesn’t have to be loose pants! It does help a little but it’s not necessary. Just draw around your fitted pants and then enlarge the pattern by a couple inches sideways.
It looks like a good project and easy but don’t you have to trace off BOTH the front AND back crotches sinces both are different for fit? I’d like to make these pants but am wondering about this. Thanks!
Hi Maggie. These are super large pants, they’ll have plenty of room to accommodate the back without a separate pattern.
I’d think you could do it as she has if you’re thin, but if you have a large booty and you do both sides the same you’re gonna have a ton of excess material sagging around the front. OR if you have a big gut and no butt, the opposite effect. However, be easy enough to add a few darts to take up the excess.