

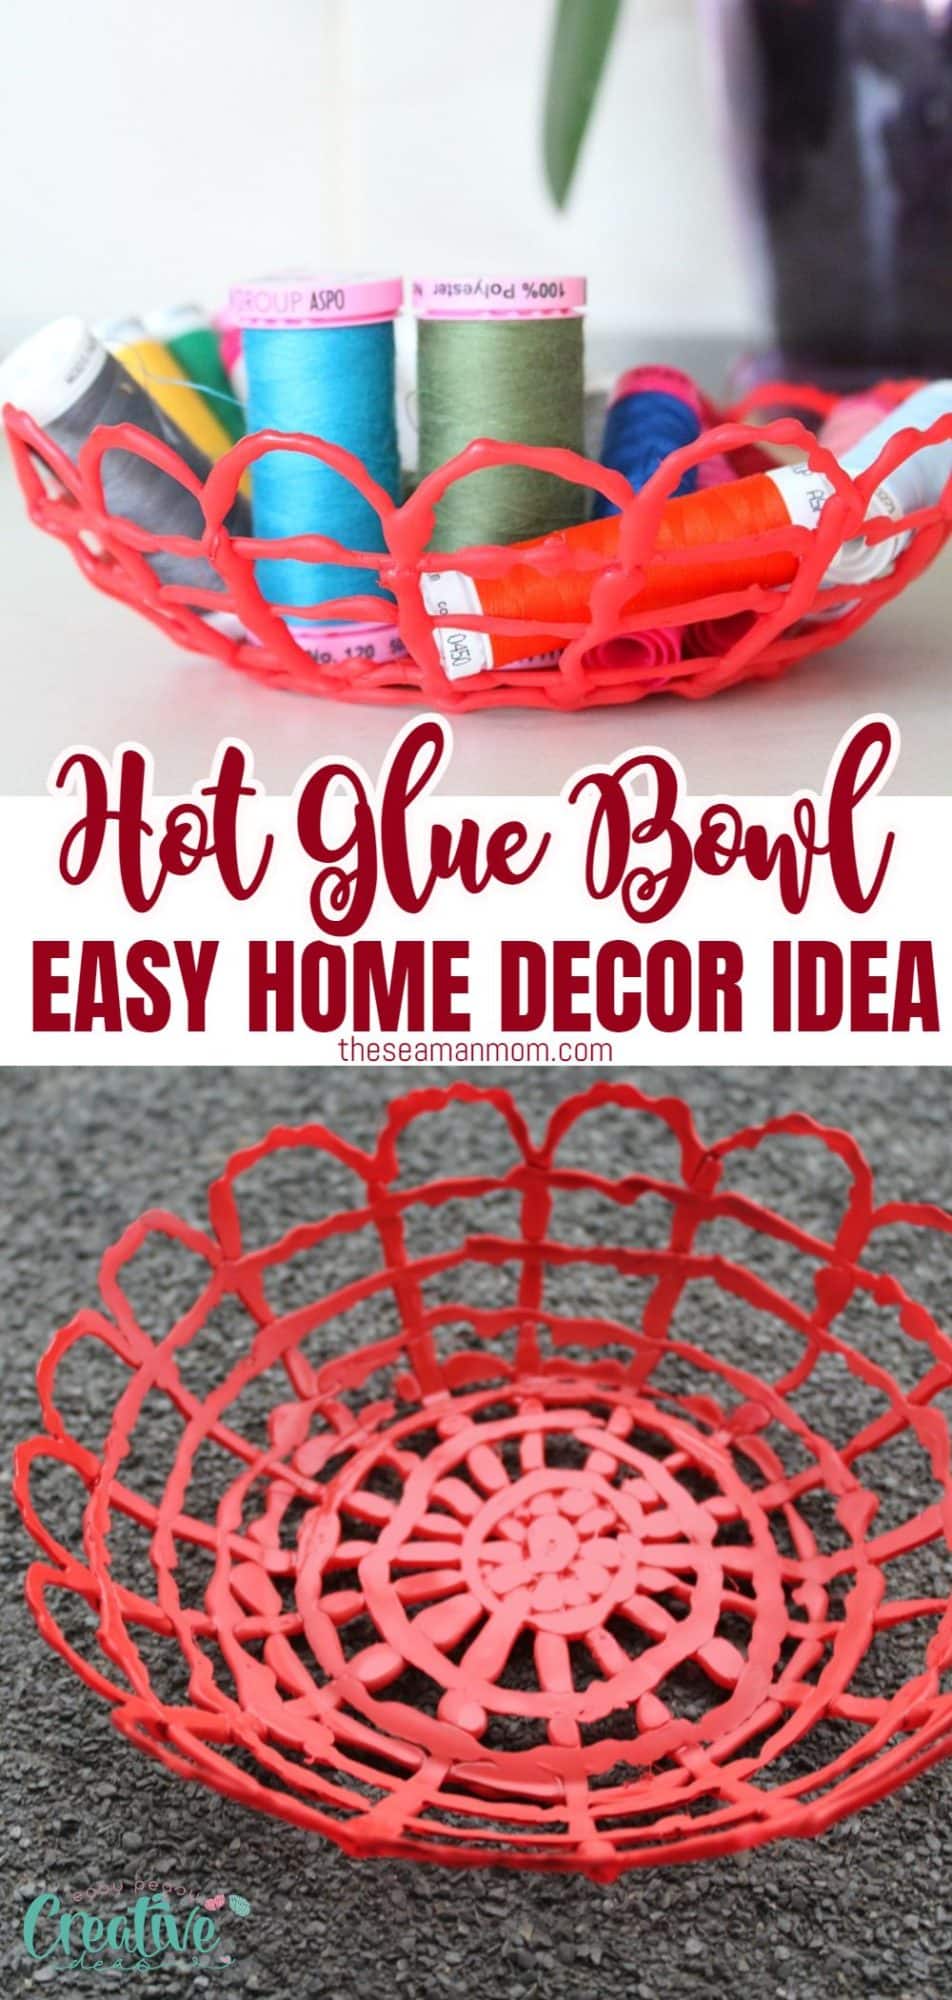
DIY Hot Glue Bowl
If you have some spare time or need a little bowl for storing craft or sewing supplies, you can make a neat and super cool hot glue bowl with this easy and quick project.
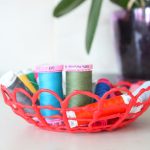
Hot Glue Bowl
This crafty hot glue bowl is the perfect way to add a fun and creative element to your home. It’s easy to make, doesn’t require any fancy supplies, and costs next to nothing! This DIY basket is perfect for adding a special touch to any room in your house.
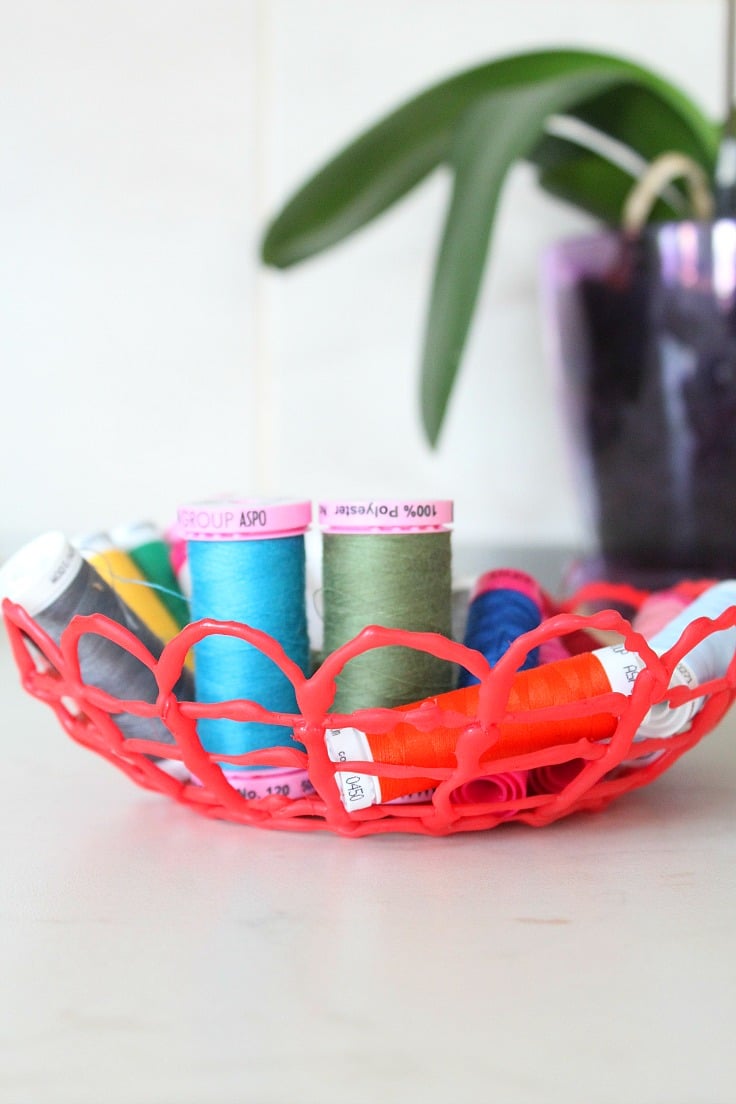
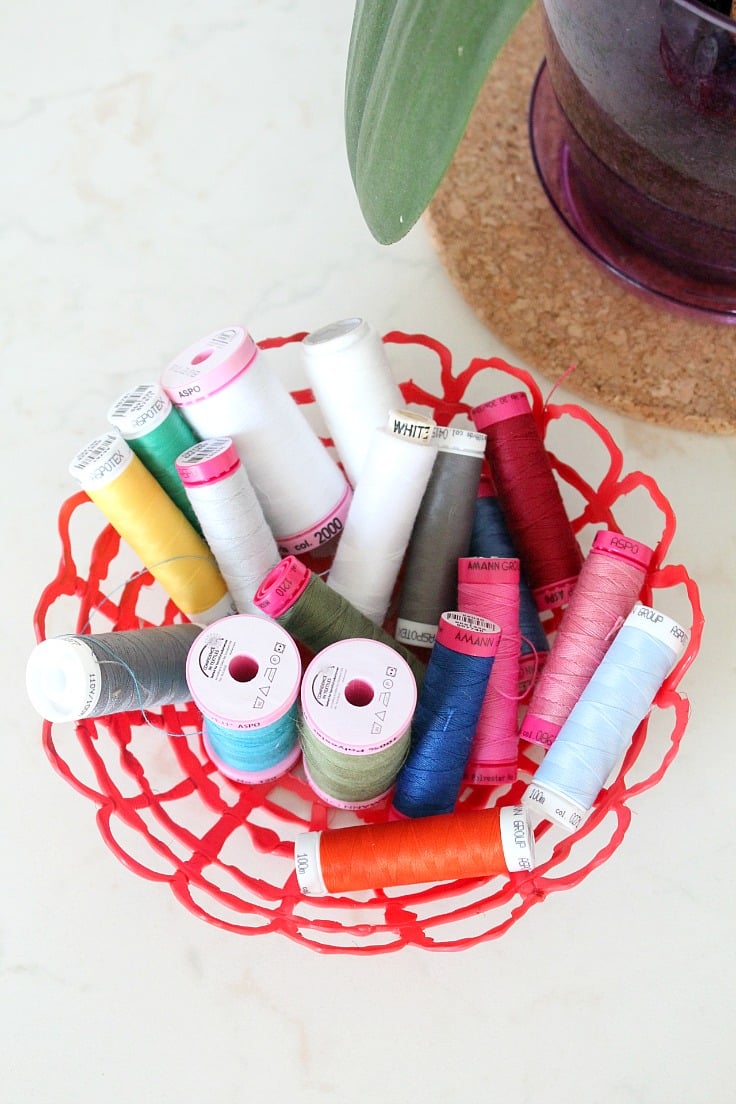
After making these Cute Rope Bowls which were so handy dandy and since bowls seem to work so great for me as storage ideas, I decided to make something similar but using the glue gun I just purchased. So I made a hot glue bowl to use for my hair accessories (or for Ellie to play with as a crown; works just as well) and another one for some of my sewing notions.
More storage ideas you will love:
We lead a pretty simple life and try to keep clutter at bay by purchasing just the things we absolutely need (except for the toys; apparently we need more toys every day!). But even with such a minimalist lifestyle, I find myself in need of storage space especially for my craft and sewing supplies and notions. And lately for some hair accessories I discovered I still own although I thought I’d lost them a long time ago. Turns out I’m not as organized as I like to think I am! (lol)
This glue bowl is a pretty simple and fairly easy project unless you are a rookie as me and can’t control your hands very well while handling the glue gun. Also my designing skills are pretty rudimentary. But all in all, I’m happy with the results, considering this was a first project using a glue gun.
What are the safety precautions for hot glue gun?
Hot glue guns are very useful tools for crafting, but they can also be dangerous if not handled properly. To ensure your safety while using a hot glue gun, please follow these tips:
- Make sure the area is well ventilated before you begin.
- Always wear protective gloves and eyewear when handling the glue gun.
- Be careful not to let the glue gun touch your skin, as it can cause burns.
- Keep children and pets away from the area where you are working with hot glue guns.
- When finished with the project, unplug the glue gun and allow it to cool before storing.
Why doesn’t hot glue stick to glass?
Hot glue is made of plastic polymers that can quickly harden and create a strong bond. Glass is a non-porous material, which means the hot glue won’t be able to properly adhere which makes the perfect combination for our project here!
How long does it take to make a hot glue bowl?
Depending on the size and complexity of the project, it can take anywhere between 15 minutes to an hour.
What is the best way to clean a hot glue bowl?
To clean your hot glue bowl, simply wipe with a damp cloth or paper towel. Avoid using any abrasive scrubbing materials, as they can damage the bowl.
Can I use other types of glue for this project?
No, it is important to use hot glue specifically for this project due to its quick setting and strong bond capabilities. Other glues may not work as well or provide a secure hold.
What can I use my hot glue bowl for?
You can use your hot glue bowl for a variety of purposes, including storing small items like coins and jewelry, or as a decorative piece in your home. You can also add potpourri for a fragrant touch. With some creative ideas, you can use your hot glue bowl in a variety of ways! Just make sure you add enough glue to the walls of your bowl, depending on the final use.
Is it safe to use a hot glue gun?
Yes, as long as you follow the safety precautions mentioned above. Always wear protective gloves and eye wear while handling the glue gun, make sure the area is well ventilated, and keep children and pets away from the project area. When finished with your project, unplug the glue gun and allow it to cool before storing.
What tips can you give for making a successful hot glue bowl?
Make sure to use even pressure when pressing the pieces of hot glue together – too much pressure will create a gap between the pieces, while not enough pressure won’t provide adequate adhesion.
Also, make sure you use enough glue on the walls of your bowl to ensure it maintains its shape and stability.
Last but not least, have fun and be creative with colors and decorations – that’s the best part!
These pretty little hot glue bowls are not only very handy (think about all those office supplies, craft supplies, sewing notions or even cosmetic pads that you can store), but also make great gifts! So give it a try, have fun and let your creativity flow!
How to make a decorative bowl with hot glue
Materials:
- Hot glue gun
- Hot glue sticks (neutral or colored)
- Clean bowl
- Spray paint in color of choice (skip if using colored glue)
- Wax paper
Directions:
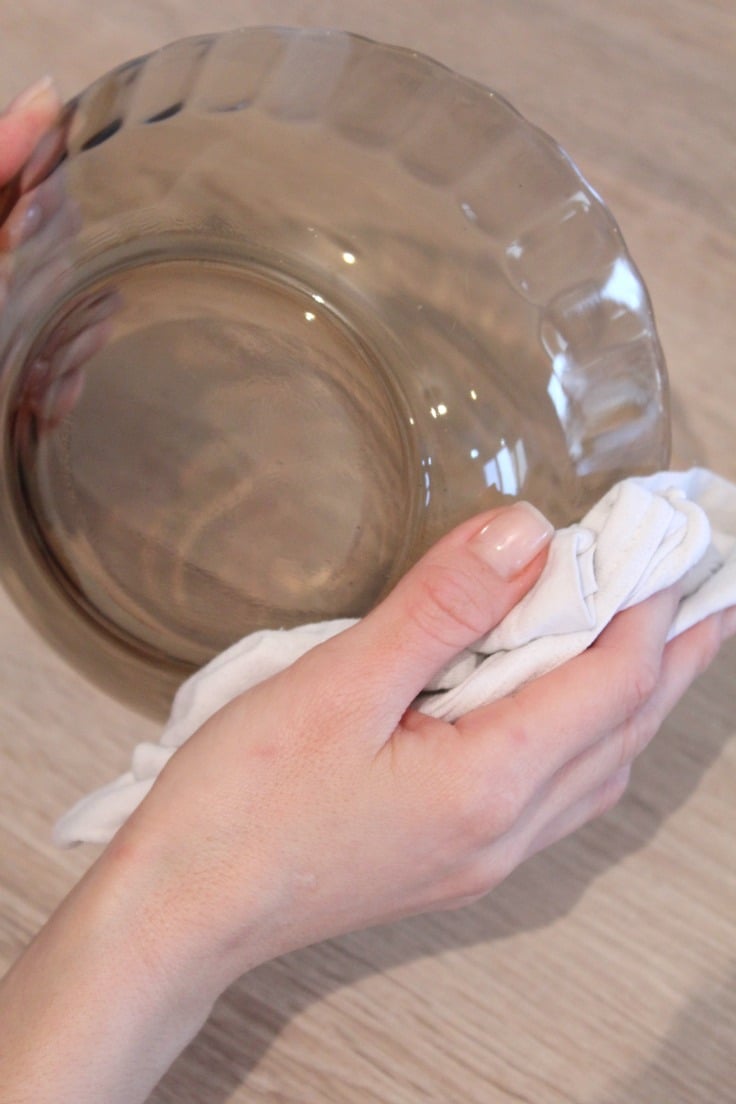
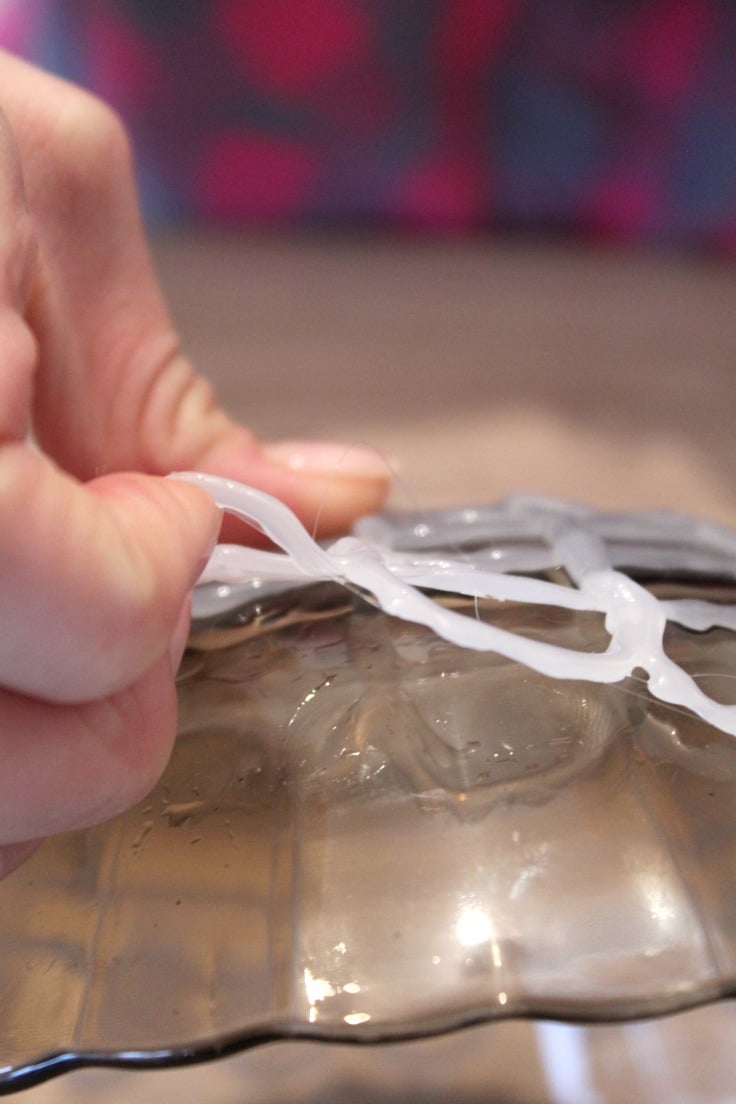
- Start with a very clean bowl so wash and completely dry the bowl that will serve as the base of your hot glue bowl.
- Make sure you work with a very hot glue so make a little test just before starting to build your bowl by squirting a dollop of glue on a piece of wax paper.
- Turn the bowl upside down. I found it easier to create my bowls using the outside of the bowl not the inside.
- Start making circles all around the base of your bowl.
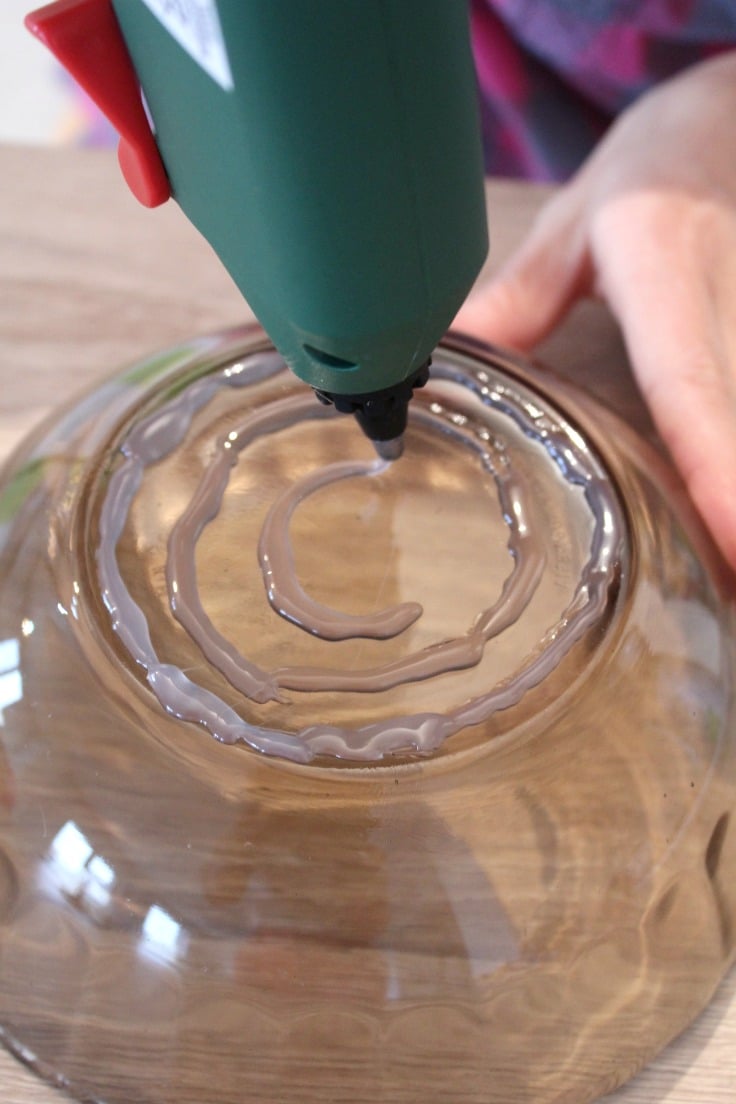
- Then connect those circles with diagonal hot glue lines, starting at the center of the bottom of the bowl.
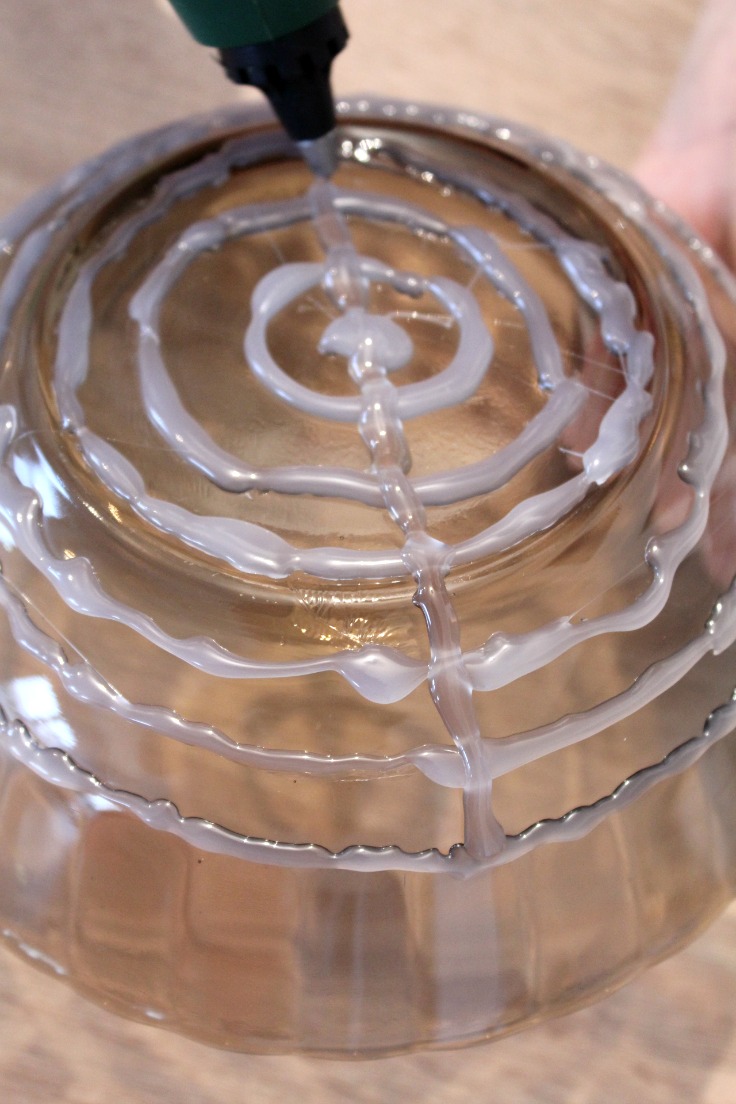
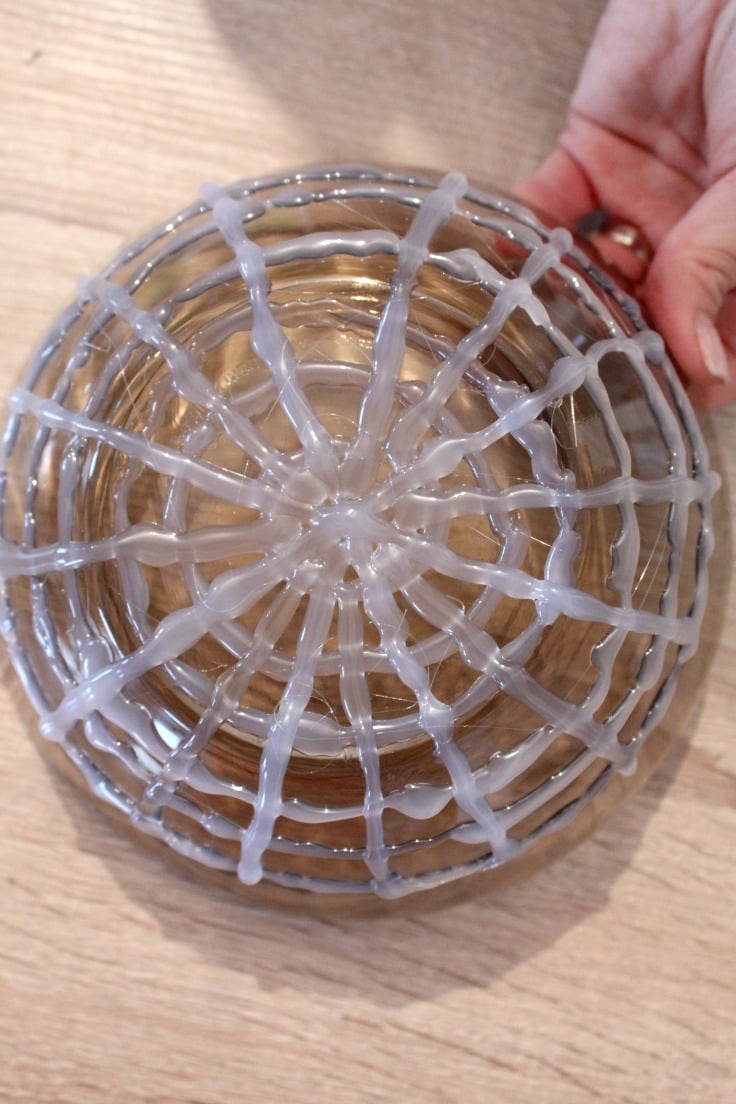
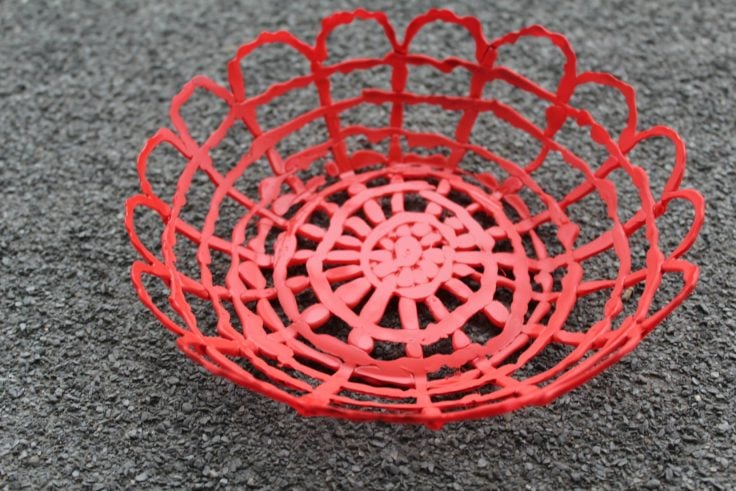
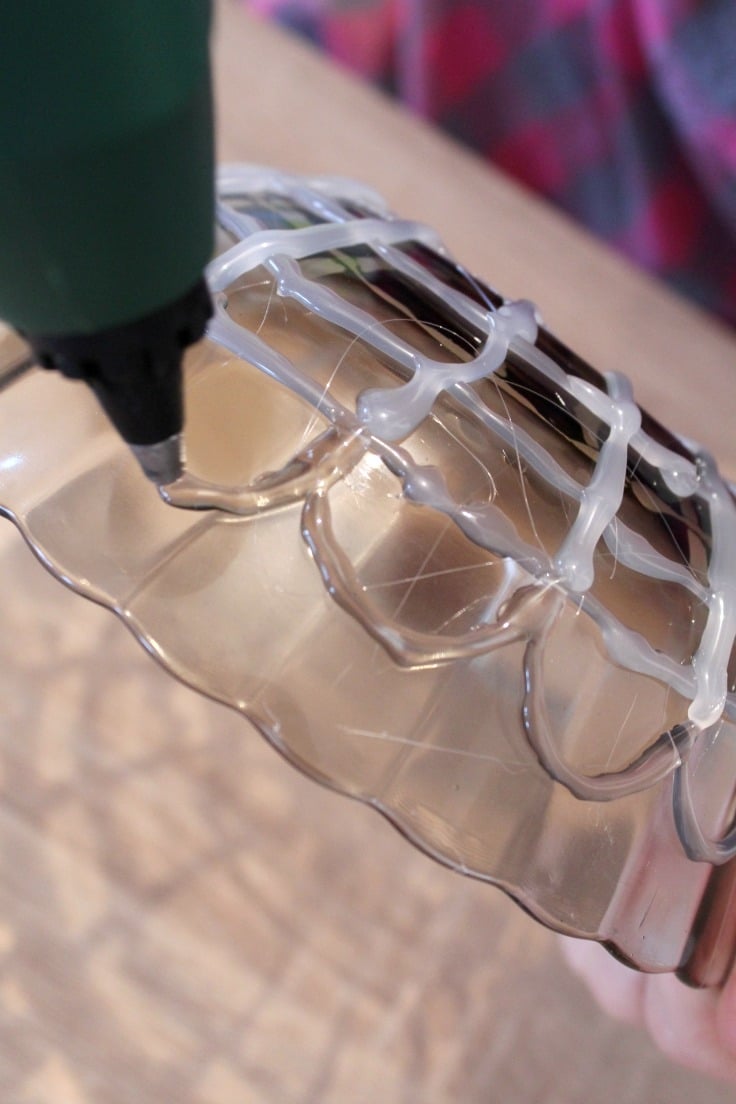
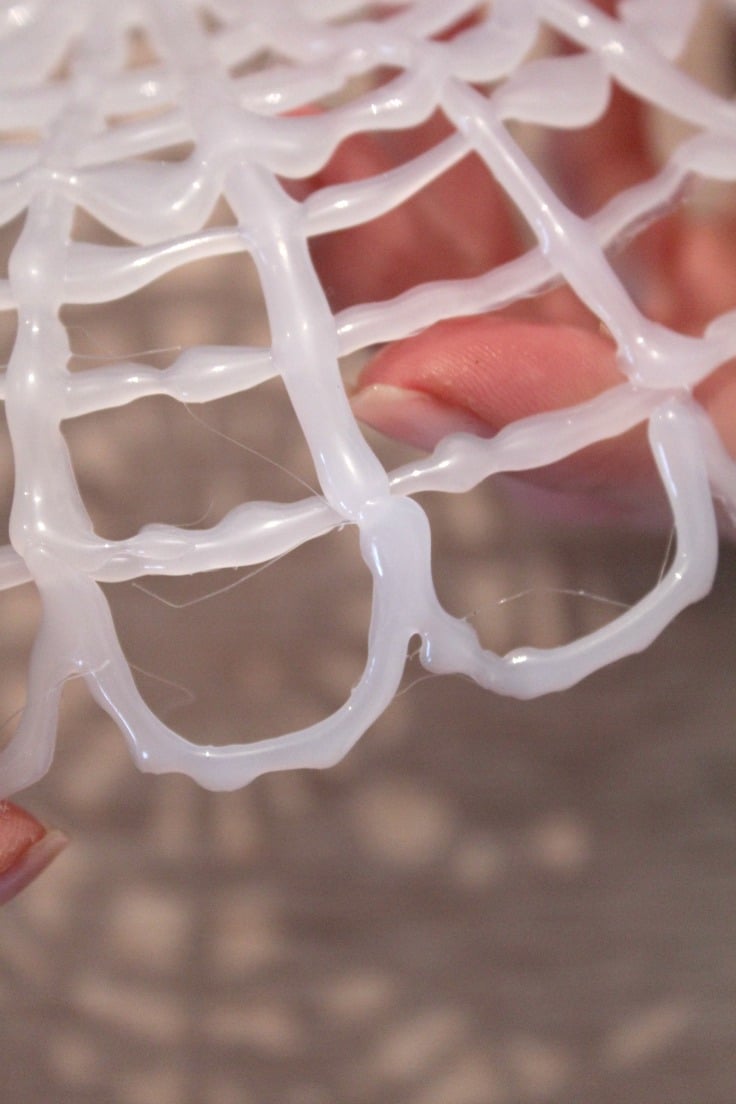
- Make the design of your choice. I decided to go simple for this project since it was my first so I just made a basic bowl and some scallops around the edge of the bowl. You can add a lot of very thin strings of glue all around your bow if you’re going to use it for storing small objects line earring or potpourri flower petals. Or you can add a second row of hot glue to make your bowl more durable.

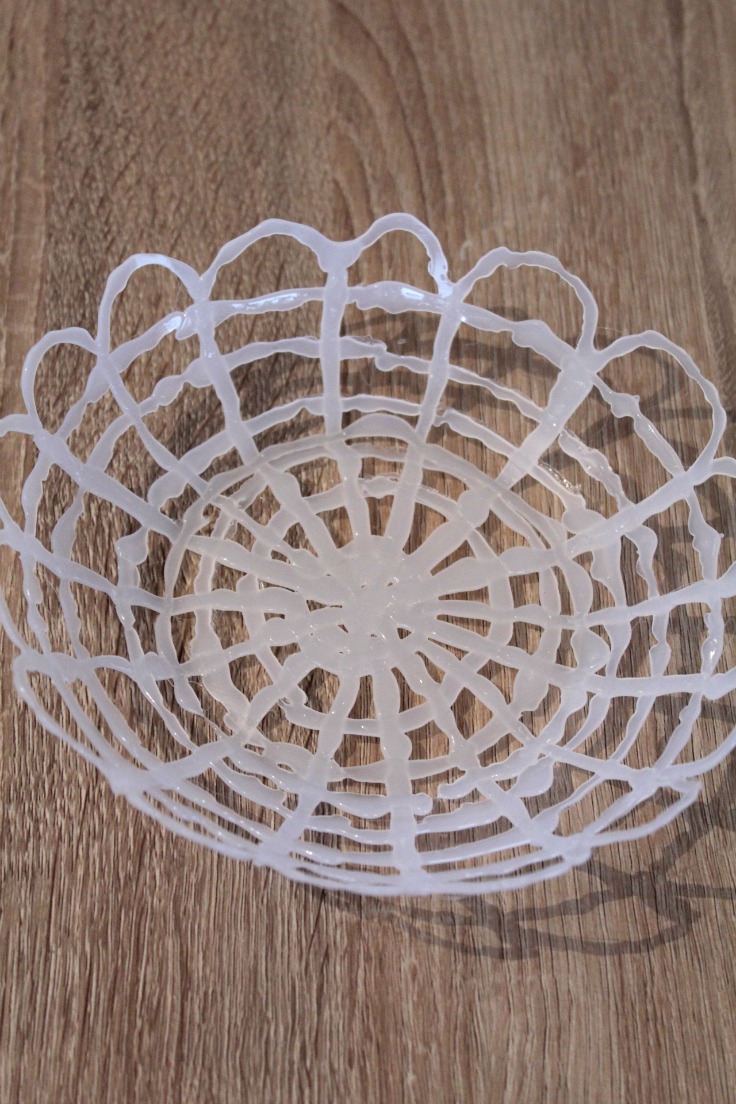
- Allow the glue to completely dry. Test it with your fingers once you see it going white.
- Using your nails, gently peel it off of your base bowl.
- Remove the tiny glue residues with your fingers or trim off using small, sharp scissors.
- Spray paint or leave as is. I preferred mine colored. You can skip this step if you used colored glue sticks.
You can use this decorative hot glue bowl to store your craft supplies, small trinkets, jewelry and more. It makes a great gift for any occasion and shows off your creativity in a unique way. Best of all, you made it yourself!
If you enjoyed making this decorative bowl and would like even more creative ideas, sign up to my newsletter to get the latest updates. I can’t wait to hear what you create!
Happy crafting!
Pin to save for later
Print the craft card
How glue bowl diy
Materials
- Hot glue sticks neutral or colored
- Clean bowl
- Spray paint in color of choice skip if using colored glue
- Wax paper
Tools
Instructions
- Start with a very clean bowl so wash and completely dry the bowl that will serve as the base of your hot glue bowl.

- Make sure you work with very hot glue so make a little test just before starting to build your bowl by squirting a dollop of glue on a piece of wax paper.
- Turn the bowl upside down. I found it easier to create my bowls using the outside of the bowl not the inside.
- Start making circles all around your base bowl.
- Then connect those circles with diagonal hot glue lines, starting at the center of the bottom of the bowl.
- Make the design of your choice. I decided to go simple for this project since it was my first so I just made a basic bowl and some scallops around the edge of the bowl. You can add a lot of very thin strings of glue all around your bow if you're going to use it for storing small objects line earring or potpourri flower petals. Or you can add a second row of hot glue to make your bowl more durable.
- Allow the glue to completely dry. Test it with your fingers once you see it going white.
- Using your nails, gently peel it off of your base bowl.
- Remove the tiny glue residues with your fingers or trim off using small, sharp scissors.
- Spray paint or leave as is. I preferred mine colored. You can skip this step if you used colored glue sticks.
Article may contain Amazon & affiliate links. As an Amazon Associate I earn from qualifying purchases at no additional cost to you.

I haven’t tried this, but I read years ago to get rid of the glue “wires”, use a hair blower to get rid of them. Hope this helps
Thanks so much for the tip, Marion!
I tried to make one of the bowl and it didn’t stay up like a bowl what sis I do wrong.it’s like rubber. Thanks kathy
Hi Kathy. I’m so sorry to hear you had troubles with this project. I’m not sure what the cause might be, maybe it was the quality of the hot glue sticks or maybe your gun hasn’t heated the sticks enough. Also how big is your bowl as the bigger the more wiggly it gets. Also bare in mind this owl is not designed for “heavy duty” stuff, it’s doing a pretty good job at storing sewing notions or a few light craft or office supplies. I’ve made this bowl for my sewing notions and it works wonderfully.
Wow, this is kind of amazing! I never thought of making something like that from hot glue. Great tutorial! Thanks for sharing with DIY Crush! You can see it here: http://www.diy-crush.com/blog/make-hot-glue-bowl/
Thank you.
Yes, now I know what you mean.
They get everywhere, don’t they?
Love the bowl idea!
What are you talking about when you say, remove the glue wires?
Hi Brenda. Sorry for being confusing. Not sure how to call them exactly so I chose to call them wires, I’m probably wrong. You know how glue leaves some tiny thread like thingies behind when pulling the gun away from the spot you’re working on? This happens when you’re not very familiar with using a glue gun, as myself. If you look at my photos, you’ll notice little glue threads in between the main lines, like in these photos https://theseamanmom.com/wp-content/uploads/2016/02/IMG_4140.jpg https://theseamanmom.com/wp-content/uploads/2016/02/IMG_4141.jpg
I love this! Going to Pin and make as gifts. Visiting from Blitsy.com
Aww, thank you so much!