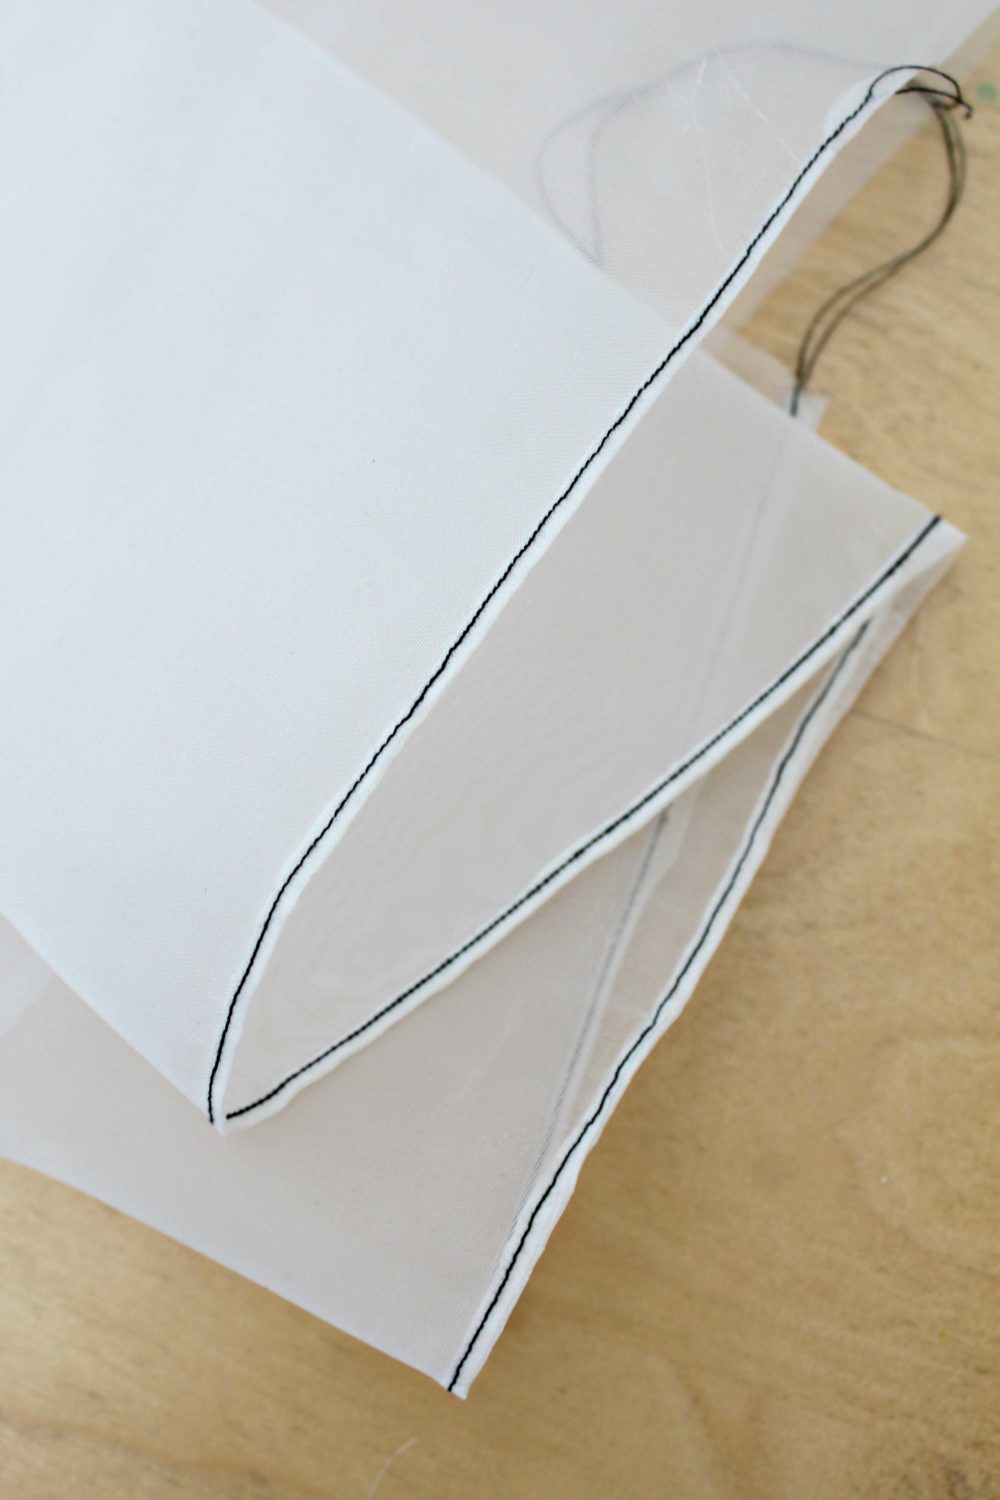
Sewing a rolled hem with a rolled hem foot
Unlock the secrets to sewing flawless rolled hems! Ever wondered how those delicate, perfectly stitched narrow hems on lightweight fabrics are created? In this tutorial, I’ll guide you through the easiest and most effective way to master a rolled hem using a rolled hem foot.
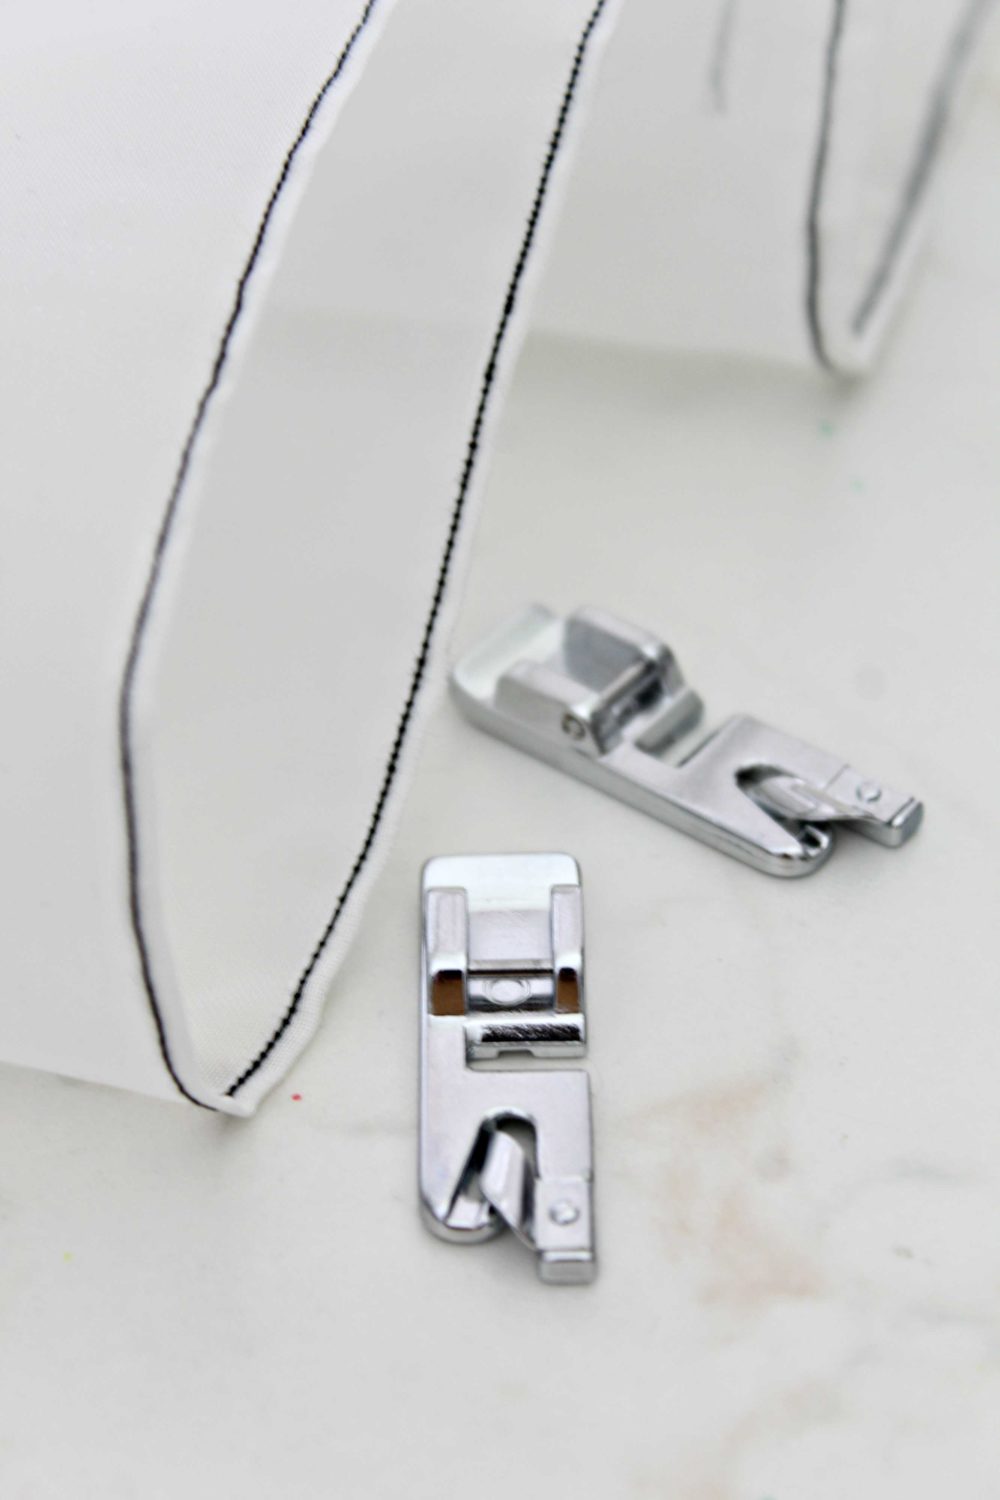
I’ve always loved working with lightweight, sheer fabrics, but they can be quite challenging, especially when it comes to sewing a rolled hem. After some trial and error, I discovered that the best way to achieve a narrow, clean rolled hem on these delicate fabrics is with a rolled hem foot, also known as a hemmer foot. Once you get the hang of it, using a rolled hem foot makes the process remarkably simple and effective!
Below I’ll show you everything you need to know to sew a rolled hem yourself, together with a list of important tips, to make sewing this kind of hem even easier. So you can sew the perfect tiny rolled hem on all your projects!
If you’ve been meaning to learn how to sew a rolled hem for ages but lacked the courage, I’m here to tell you there’s nothing to be afraid of! All you need is a little practice and patience when using a rolled hem foot, particularly on lightweight fabrics.
How to sew a rolled hem
Materials:
- sewing machine
- rolled hem foot
- fabric
- sewing needles
- hair spray (or make your own spray starch as here)
- scissors
- pressing iron
Instructions to sew the rolled hem with the rolled hem foot
See the craft card below for detailed video instructions!
Prepping for sewing
- If you’re using lightweight, slippery fabric, start by lightly spraying the hem line with a little hair spray or with your own spray starch. Allow to dry before proceeding to the next step.
- Prepare the first couple of inches of the hem edge. Make a tiny fold in the desired allowance and also to match your rolled hem foot (they come in different sizes). I like to match the fold in my hem with the edge of my foot. With tiny hems on sheer fabrics, I like to use my tweezers too, to help me make that super tiny fold. Finger press to keep it in place then press with your iron. Repeat the process for a second fold, in the same manner.
Sewing the rolled hem
- With the fabric wrong side up, feed the folded part of the hem under the foot, making sure you leave some thread tails behind the foot.
- Now carefully line up the folded outer edge of the folded hem to the inner edge of the presser foot’s right leg. While gently pulling the thread tails away from the machine, slowly stitch 2-3 stitches into the hem to secure it in place, using the hand wheel.
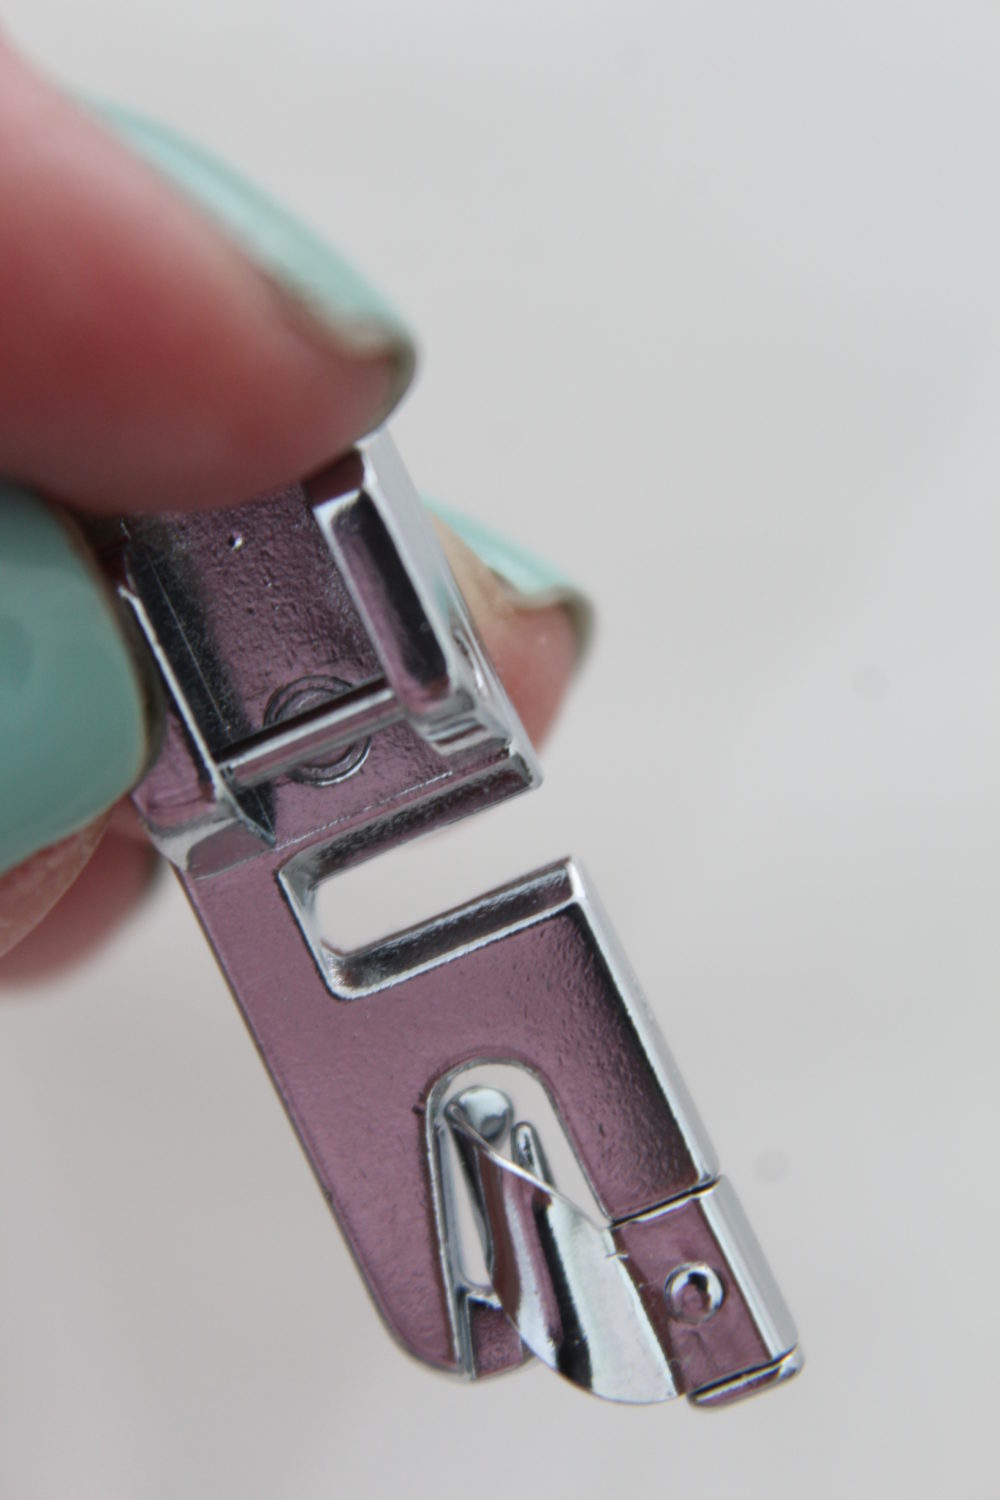
- Lift the foot but keep the needle into the fabric. Begin to feed the folded hem into the funnel (curled portion of the presser foot). Use the thread tails and a pair of tweezers to make this process easier and faster as feeding teeny tiny hems through that teeny tiny funnel can prove to be a challenge.
- Lower the foot and sew slowly, making sure to keep the fold positioned over the funnel portion of the rolled foot. With your right hand continue to help the fabric fold down as you sew, while feeding the folded edge into the funnel with your left hand, as evenly as possible.
- Work in small sections and stop whenever needed to re-feed the folded fabric through the funnel (this particularly happens with the smallest size of the hemmer foot)
Important tips to keep in mind when sewing a rolled hem
- Rolled hems take some practice so I advise you to take some time to test it up on scrap fabric of different weights so you can get the grasp of it before working on an important project such as garments, lingerie, home decor etc
- When using lightweight fabrics, it’s best to use a bit of hair spray to stiffen the fabric a little and prevent it from slipping. It also helps with feeding the fabric through the hemmer foot too and also for guiding it through while sewing.
- Leave a long thread tail for easy seam start. Start your seam holding the thread tails. It also comes in handy when feeding the fabric through the funnel in the foot.
- Keep a pair of tweezers on hand to help you with the feeding process.
- Use the correct sewing needle and thread for the fabric.
- If you normally use long stitches on your projects, for a tiny hem you’ll need to adjust to a smaller stitch length.
- Sew slow, work in small sections and stop often to re-fold the fabric or re-feed it through the funnel.
- Use both hands to guide the fabric through the foot: the right hand will help the fold stay in place while the left will guide the fabric through the funnel.
- When holding fabric with the left hand, keep a little tension without pulling too hard. Also slightly direct the fabric to the left so that it feeds easier through the funnel.
Frequently asked questions
What is a rolled hem?
A roll hem is also known as a narrow hem and is used to hem lightweight and delicate fabrics such as silks, chiffon, organza, rayon and other sheer fabrics. It is a very small hem, sewn on the wrong side of the fabric, that gives garments and other projects a neat and professional hem finish.
As a general rule you would use this hem for lightweight to medium weight fabrics. This kind of hem is used to produce a very very small and elegant hem, made up of two teeny tiny folds which is what makes sewing this type of hem a bit difficult if you don’t have the right tool, like a hemmer foot.
How do you make a rolled hem?
You can use your regular sewing machine to sew this hem or you can do it by hand. The first option is done through the rolled hem foot and is the fastest method once you get the grip of using the foot. Or you can do a narrow hem without the special foot (see the tutorial here) or sew it by hand which is the slowest method and also doesn’t produce a professional looking hem.
What is the rolled hem foot?
A rolled hem foot sews a very narrow hem, providing a professional edge finish. It features a groove on the back and a funnel on the front side. This is where your fabric will roll up into and will go out through the back, running through the groove while the needle will go through it, sewing the smallest hem possible!
Can you sew a tiny hem like this with a serger?
Yes, you can sew this kind of hem on your serger using a rolled hem stitch. This type of stitch creates a similar effect on the raw edge of the fabric to the rolled hem foot, but it’s done with an overlock machine instead. It takes some practice and a few adjustments to the settings on your serger, but once you get the hang of it, it can be a quick and easy way to finish hems on lightweight fabrics.
What is the allowance for this type of hem?
The hem allowance for a hem like this can vary depending on the type of fabric and the size of your hem feet. Generally, it is recommended to have a 1/4 inch or smaller hem allowance for this type of hem. However, you may need to adjust the allowance based on your specific project, materials and your sewing skills.
More sewing tips you will enjoy:
- Essential sewing tips for beginners
- Tips for sewing vinyl
- French seam tutorial
- How to sew organza fabric
- How to hem lightweight fabrics
This is a great technique to master for creating professional-looking hems on lightweight and delicate fabrics. With the right tools and techniques, this type of hem can add a beautiful finishing touch to your sewing projects.
I’d love to see how you’ve put this new found technique into practice so feel free to shoot me an email or simply comment below with your experience and feedback on this! Happy sewing!
How to sew a rolled hem with a rolled hem foot
Materials
- fabric
Tools
- rolled hem foot
- sewing needles
- hair spray
- scissors
- pressing iro
Instructions
- If you're using lightweight, slippery fabric, start by lightly spraying the hem line with a little hair spray or with your own spray starch. Allow to dry before proceeding to the next step.
- Prepare the first couple of inches of the hem edge. Make a tiny fold in the desired allowance and also to match your rolled hem foot (they come in different sizes). I like to match the fold in my hem with the edge of my foot. With tiny hems on sheer fabrics, I like to use my tweezers too, to help me make that super tiny fold. Finger press to keep it in place then press with your iron. Repeat the process for a second fold, in the same manner.
- With the fabric wrong side up, feed the folded part of the hem under the foot, making sure you leave some thread tails behind the foot.
- Now carefully line up the folded outer edge of the folded hem to the inner edge of the presser foot’s right leg. While gently pulling the thread tails away from the machine, slowly stitch 2-3 stitches into the hem to secure it in place, using the hand wheel.
- Lift the foot but keep the needle into the fabric. Begin to feed the folded hem into the funnel (curled portion of the presser foot). Use the thread tails and a pair of tweezers to make this process easier and faster as feeding teeny tiny hems through that teeny tiny funnel can prove to be a challenge.
- Lower the foot and sew slowly, making sure to keep the fold positioned over the funnel portion of the rolled foot. With your right hand continue to help the fabric fold down as you sew, while feeding the folded edge into the funnel with your left hand, as evenly as possible.
- Work in small sections and stop whenever needed to re-feed the folded fabric through the funnel (this particularly happens with the smallest size of the hemmer foot)
Video
Article may contain Amazon & affiliate links. As an Amazon Associate I earn from qualifying purchases at no additional cost to you.


Hello Petro, I currently own a rolled hem attachment such as yours, however, I’m looking for a rolled seam attachment such as the the one sold by Patrick Salsbury.
Do you carry carry an attachment such as this?
Regards,
Yvonne Kiebert
Hi Yvonne! Thanks for reaching out! I don’t sell sewing tools & notions in my shop, just patterns & templates.