

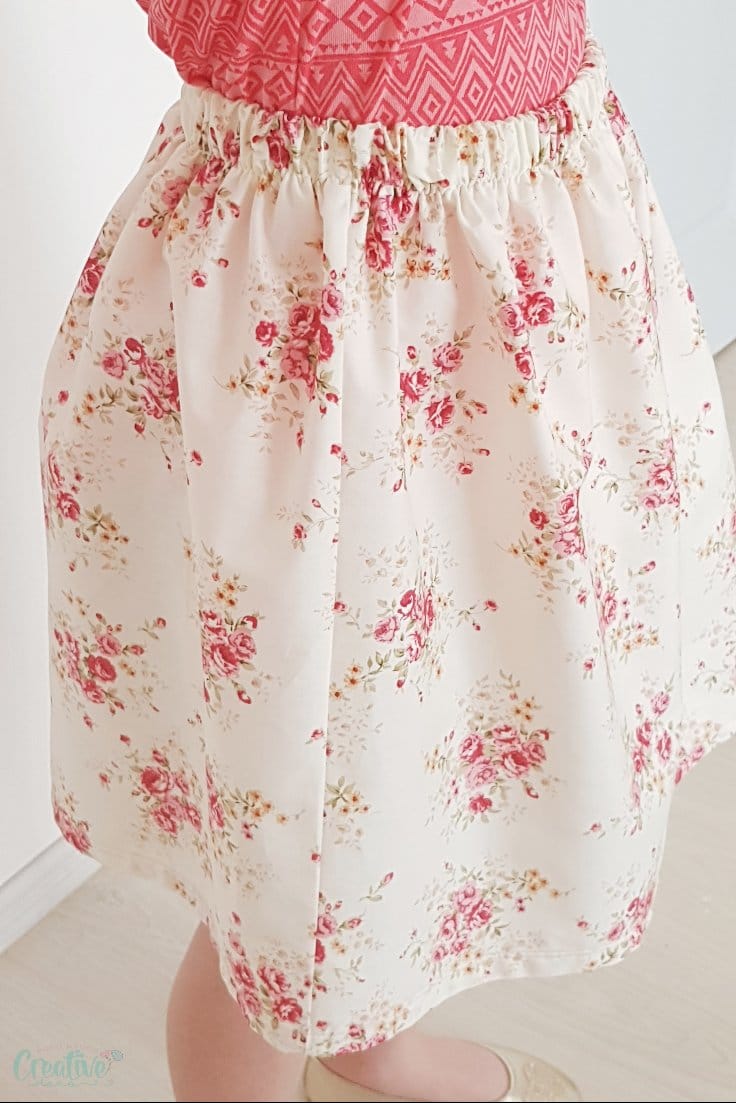
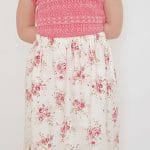
Easy to sew elastic waist skirt
With just 20-30 minutes, you can create this simple and stylish elastic waist skirt pattern! It’s an ideal project for beginners looking to practice their sewing skills or for kids eager to learn the basics. The straightforward design ensures a quick and satisfying result, making it a fun and rewarding activity for anyone new to sewing.
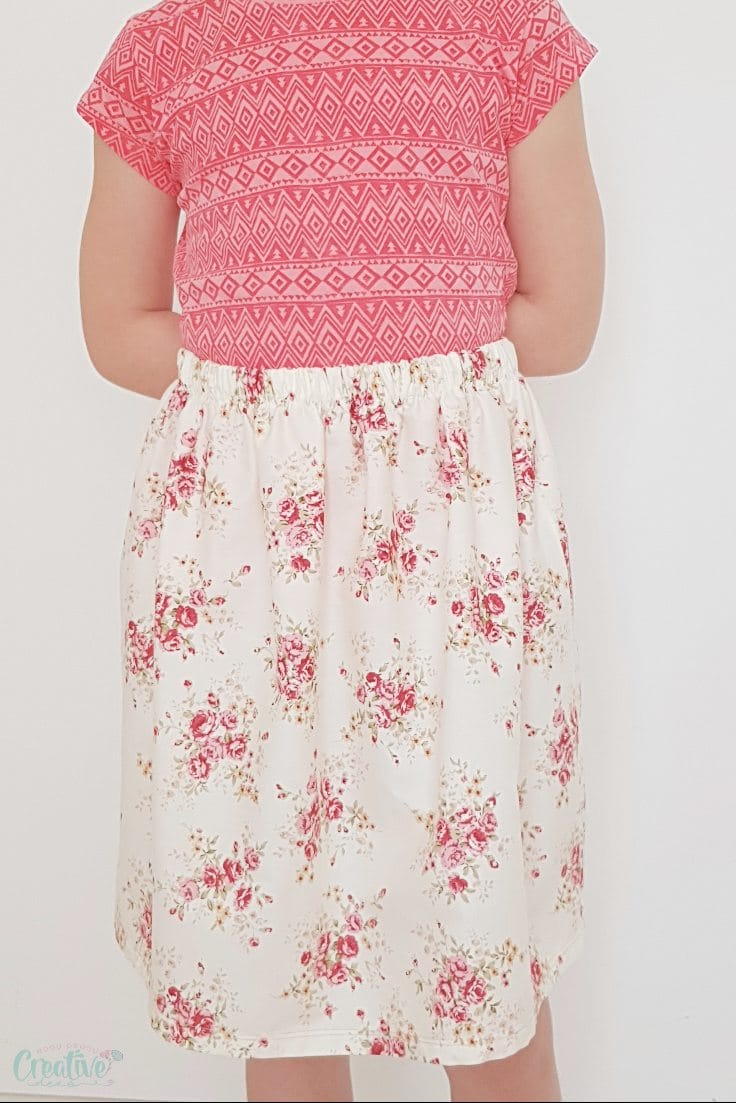
Perfect for casual wear or as a thoughtful handmade gift, this elastic waist skirt pattern is as versatile as it is easy to make! This project is made in collaboration with my daughter Ellie. This tutorial can easily be adapted to fit your own size, be it for kids or adults! I’ve started to teach Ellie a few things about sewing, and I thought it’s time for her to start working on projects that are a little more advanced.
This gathered skirt with elastic waist is the perfect project to take your beginner skills to the next level as it’s super simple to measure, draft, cut and sew, it’s not scary at all and although a little more advanced than the basic beginner projects, it won’t let you feeling overwhelmed or tired.
This simple skirt pattern with elastic waist involves sewing a zig zag stitch over the elastic though so if you’re not comfortable sewing these, I’ve shown an alternative method below. For our elastic waist skirt pattern, Ellie and I opted to use the zig zag stitch because we find this option looking a little better than the other. At which point Ellie took a break and I took over the sewing machine.
Ready to make your own skirt? Here are the full details on how to sew an elastic waist skirt!
Elastic waist skirt pattern

Materials:
- cotton fabric (use the guidelines and the diagram above to calculate the fabric needed for your particular project)
- fabric marker
- measuring tape
- yardstick
- scissors
- pins
- elastic (we used 1″ wide elastic)
- seam gauge
- matching thread
- sewing machine
- serger (optional) to prevent fraying
- pressing iron
Instructions to make the easy elastic waist skirt:
How much fabric is needed for an elastic waist skirt
Here’s what I do:
- Measure the waist
- Use this number to calculate the width of each skirt panel (front and back)
- Add seam allowance (for the 2 side seams; typically 1″ for each panel).
- Measure the desire length of the skirt
- Measure the width of the elastic.
- Add seam allowance for the elastic waist, elastic width x 2 plus 1/4″.
- Add seam allowance for the hem (typically 1″)
- Cut 2 rectangles using these measurements.
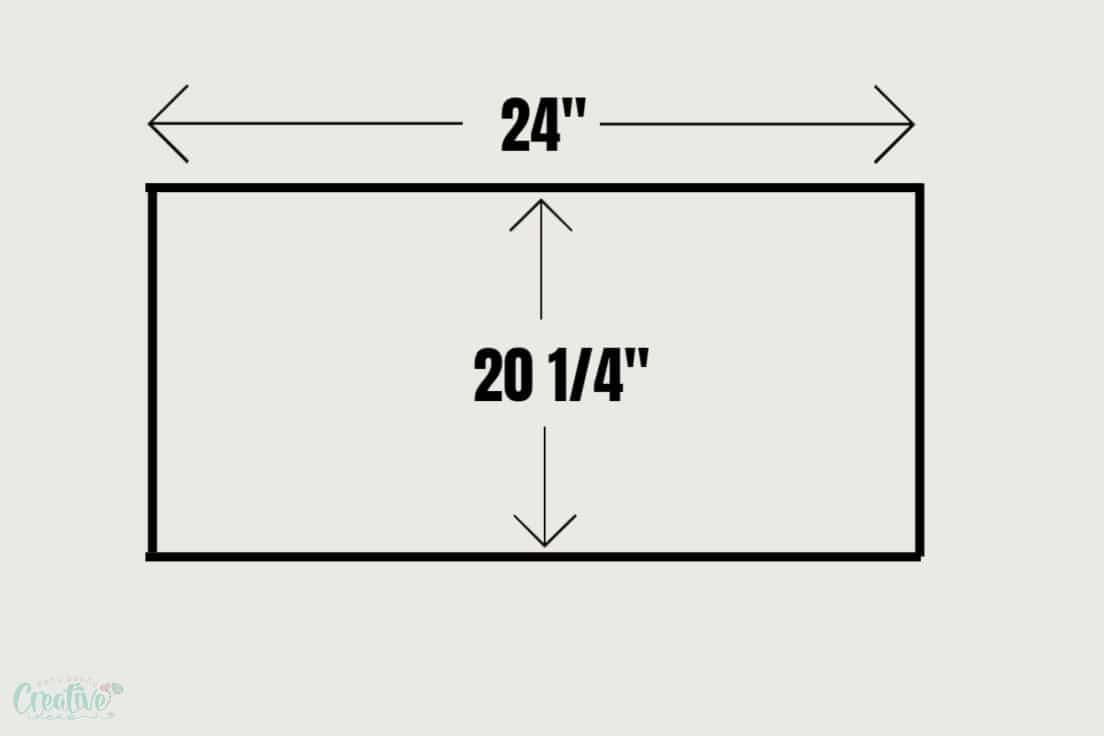
As an example: Ellie’s waist is 23″, the measurement from waist to above knee is 17″ and the elastic width is 1″. We cut 2 rectangles of 24″ by 20 1/4″ as illustrated in the diagram below.
How do you measure the elastic for a waist skirt?
Measure the waist and then subtract 2″- 3″, depending on what feels comfortable. If you’re planning on overlapping the ends of the elastic you need to take that allowance into consideration too. This method is the simplest but will create bulk at the joining seam. To avoid that, use this tip for joining elastic ends or simply join them with a zig zag stitch, sewn 2-3 times. The tip mentioned is also great to use when you’re running short on elastic as it will extend the elastic a bit.
Prepare the fabrics
- Measure your waist.
- Use these measurements to calculate the width of each skirt panel, adding 1″ allowance to the width of each panel.
- Measure from waist down to where you want the hem and add 3 1/4″ (1″ for the hem and 2 1/4″ for the elastic waist)
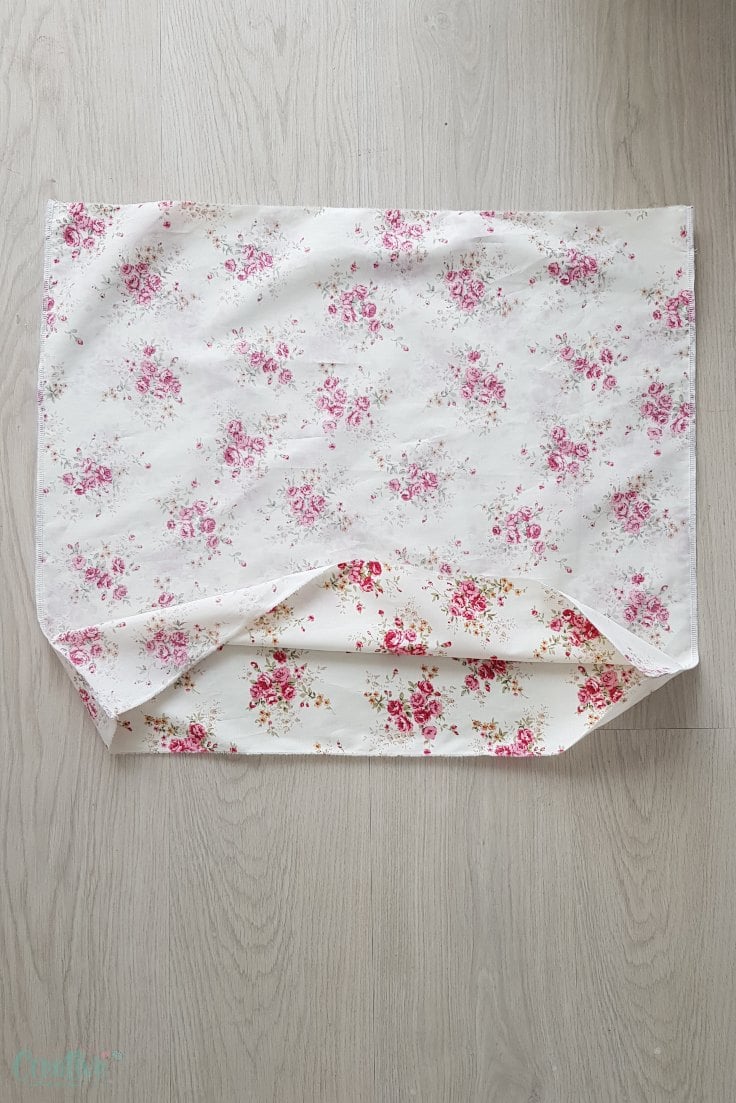
- Place the fabrics right sides together and draw a rectangle with the fabric marker, using the above measurements.
- Pin the fabrics together and cut out the rectangular piece of fabric with your scissors.
- Cut a piece of elastic that is about 2″ smaller than your waist measurements.
Sew the skirt
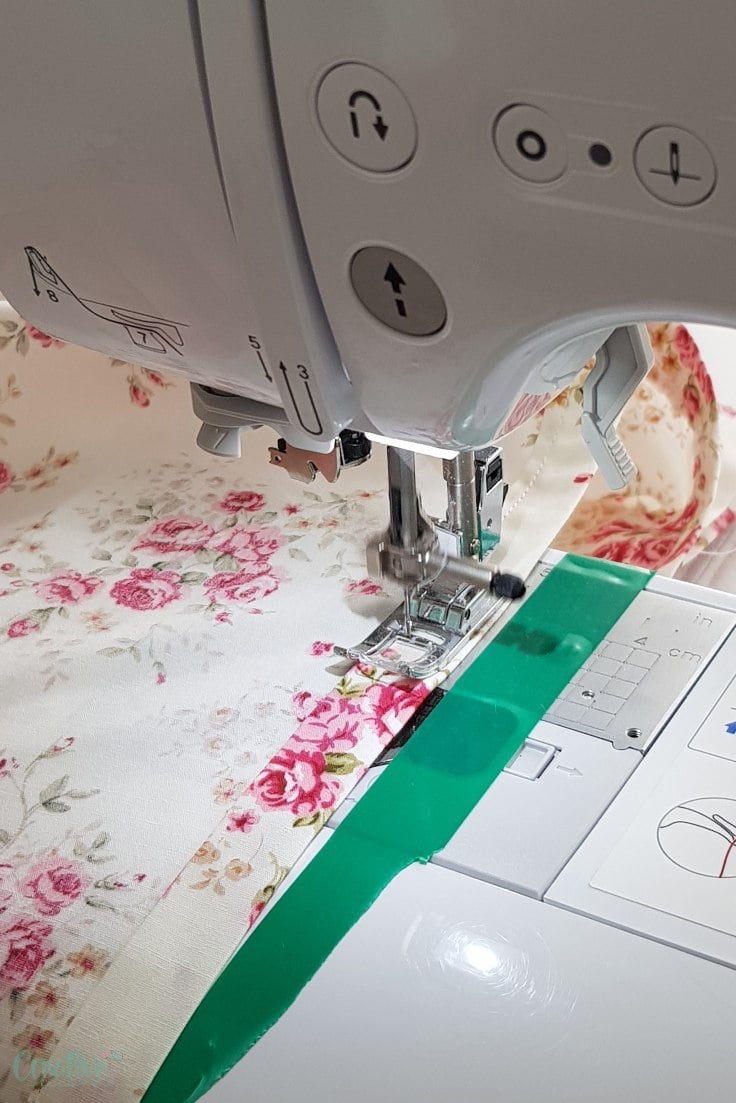
- Take the pinned panels to the sewing machine and sew the sides only with a 1/2″ allowance.
- Take the skirt to the serger and finish the raw edge of the fabric in the side seams. Alternatively, use a zig zag stitch to finish the raw seams if you don’t have a serger. Other methods for finishing the raw seams are highlighted in this tutorial.
Hem the skirt
- With the seam gauge or the measuring tape and the fabric marker, mark 1/2″ along the hem line, on the right side of the fabric.

- Turn the fabric wrong side out.
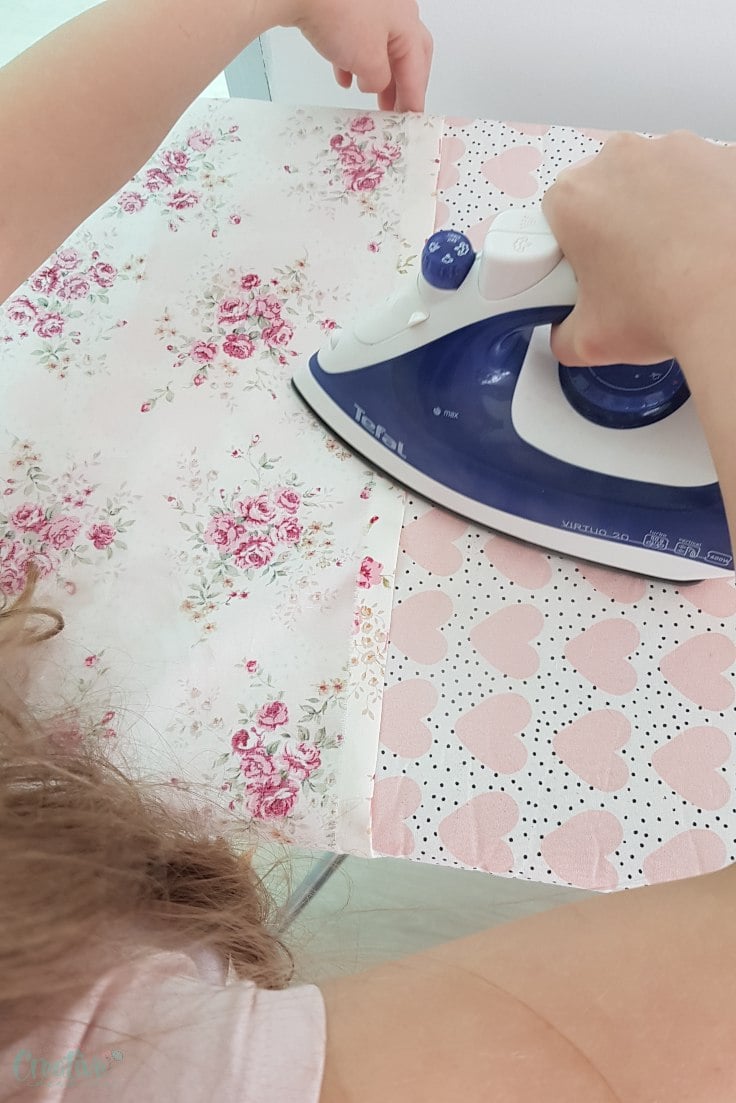
- Fold the hem up at the 1/2″ marks and press well with the iron on steam.
- Fold again and press.
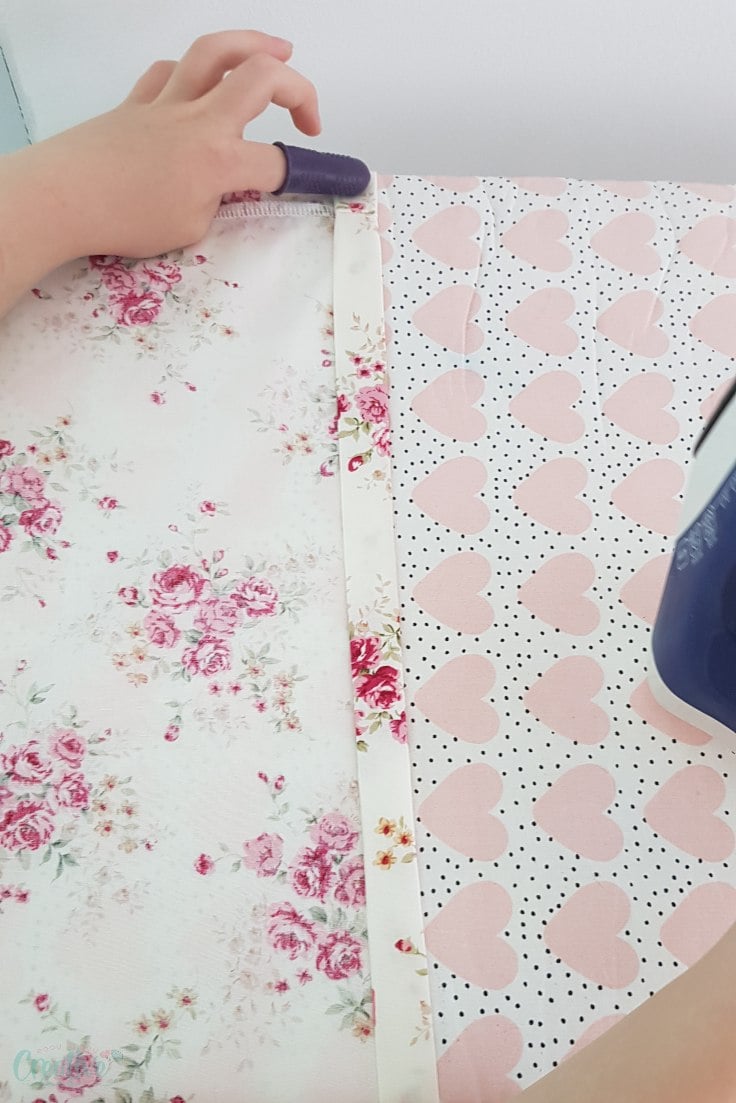
- Take the skirt to the sewing machine and sew the hem about 1/8″ away from the inside fold.
Attach the elastic
- Join the elastic ends with a zig zag stitch or using this method.
- Divide the elastic in 4 and add a pin at these marks.
- Repeat for the top of the skirt.
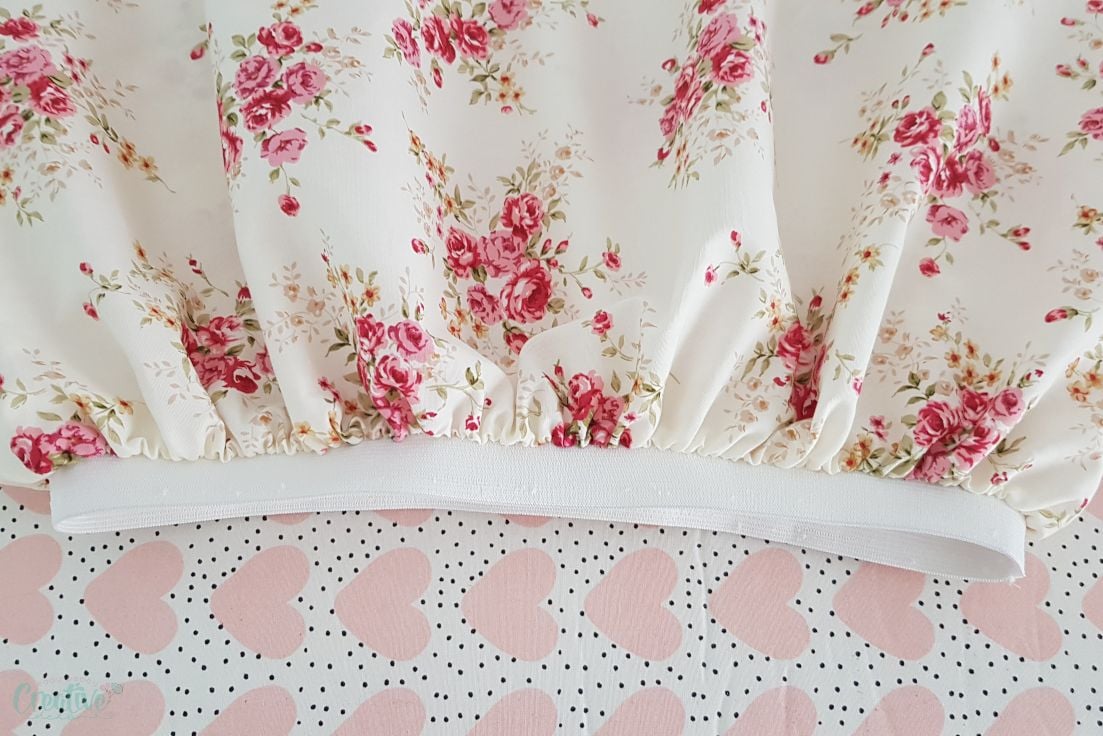
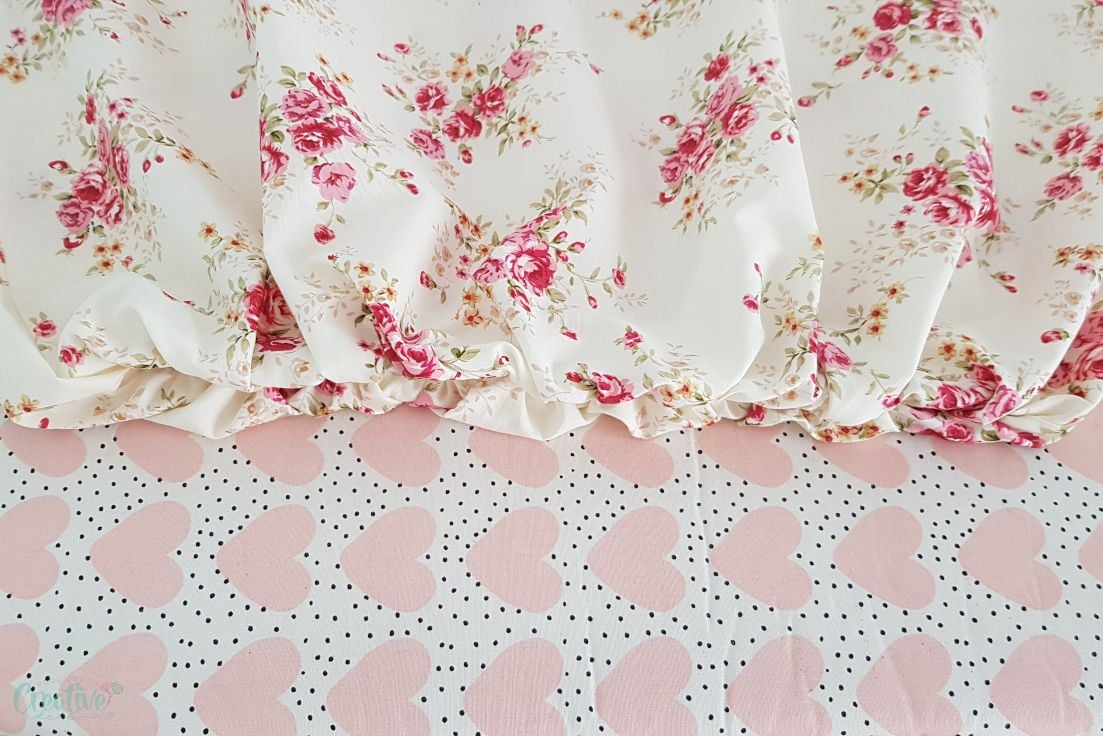
- With the skirt right side out, attach the elastic to the top of the skirt at the 4 marks in both the elastic and the skirt. Then add 4 more pins in between these marks.

- Sew the elastic to the skirt with a wide zig zag stitch, about 1/4″ away from the raw edge.
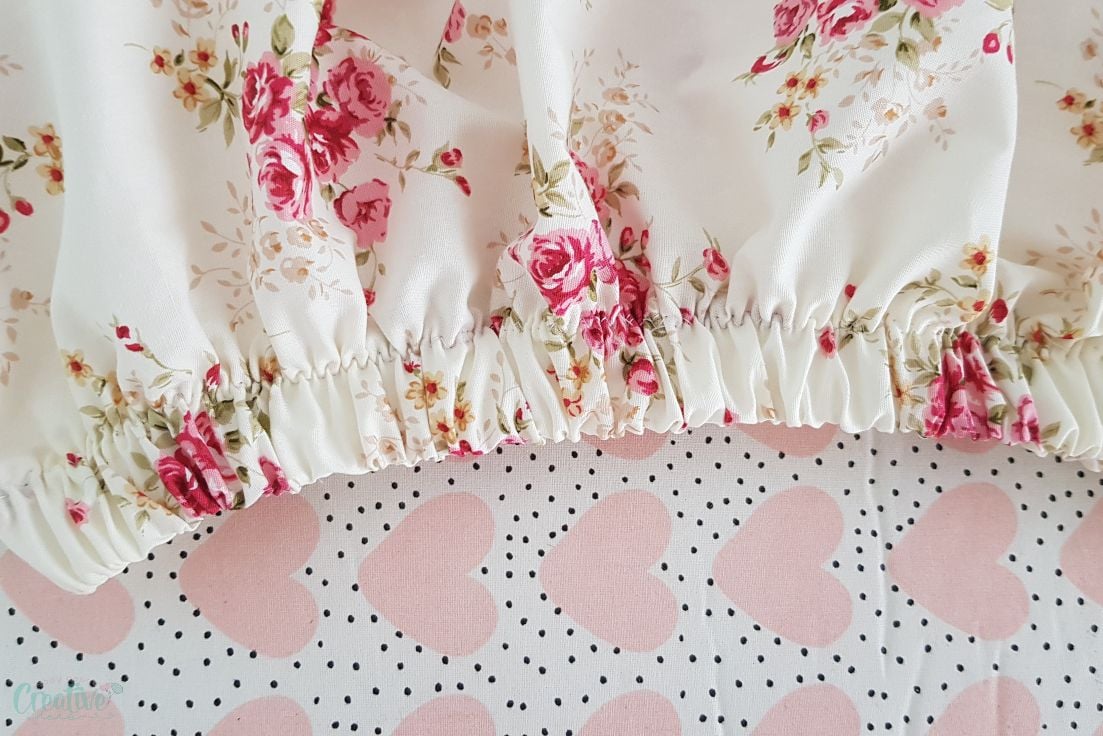
- Fold the elastic down.
- Fold the elastic inside the skirt.
- Then fold again inside the skirt.
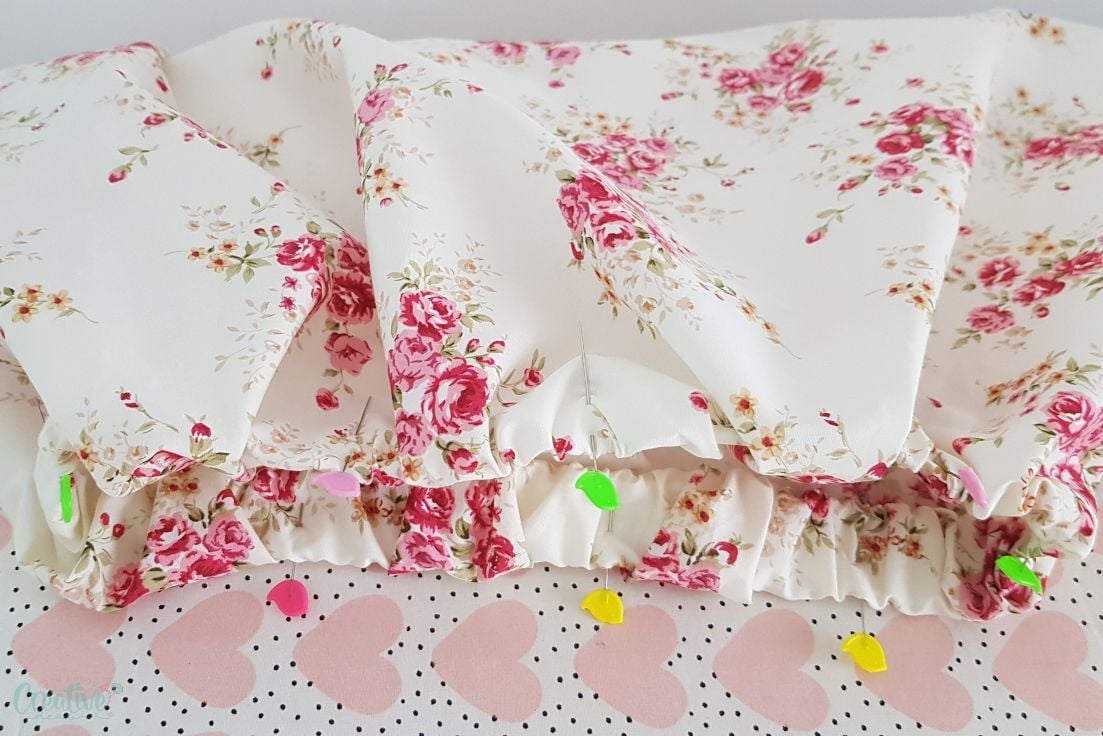
- Pin and sew with a zig zag stitch, close to the inside fold.
Alternative method for attaching the elastic
- This is a more comfortable alternative. For this method you don’t need to join the elastic ends before so leave the elastic as is.
- To insert the elastic you’ll need to create tunnel casings in the top of the skirt.
- For this, fold the top of the skirt inside 1″ and press with the iron on steam.
- Fold inside again 1″ and press.
- Sew around the casing, about 1/8″ away from the inside fold. Leave a small opening, about 2″.
- With the help of a safety pin, insert the elastic through the casing until the ends meet.
- Join the elastic ends as indicated above.
- Top stitch the gap in the casing and even out the gathers.
And that’s pretty much it! Have fun wearing your comfortable elastic waist skirt!
Tips
- When choosing fabric, opt for lightweight, breathable materials like cotton or linen for maximum comfort.
- If you prefer a decorative touch, you can add lace or trim to the hemline.
- Measure your waist and the length carefully before cutting the fabric to ensure a perfect fit.
- Experiment with different skirt lengths and prints to suit your personal style. This style is great for any length, mini, midi or maxi skirt.
Other skirt ideas you will love:
- Paper Bag Skirt Sewing Tutorial
- Full Circle Skirt With Elastic Waist Sewing Tutorial
- Box pleated skirt sewing tutorial
- Reversible Skirt Sewing Tutorial
Sewing project variations
- Instead of an elastic waistband, you can create a drawstring waist by sewing in a small channel and threading a ribbon or cord through it.
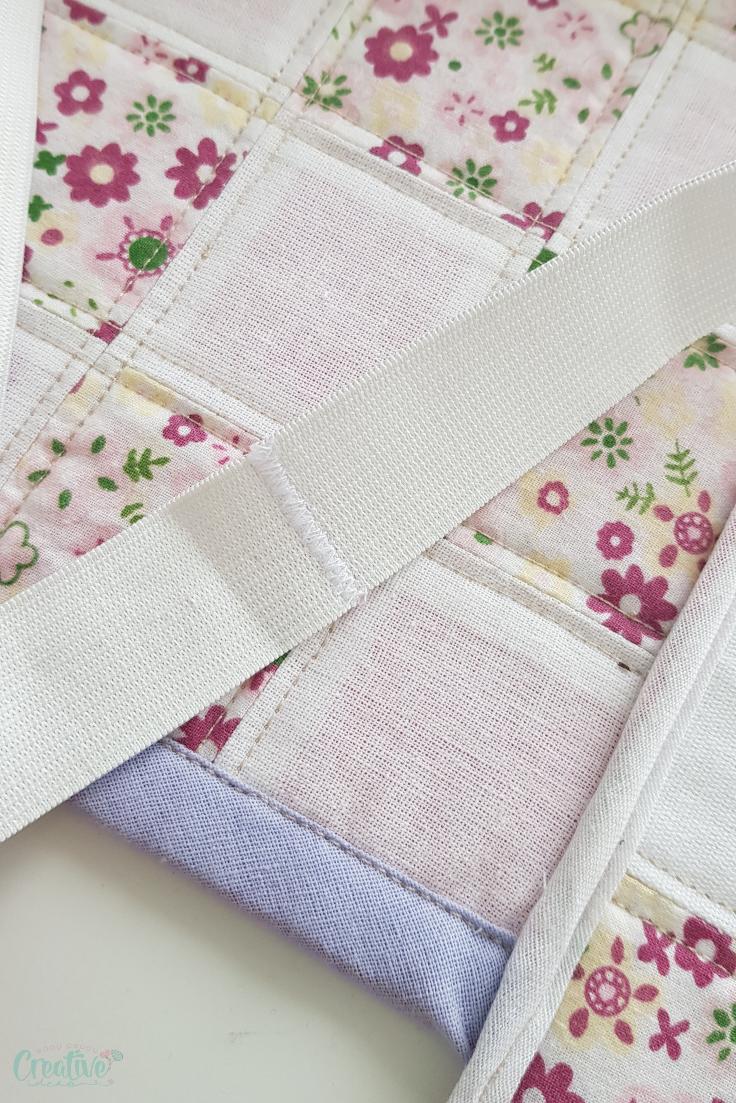
- Add pockets to your skirt by cutting out two rectangles of fabric and sewing them onto the side seams before sewing the front and back pieces together. I find pockets so useful so I added a couple of pocket pieces to this skirt after sewing it, in this tutorial.
- For a flowy look, try using chiffon or silk fabric for your skirt. Just be sure to use a lining underneath for modesty.
- If you’re feeling adventurous, try adding ruffles or pleats to the bottom of your skirt for added volume and movement and why not, a dose of cuteness!
Styling tips
- Pair your new elastic waist skirt with a tucked-in blouse or top for a more put-together and polished look.
- For a casual and effortless vibe, pair your skirt with a basic t-shirt or tank top.
- Add some edge to your look by pairing your skirt with a leather jacket and ankle boots.
- Don’t be afraid to play around with patterns and prints! A fun printed skirt paired with a solid colored top can make for an eye-catching outfit.
Frequently asked questions
What is the best fabric for skirts?
This elastic waist skirt can be sewn in all kinds of fabric, from cotton, to linen, knits or lightweight fabrics like chiffon, rayon, silk or Georgette. But for beginners I would advise using cotton as this fabric is fuss free and the easiest fabric type to work with.
That’s what we used and Ellie was able to handle the fabric with so much ease ! If the fabric is not suitable to your skills you will have troubles sewing it and you’ll end up hating sewing. So resist the urge of sewing with anything flowy and slippery for now, there’ll be plenty of time to upgrade to these materials as you make progress in your sewing journey.
Denim might seem like a good idea but in fact it’s hard to sew for beginners and will create bulk in the waist area. So I don’t recommend it.
How do you gather an elastic skirt?
You see, this is the real beauty of this elastic skirt: you don’t actually need to gather the skirt in advance! Once the elastic is added to the waist, the skirt will naturally form beautiful, even gathers! The trick is to join the elastic and the top of the skirt perfectly and find the right zig zag stitch. I typically use a medium wide zig zag stitch.
A great beginner sewing project, this elastic waist skirt is a versatile and comfortable garment that can be easily made at home with just a few materials and basic sewing skills. This type of skirt is perfect for all body types and occasions, making it a must-have in any wardrobe. So go ahead and experiment with different fabrics, colors, patterns, and styles to make your own personalized version of this timeless piece.
Happy sewing!
Check out these most popular sewing articles!
- How To Laminate Fabric At Home
- DIY corded handles for bags
- Perfectly neat curved hem tutorial
- Girls flutter sleeve dress Pattern
Elastic waist skirt pattern
Materials
- cotton fabric
- elastic we used 1" wide elastic
- matching thread
Tools
- measuring tape
- Yardstick
- scissors
- serger (optional)
- pressing iron
Instructions
How much fabric is needed for an elastic waist skirt
- Measure the waist
- Use this number to calculate the width of each skirt panel (front and back)
- Add seam allowance (for the 2 side seams; typically 1" for each panel).
- Measure the desire length of the skirt
- Measure the width of the elastic.
- Add seam allowance for the elastic waist, elastic width x 2 plus 1/4".
- Add seam allowance for the hem (typically 1")
- Cut 2 rectangles using these measurements.
- As an example: Ellie's waist is 23", the measurement from waist to above knee is 17" and the elastic width is 1". We cut 2 rectangles of 24" by 20 1/4" as illustrated in the diagram below.
How do you measure the elastic?
- Measure the waist and then subtract 2"- 3", depending on what feels comfortable. If you're planning on overlapping the ends of the elastic you need to take that allowance into consideration too. This method is the simplest but will create bulk at the joining seam. To avoid that, use this tip for joining elastic ends or simply join them with a zig zag stitch, sewn 2-3 times. The tip mentioned is also great to use when you're running short on elastic as it will extend the elastic a bit.
- Prepare the fabrics
- Measure your waist.
- Use these measurements to calculate the width of each skirt panel, adding 1" allowance to the width of each panel.
- Measure from waist down to where you want the hem and add 3 1/4" (1" for the hem and 2 1/4" for the elastic waist)
- Place the fabrics right sides together and draw a rectangle with the fabric marker, using the above measurements.
- Pin the fabrics together and cut out the rectangle with your scissors.
- Cut a piece of elastic that is about 2" smaller than your waist measurements.
- Take the pinned panels to the sewing machine and sew the sides only with a 1/2" allowance.
- Take the skirt to the serger and finish the side seams. Alternatively, use a zig zag stitch to finish the raw seams if you don't have a serger. Other methods for finishing the raw seams are highlighted in this tutorial.
- With the seam gauge or the measuring tape and the fabric marker, mark 1/2" along the hem line, on the right side of the fabric.
- Turn the fabric wrong side out.
- Fold the hem up at the 1/2" marks and press well with the iron on steam.
- Fold again and press.
- Take the skirt to the sewing machine and sew the hem about 1/8" away from the inside fold.
- Join the elastic ends with a zig zag stitch or using this method.
- Divide the elastic in 4 and add a pin at these marks.
- Repeat for the top of the skirt.
- With the skirt right side out, attach the elastic to the top of the skirt at the 4 marks in both the elastic and the skirt. Then add 4 more pins in between these marks.
- Sew the elastic to the skirt with a wide zig zag stitch, about 1/4" away from the raw edge.
- Fold the elastic down.
- Fold the elastic inside the skirt.
- Then fold again inside the skirt.
- Pin and sew with a zig zag stitch, close to the inside fold.
Alternative method for attaching the elastic
- For this method you don't need to join the elastic ends before so leave the elastic as is.
- To insert the elastic you'll need to create a casing in the top f the skirt.
- For this, fold the top of the skirt inside 1" and press with the iron on steam.
- Fold inside again 1" and press.
- Sew around the casing, about 1/8" away from the inside fold. Leave a small opening, about 2".
- With the help of a safety pin, insert the elastic through the casing until the ends meet.
- Join the elastic ends as indicated above.
- Top stitch the gap in the casing and even out the gathers.
Article may contain Amazon & affiliate links. As an Amazon Associate I earn from qualifying purchases at no additional cost to you.

This is nice but I’d like to have elastic band across the back with a plain band in the front. How can that be done, please? It can still be gathered.
Hi Dottie. You can split the way you finish waist band, make it out of 2 pieces, one for the front, one for the back. Interface the front piece, and add elastic to the back piece (you’ll need to create a casing for this part to thread the elastic through). Leave seam allowance at the sides. Then sew the front & back skirt together.
Hi Petro, This skirt is just what I was looking for. When pinning the elastic to the skirt, do you keep it even with the top edge, or 1/4 inch below?
Thank you.