

How to sew a pretty flounce hem
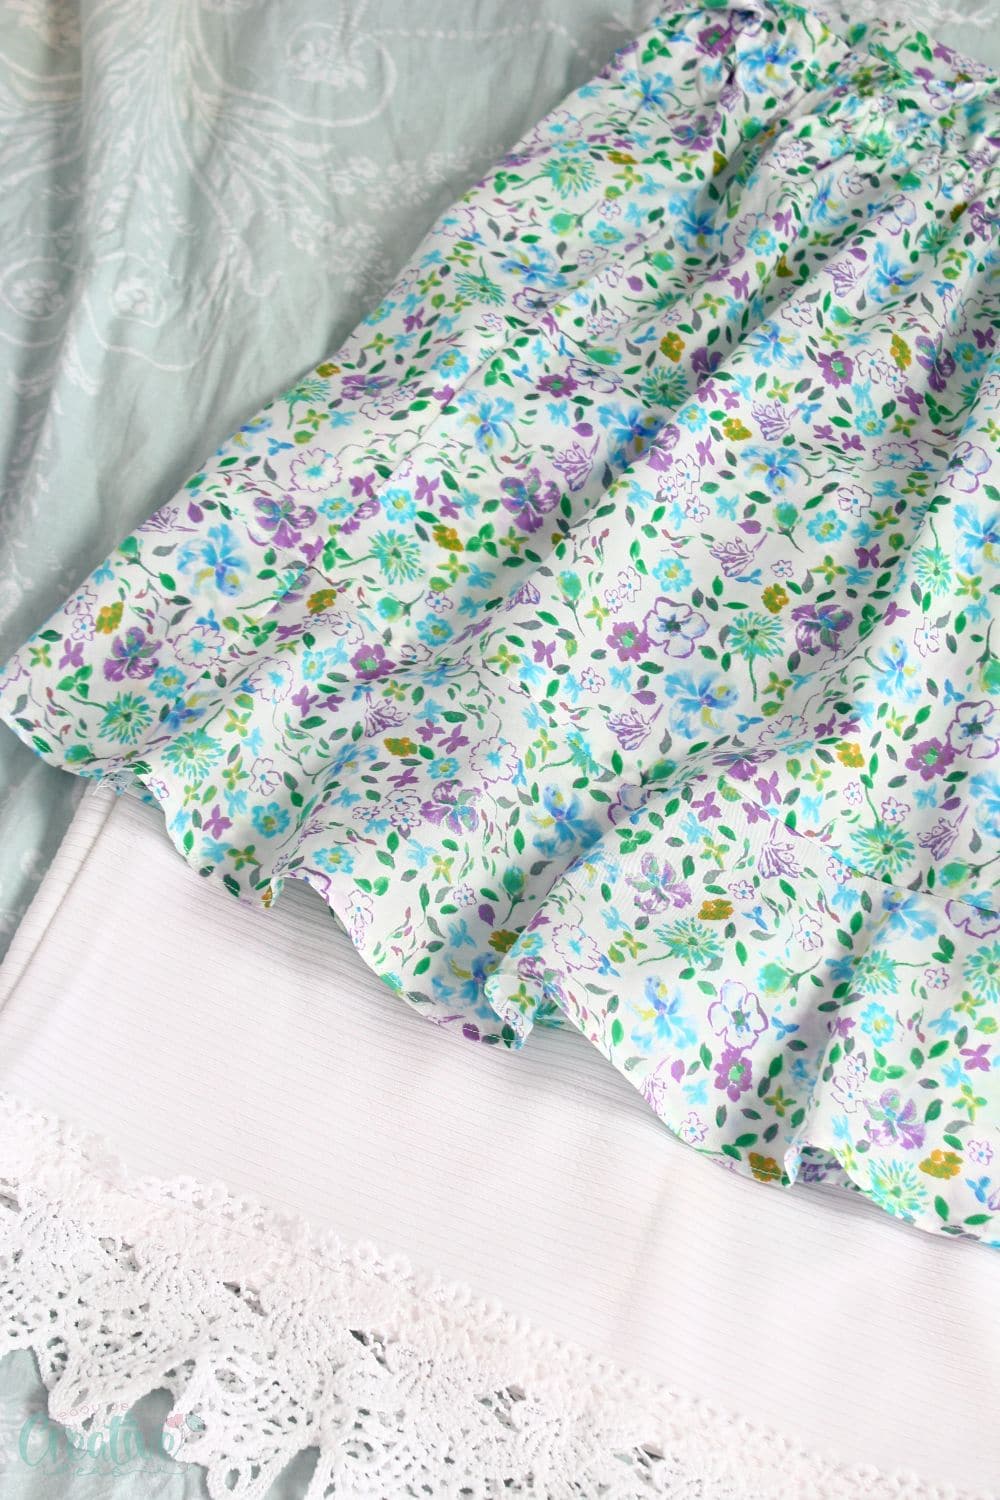
Want to learn how to make a flounce also known as a circular ruffle with ease? Let me show you how you can effortlessly add some flare to your garments with this simple and easy technique!

Learning how to make a flounce is an easy way to add a beautiful ruffle to any garment. While using a gathering foot is a common method for creating ruffles, making a flounce can save you time and offers a unique, sweet touch that sets it apart from traditional gathered ruffles.
This tutorial has been converted to a PDF file, available to purchase HERE. This article is completely free to read.
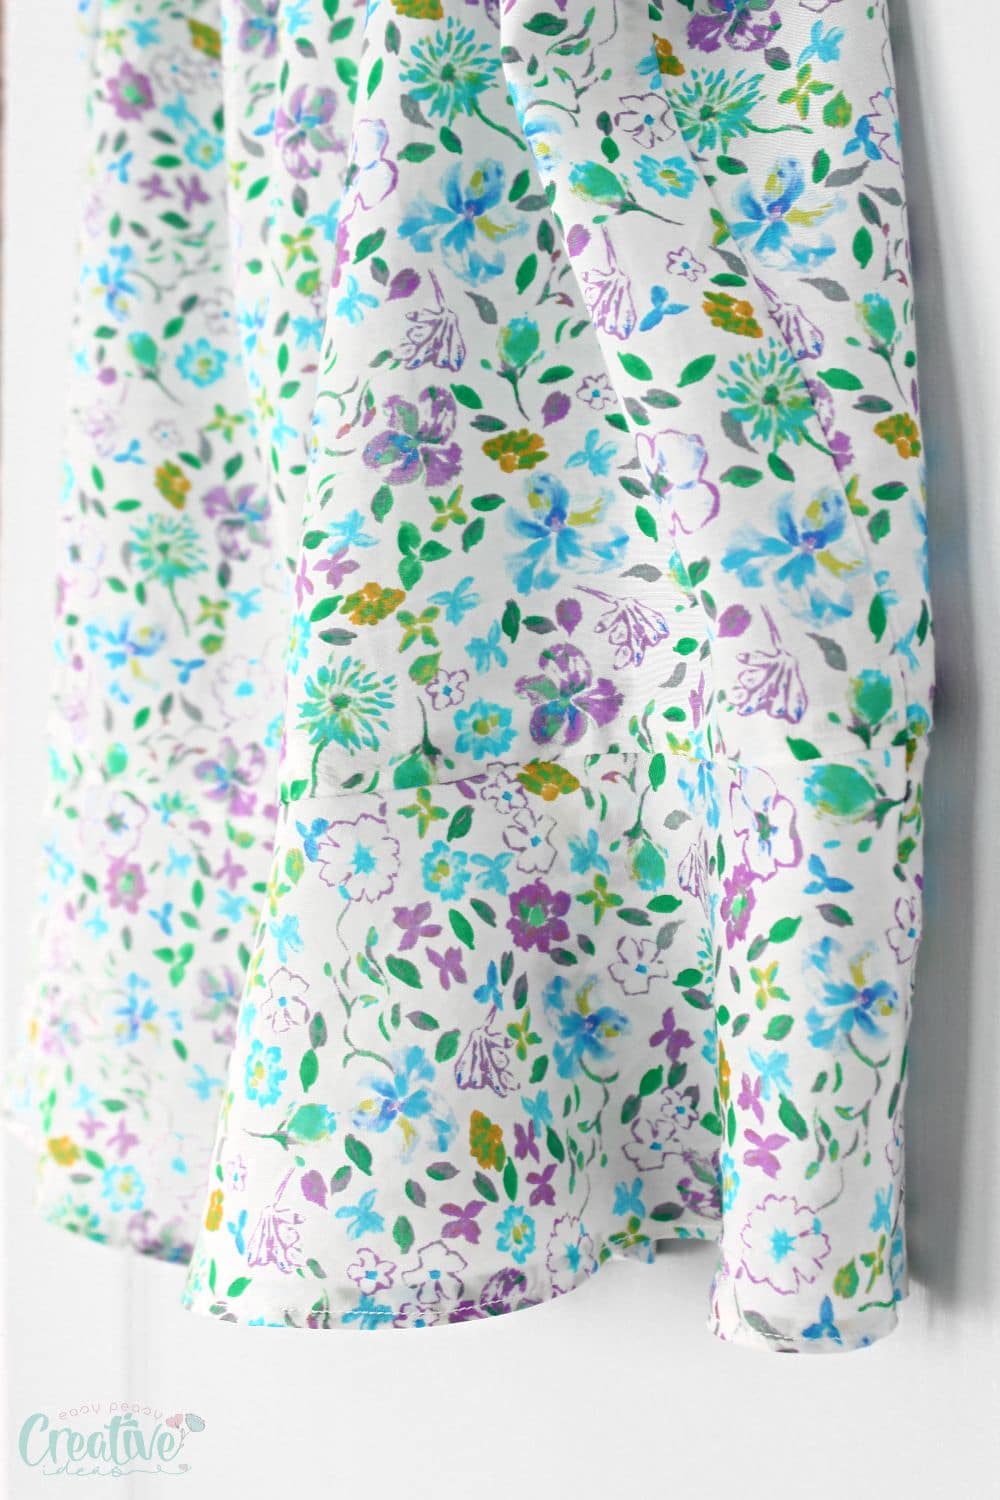
Making a flounce pattern is also super easy for any piece of garment! A flounce hem is basically a circular ruffle cut from a circular piece of fabric rather than a straight strip as you do with a regular ruffle. Below I’ll show you how to make a flounce in just a couple of simple steps. But the basic idea is to cut a strip of fabric in a circle and sew it to a straight piece of fabric (like a blouse, dress or skirt). This straightens the circle and creates a beautiful wave. The size of the curve and the depth of the ruffle creates more of a wave so the deeper the curve, the wavier the ruffle!
In addition to being quick to make and super sweet, a flounce ruffle creates little to no bulk, making it easier to attach to any piece of garment with absolutely no problems. The gathers won’t move as it may happen in a regular gathered ruffle.
How to make a flounce
Materials:
- square of fabric
- measuring tape
- a round object with the circumference the same length or large than the edge of the garment you need to attach the flounce to
- a round object that is smaller than the object above (when picking these objects, bare in mind that the distance between the smaller circle and the larger circle is be the height of the ruffle)
- fabric marker
- sewing shears
- sewing machine
- matching thread
Directions:
There are two ways you can create your flounce, using a half circle strip of fabric or a full circle strip.
Making a half flounce pattern
- You can use a full flounce pattern or a half pattern piece as I did. The reason I wanted to make a half circle flounce is that I needed two layers of flounce. I added one to the front of a blouse and the second one to the back of my garment, then I joined the two piece of the blouse together at the sides.
- The process started with measuring the bottom of my blouse and divided it in half.
- I used this measurement to draw a half circle on a large piece of paper, using a super large bowl.
- After deciding how wide I wanted the flounce, I added that measurement to the circle I drew above and made a smaller circle, inside the larger one, using a smaller bowl.
- Then I used the half circle to cut two flounce ruffles from my fabric.
- You can also make a half circle, fold the fabric in half, place the half circle on the fold then mark and cut out. This will give you a continuous circle that you need to cut open so you can attach it to the garment.
- Don’t forget to add the hem allowance you like, and also for the side seams.
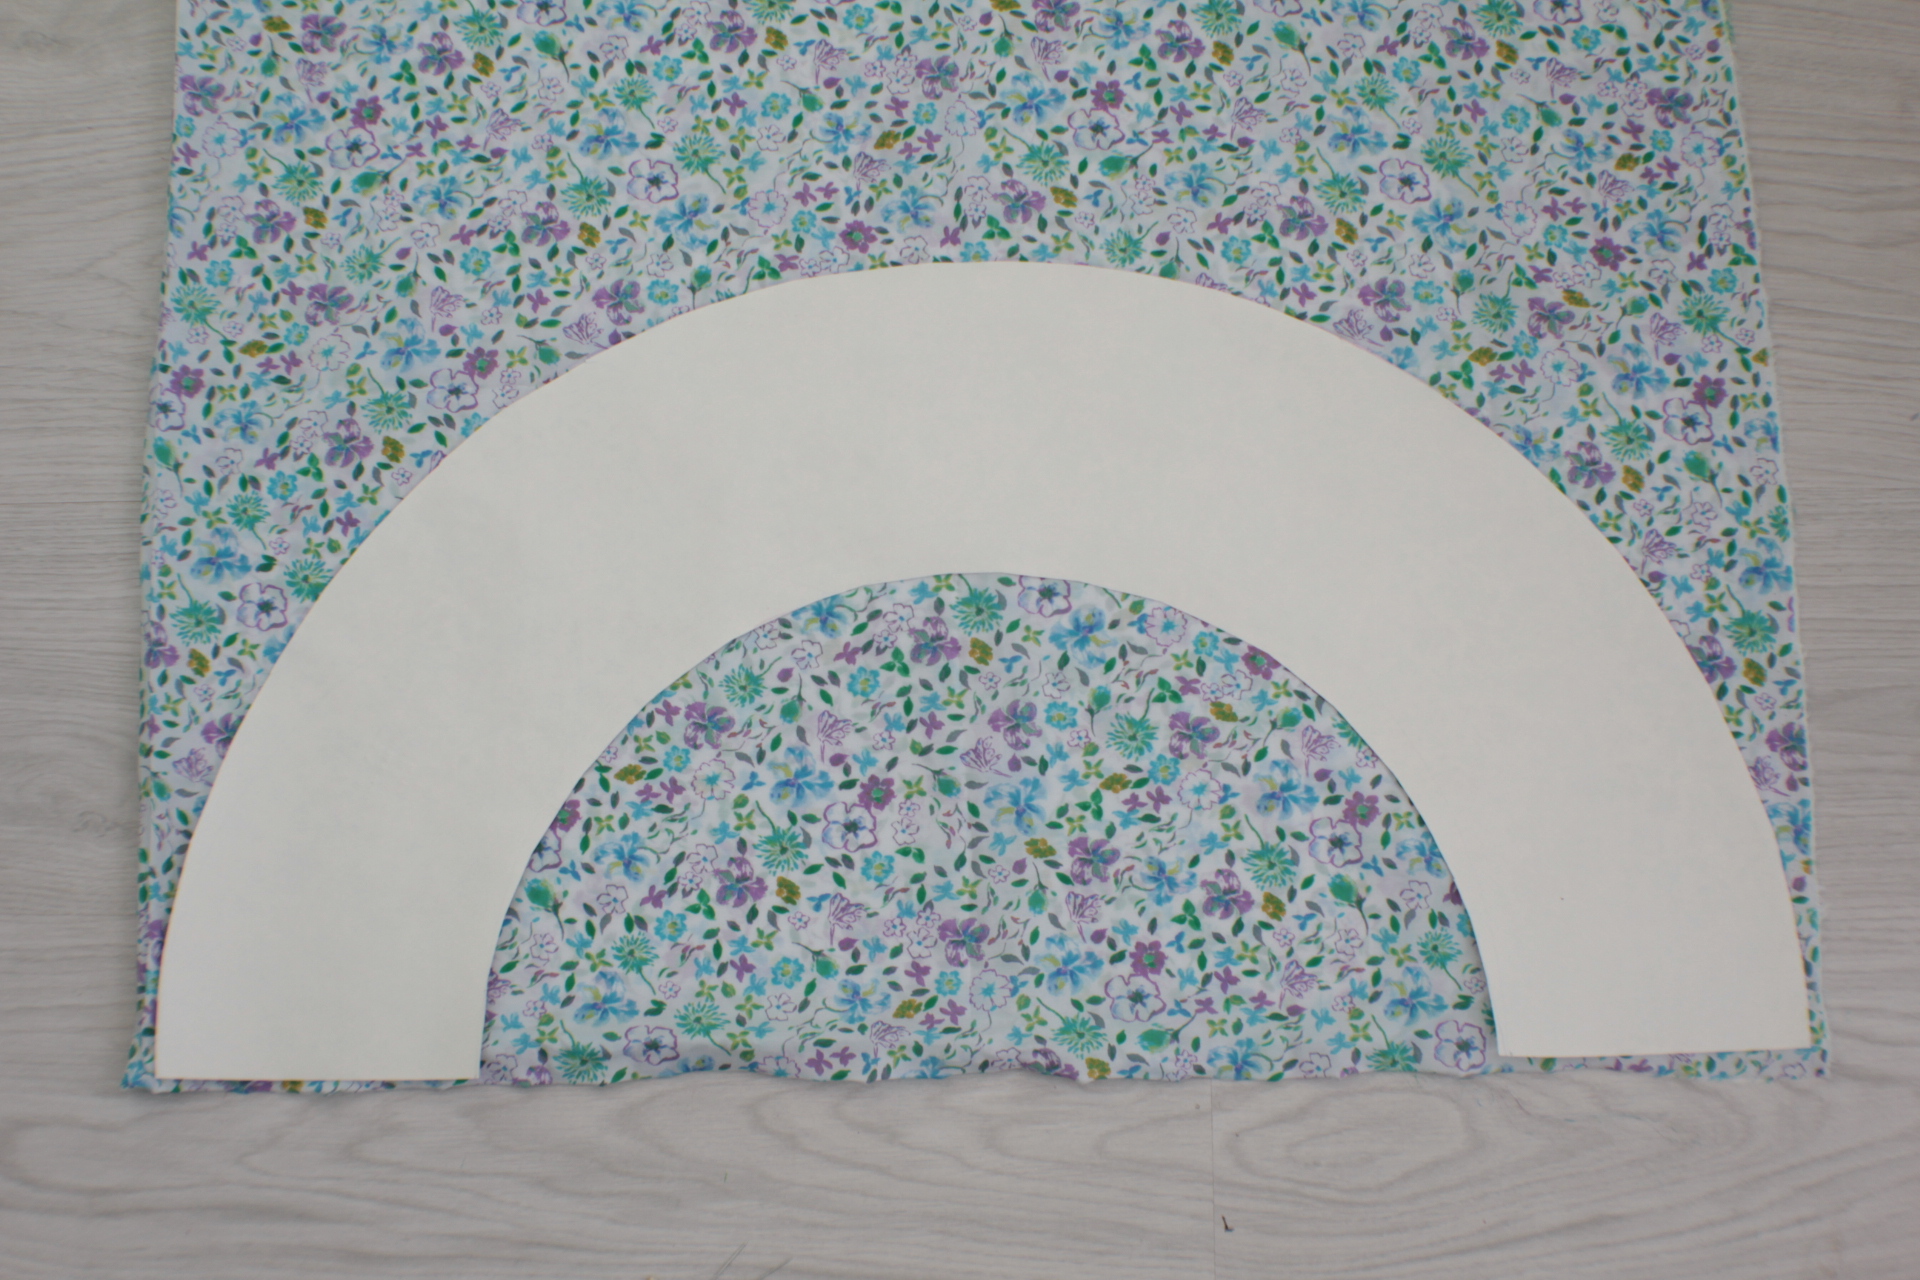
Making a full flounce pattern
- Another alternative is to make a full circle directly on the fabric.
- Lay your fabric square on a table and place the larger round object on the fabric.
- Using a fabric pen, draw a circle around the object, onto your fabric.
- Get the smaller round object and draw a smaller circle inside the first circle.
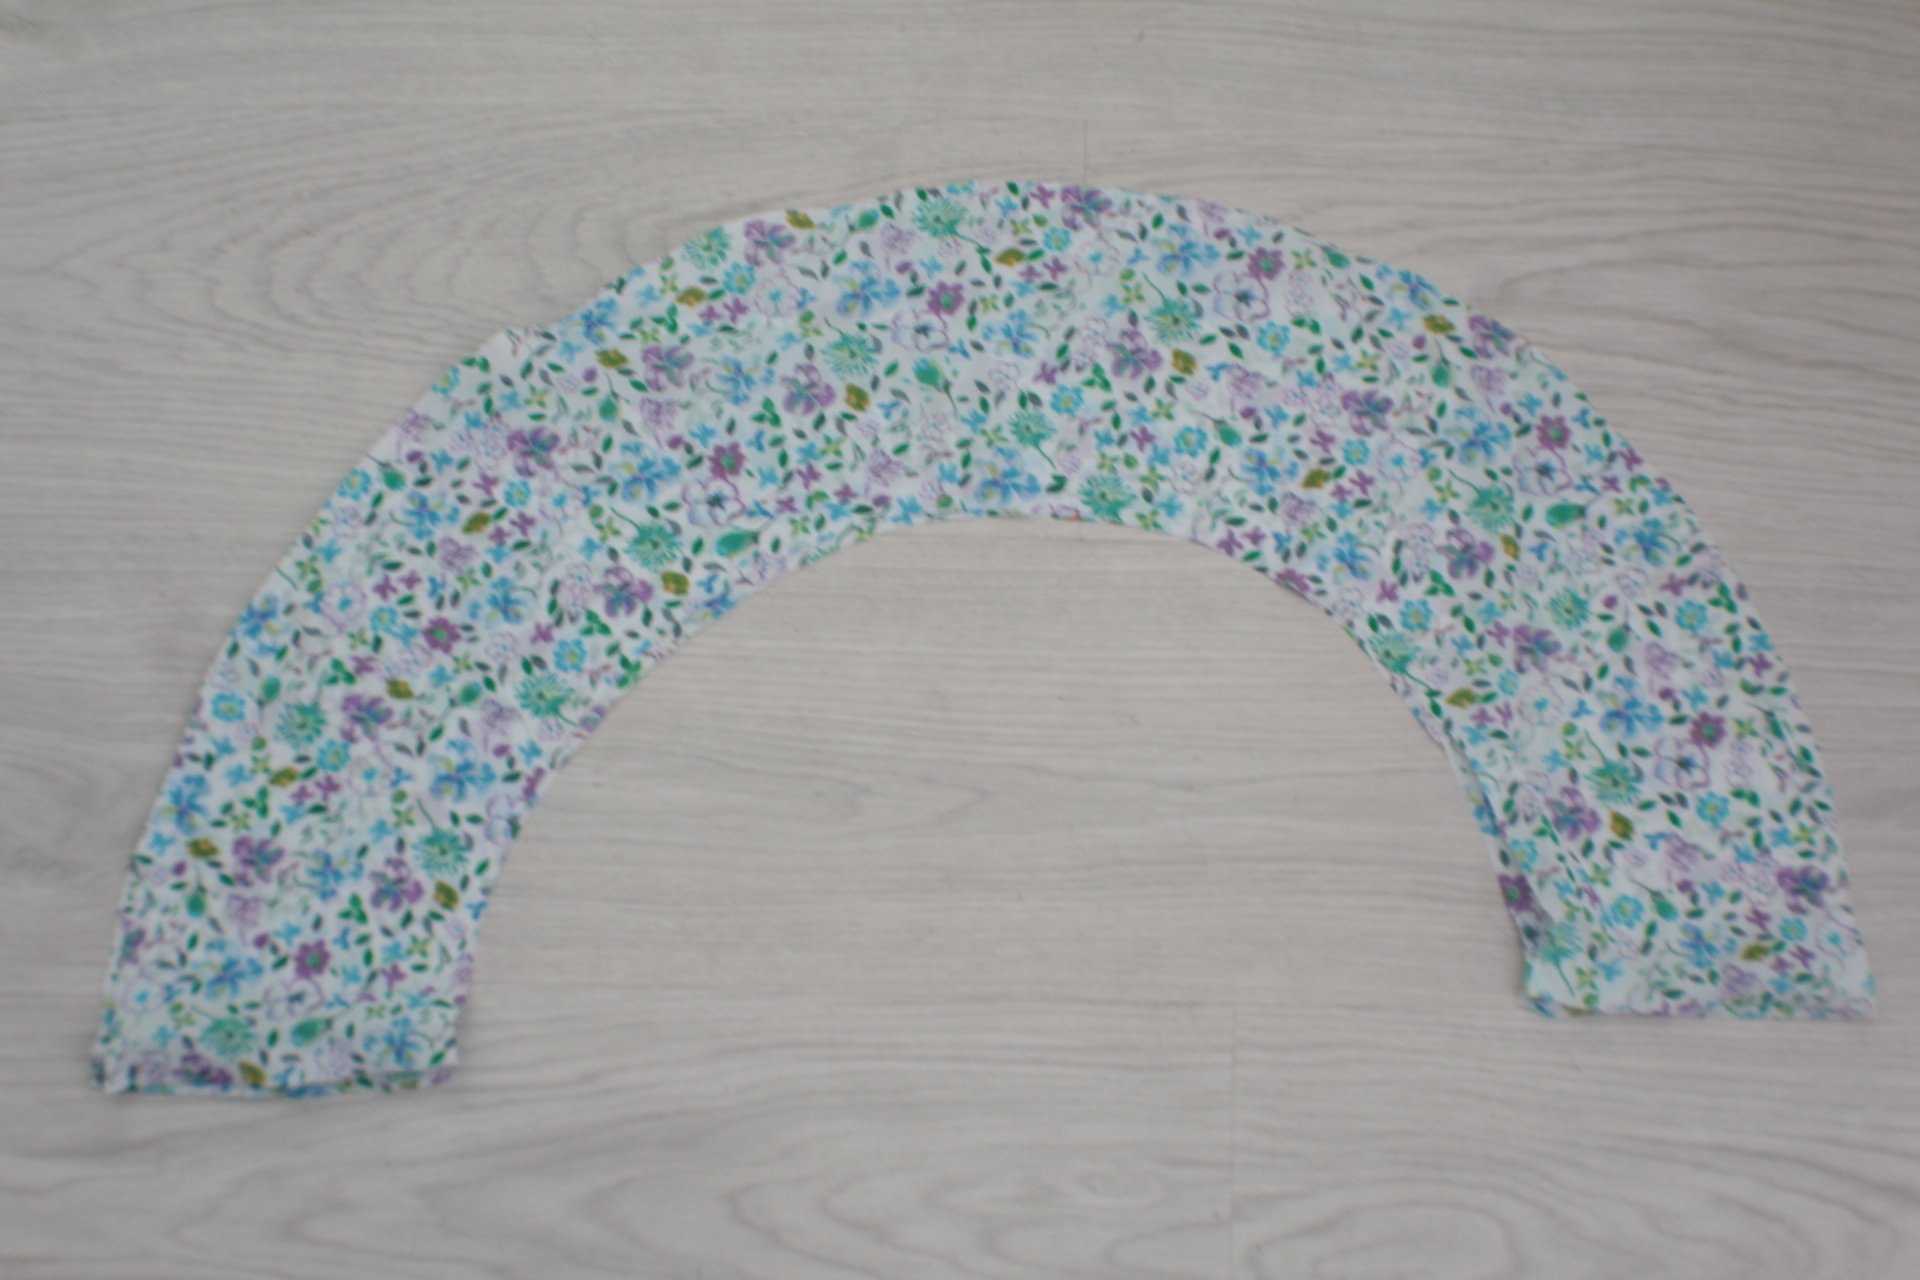
- Using your scissors, cut out the circle in the fabric.
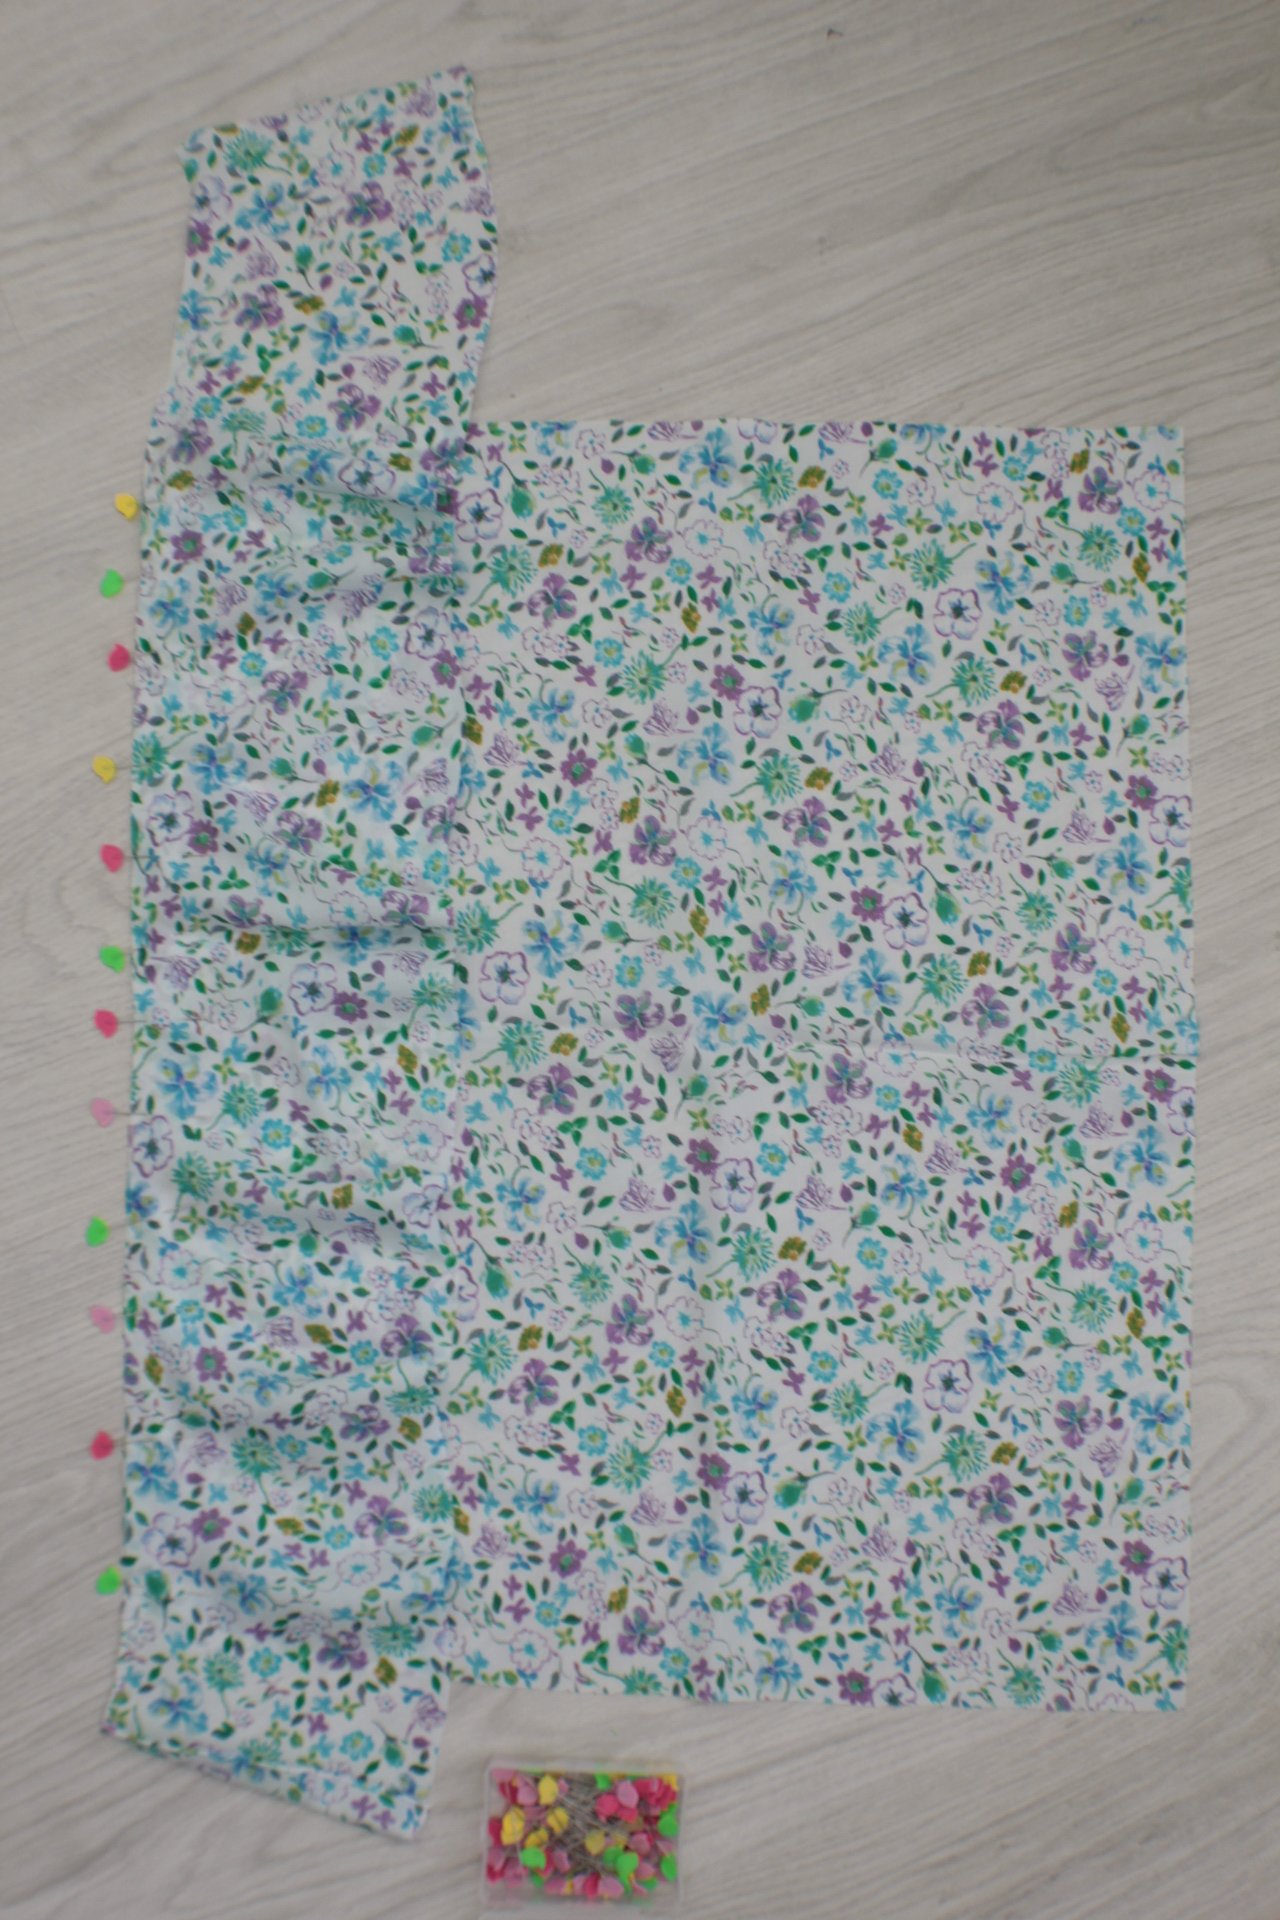
- Attach the inner circle of the pattern to the edge of the garment, fabrics matching at the right side, using a regular stitch then finish the seam with a zig zag stitch or with a serger.
- Finish the outer circle with a regular hem (using this tutorial for sewing a round hem), a narrow hem or a rolled hem, depending on the type of fabric you’re using.

- Please note that if you’re using striped fabric, the direction of the strips in your flounce hem will change in all kinds of different directions, giving an unpleasant look to your ruffle. So you might want to use plain fabric to make your flounce ruffle.
Tips for designing and creating your own flounce ruffle
Now that you have learned the basics of creating a flounce ruffle, here are some tips to help you design and create your own unique flounce ruffle:
- Experiment with different types of fabric to get different looks. Try using lightweight fabrics like chiffon or silk for a more flowy and delicate look, or use heavier fabrics like cotton or denim for a more structured and dramatic effect.
- Vary the width of your flounce to achieve different styles. A wider flounce will add volume, drama, and a nice drape, while a narrower one will give a more subtle and feminine touch.
- Add a double layer flounce or multiple layers by stacking multiple flounces on top of each other, or creating a cascade effect by gradually increasing the length of each flounce.
- Play with asymmetry by placing your flounce off-center or at an angle. This will add interest and create a unique silhouette.
- Use contrasting colors or patterns for your flounces to make them stand out even more.
Frequently asked questions
What is the difference between a ruffle and a flounce?
A ruffle and a flounce are both decorative fabric features that add volume and movement to a garment. The main difference between the two is how they are created – a ruffle is made by gathering a strip of fabric, while a flounce is made from cutting a circular shape and attaching it to the edge of the garment.
Ruffles tend to have more volume and create a more pronounced wave, while flounces are lighter and softer. Both techniques can be used to add beautiful detailing to any sewing project.
What is the difference between a flounce and a peplum?
A peplum is a type of flounce that is attached to the waistline of a garment, creating a short overskirt or ruffle. It adds volume and definition to the waist, making it a popular choice for tops.
The main difference between a flounce and a peplum is that the peplum is usually wider and shorter, while a flounce can be of any length.
How do you calculate flounces?
Calculating a flounce depends on the desired depth of the flounce and the circumference of the garment edge. To create a deeper wave, you will need to use more fabric for your flounce. A general rule is to multiply the length of the curved edge by 1.5 or 2 to determine how much fabric you’ll need for your circular strip.
For example, if the length of the curved edge is 20″ and you multiply it by 1.5, you will need a circular strip of fabric that is at least 30″ in length. This will create a flounce with a more gentle wave. If you want a more dramatic wave, you can multiply the length by 2 and use a 40″ circular strip.
The circumference of your circular ruffle should match the edge of the garment. As for the width (the flounce length), that is up to you. A wider flounce will look better as hems on a peplum skirt, dresses and blouses. A narrower one is best suitable as a hem for sleeves, as a finishing touch to a neckline or as a diagonal detail for blouses, t-shirts or swimsuits.
When I learned how to make a flounce I found it easier to just cut a long strip of circular fabric, attach the inner circle to the garment and then trim the excess off. I didn’t want to accidentally cut a flounce that is too small for my project. But if you’ve confident in your skills, just match the edge of the garment and the circumference of your circular strip and you’re good to go.
More sewing tips you will love
- How to match stripes
- DIY spaghetti straps
- Tips for clipping & notching seam allowances
- How to turn fabric tubes out easily
- Genius tip for sewing super sharp corners
I hope you found this tutorial helpful! I’d love to hear your feedback—feel free to share your thoughts in the comments below. Don’t forget to rate the craft card as well. Thank you!

How to make a flounce
Materials
- square of fabric
- measuring tape
- matching thread
Tools
- a round object with the circumference the same length or large than the edge of the garment you need to attach the flounce to
- a round object that is smaller than the object above (when picking these objects, bare in mind that the distance between the smaller circle and the larger circle is be the height of the ruffle)
- sewing shears
Instructions
Making a half flounce pattern
- You can use a full flounce pattern or a half pattern as I did. The reason I wanted to make a half circle flounce is that I needed two layers of flounce. I added one to the front of a blouse and the second one to the back of my garment, then I joined the two piece of the blouse together at the sides.
- The process started with measuring the bottom of my blouse and divided it in half.
- I used this measurement to draw a half circle on a large piece of paper, using a super large bowl.
- After deciding how wide I wanted the flounce, I added that measurement to the circle I drew above and made a smaller circle, inside the larger one, using a smaller bowl.
- Then I used the half circle to cut two flounce ruffles from my fabric.
- You can also make a half circle, fold the fabric in half, place the half circle on the fold then mark and cut out. This will give you a continuous circle that you need to cut open so you can attach it to the garment.
Making a full flounce pattern
- Another alternative is to make a full circle directly on the fabric.
- Lay your fabric square on a table and place the larger round object on the fabric.
- Using a fabric pen, draw a circle around the object, onto your fabric.
- Get the smaller round object and draw a smaller circle inside the larger circle.
- Using your scissors, cut out the circle in the fabric.
- Attach the inner circle to the edge of the garment, using a regular stitch then finish the seam with a zig zag stitch or by serging it.
- Finish the outer circle with a regular hem (using this tutorial for sewing a round hem), a narrow hem or a rolled hem, depending on the type of fabric you're using.
- Please note that if you're using striped fabric, the direction of the strips in your flounce hem will change in all kinds of different directions, giving an unpleasant look to your ruffle. So you might want to use plain fabric to make your flounce ruffle.
Most popular sewing projects:
Article may contain Amazon & affiliate links. As an Amazon Associate I earn from qualifying purchases at no additional cost to you.

Wouldn’t the smaller circle be the one that needs to match the circumference of the edge you are sewing it to? Otherwise it would not be long enough when straightened out to match the edge to which it gets sewed. Plus the inner circle could get bigger or smaller depending on the length of the flounce, so I would think it would be the more critical measurement. I do think this is a beautiful look and I agree there would be less bulk. I really like the way it looks on the top you made for this tutorial.
Hi, Janet! Thanks for stopping by and for taking the time to comment. The inner radius is always smaller than the edge you are going to attach the flounce to. I “guesstimated” here as I was rushing, as you can tell in the photos I ended up with a longer flounce. But typically the inner circle should be the edge divided by 3,14. The inner circle stretches when pulled straight giving you a longer flounce.
Now you have my mind “circling” around with the idea of a couple shirts being updated with flounce. I’m in the middle of making a rug from a Jelly Roll and the flounce around will have to wait. Great idea.