

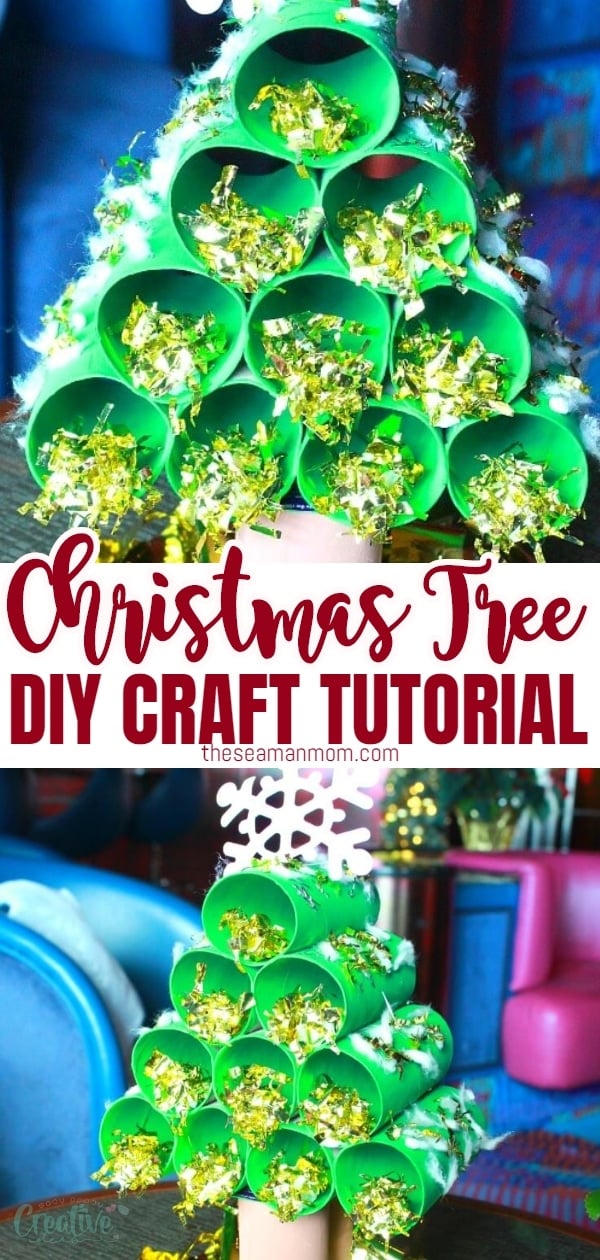
Easy cheap Christmas Tree even kids can make
Bring the holiday cheer to your home with an easy toilet paper Christmas tree craft! Easy and fun to make, this is a great holiday activity for kids and fun for the whole family!
Toilet paper Christmas Tree
If you need a great holiday craft to make with kids, this toilet paper Christmas tree is just perfect! Simple to make, this little craft is a pretty eye catching decor idea and a wonderful way to interact with kids and get them engaged in fun holiday activities. And paper tubes are perfect for kids’ crafts, safe and easy to handle.
More Christmas ideas you will love:
- Fabric covered plywood Christmas tree
- Sock snowmen
- Tinsel garland Christmas wreath
- Scarf Christmas wreath
- Paper Christmas trees
This paper tube Christmas tree is the prefect holiday decor for those who don’t like to deal with the hassle of putting up a big tree and is also ideal for small spaces. Also if you like recycling, this easy paper tube Christmas tree is a great way to put your paper tubes to a good use. And chances are you already have all the supplies on hand.
This is also a great chance to use up any leftover craft supplies you wouldn’t throw away, like ribbons, glitter, confetti, small fabric scraps, beads or any other shiny stuff that could decorate a Christmas tree. Think also of small baubles you don’t use anymore, or bead garlands. Better yet, who not make a DIY garland to decorate your new DIY Christmas tree?
Paper tube Christmas trees are a great craft for school and preschool kids that they can make in groups to spruce up their creativity and communication skills. They can learn to work together and share supplies and will be more than happy with the final result.
What can I make with toilet paper rolls for Christmas?
This little tree is just an idea you can make this Christmas. Being made from scratch, you can make it as small or large as you like, and also add more layers later if you want to. Toilet paper was a huge thing this year, so if you didn’t keep tubes from past TP rolls, you most likely still have a lot more rolls waiting to be used up.
But this is a perfect free craft supply you can make a lot of cute things out of, like these cute gift boxes, for example. Or create a snowman with the kids, or some napkin rings, a phone stand or a glasses case to give as gifts to friends and family.
What are some uses for this toilet paper Christmas tree?
This can be a cute handmade present for friends or family. Everyone appreciates a nice unique present made by their loved ones. Better yet, this paper tube Christmas tree has two sides, so if two builders can’t agree on the decorations, they can just each have their own side to decorate as they like.
Don’t just think of the kids. This kind of paper tube Christmas tree can be a great display for your DIY Christmas decorations or accessories business. An original and ecological way of presenting your works.
If you’re an Advent calendar user, close the rolls and hide small presents inside to make a cute Advent calendar. TP rolls are also great for a lot of other Christmas crafts: elves, gnomes, reindeers, snowmen or Santa figures, but also cut and shaped into cute snowflakes or other Christmas tree decorations. Ask your kids what they think they can make out of them and you might be surprised with their answers.
Making your own paper tube Christmas tree is also a great way to add your personal touch as it’s easy to customize. Keep it classic, give it a rustic feel or decorate it as funky as yourself, no matter your choice, you’re in for a super fun activity that kids will be crazy about. A fair warning though: it can get pretty messy so choose your work area carefully.
To make it quicker, you can just staple the paper rolls together instead of using glue. This way, it’s also going to be a lot less messy.
Paper Tube Christmas Tree Tutorial
Materials:
- paper tubes (I used toilet paper rolls)
- washable paint, green and brown
- soft brittle brush
- School Glue
- scissors
- jumbo paper clips
- green cardboard
- gold foil ribbon or curling ribbon or a small piece of gold tinsel garland
- tissue or toilet paper (or cotton balls) for the gold decorations inside the tubes
- cotton balls for the “snow” (I used the cotton from a few cotton buds)
- small piece of silver tinsel garland
- large snowflake (for the top) or any other decoration you like
How do you make a toilet paper Christmas tree?
Prepare the tubes
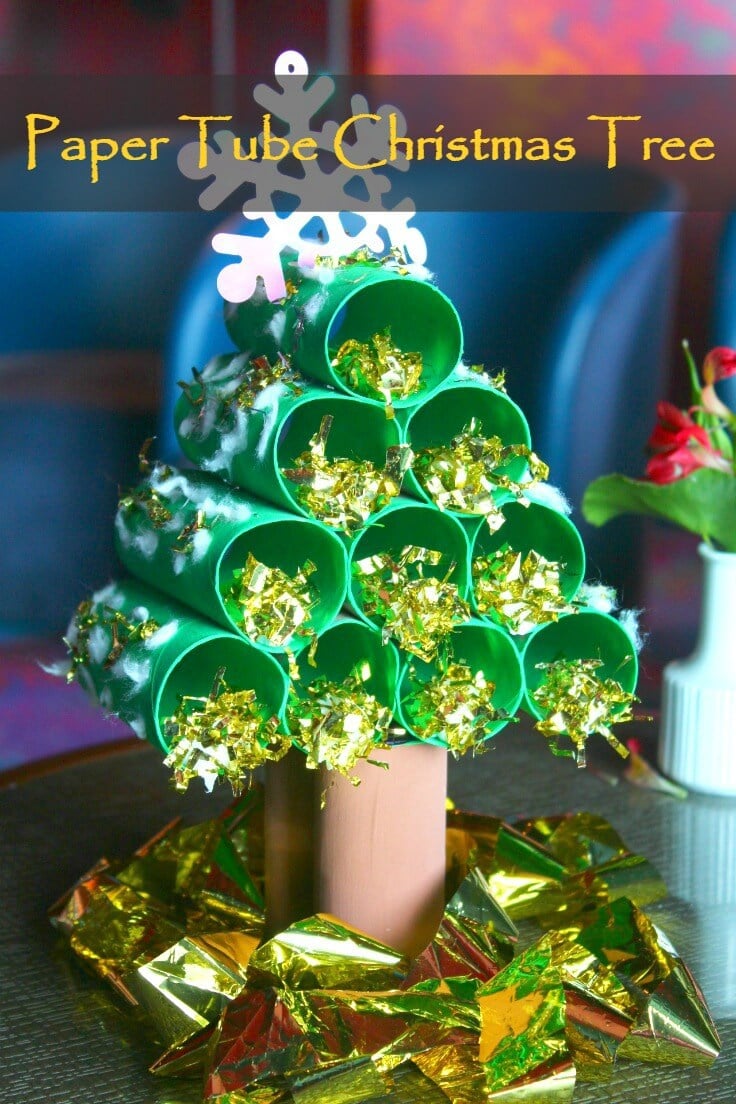
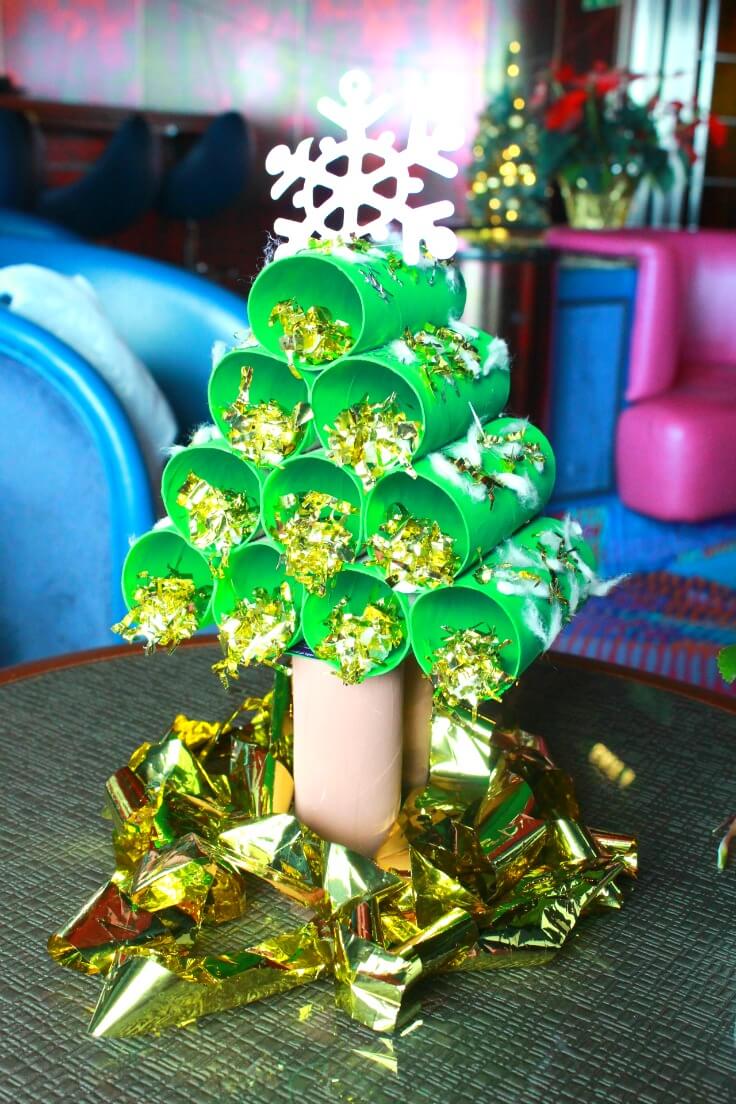
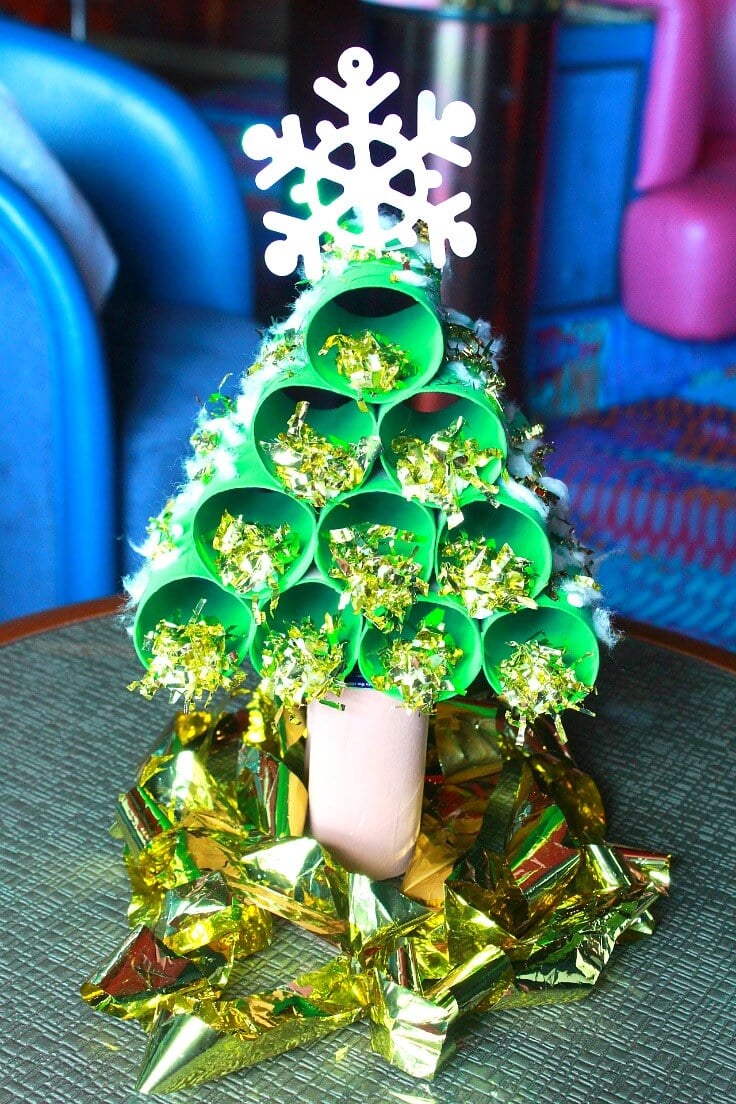
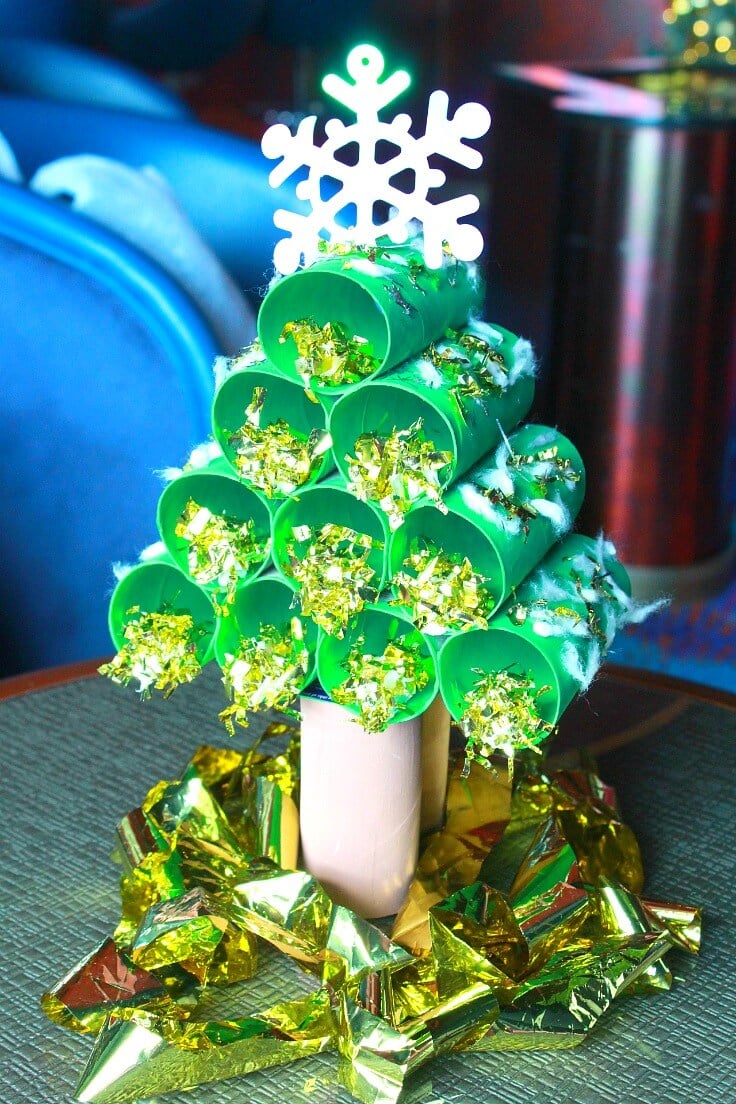
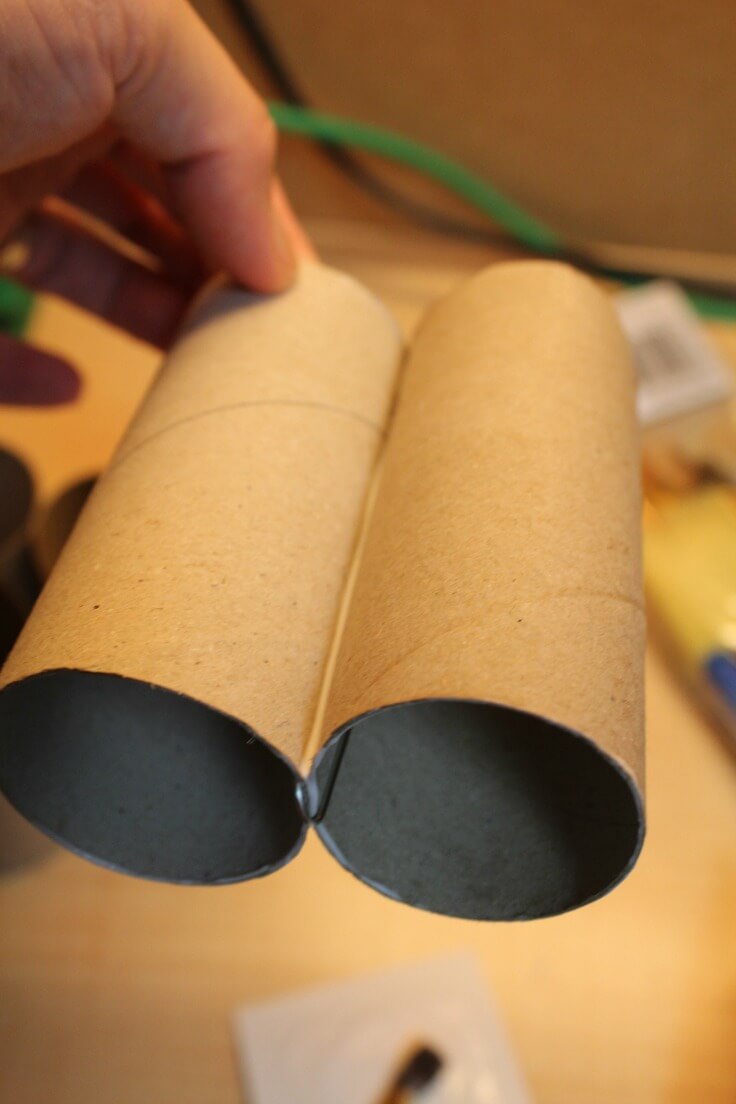
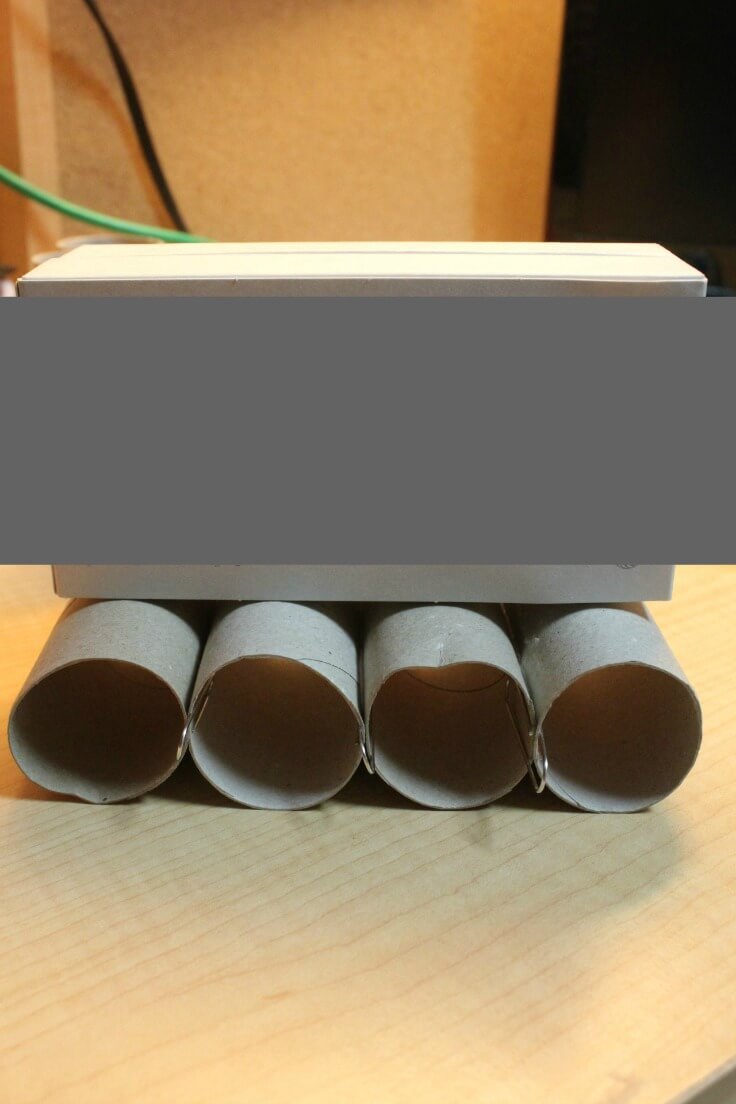
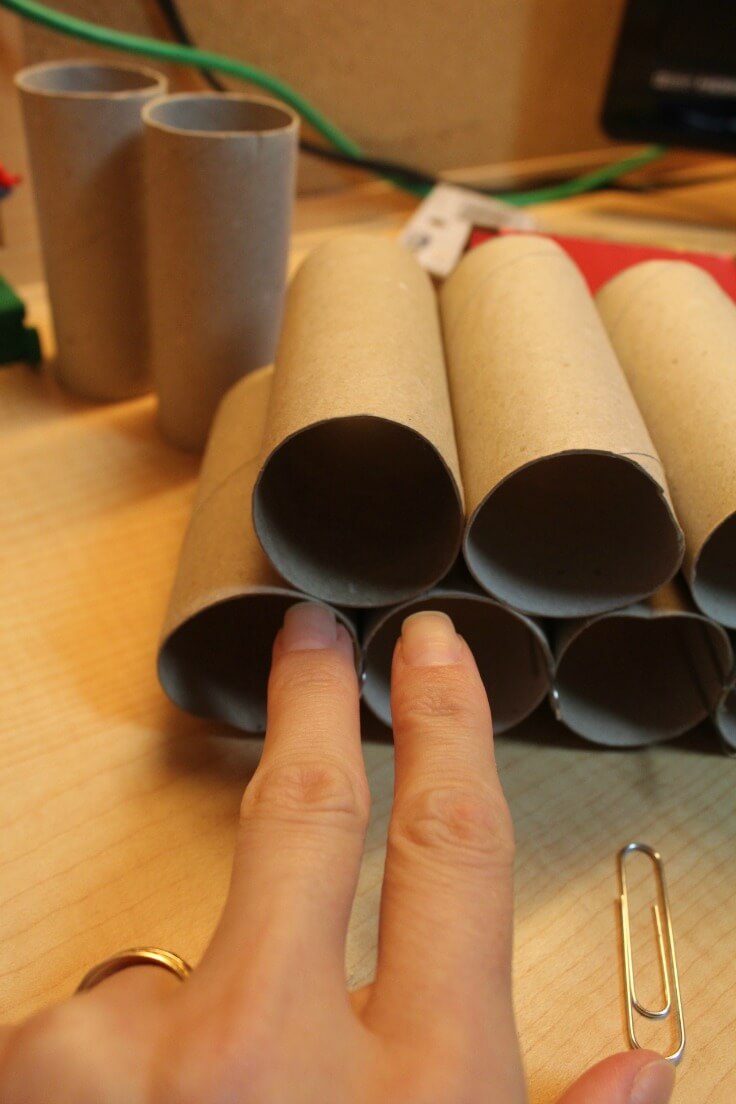
- Peel the paper off of your paper tubes thoroughly, making sure no trace is left on. Decide how large your tree’s base will be and from there work out how many tubes you’ll need. The larger the base the bigger the tree.
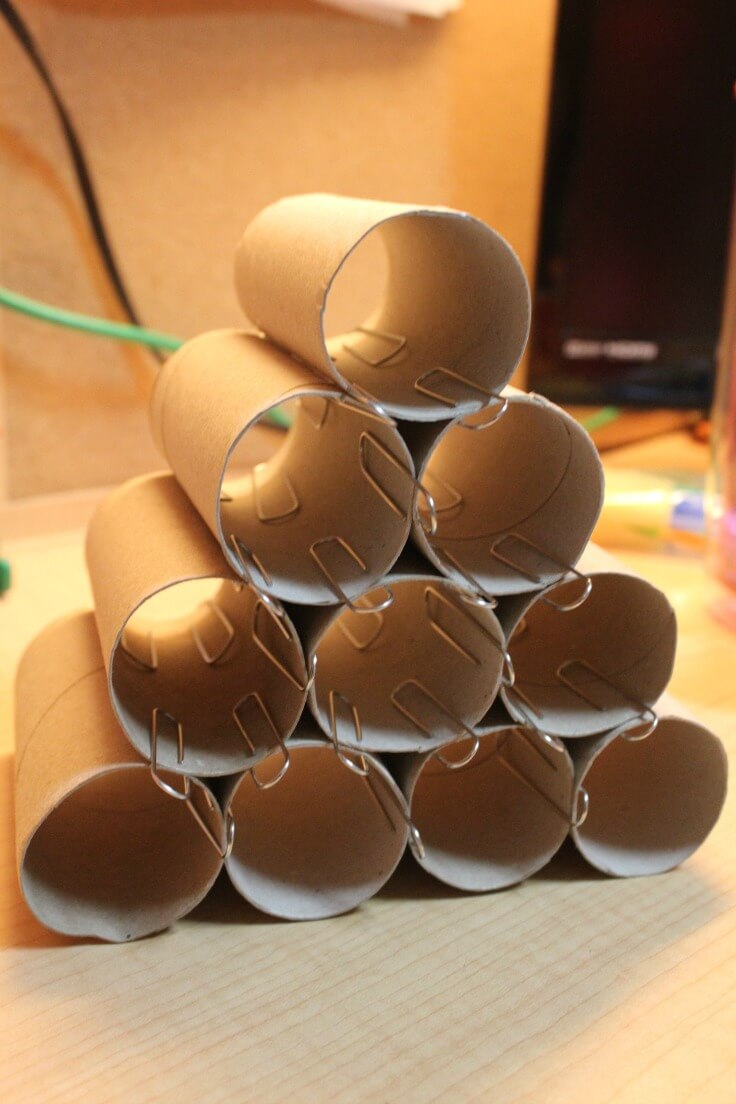
- Apply a thin line of glue on one tube then glue the second one and press lightly. Secure with paper clips at both ends. Continue for the other 2 tubes the same way. Leave to dry.
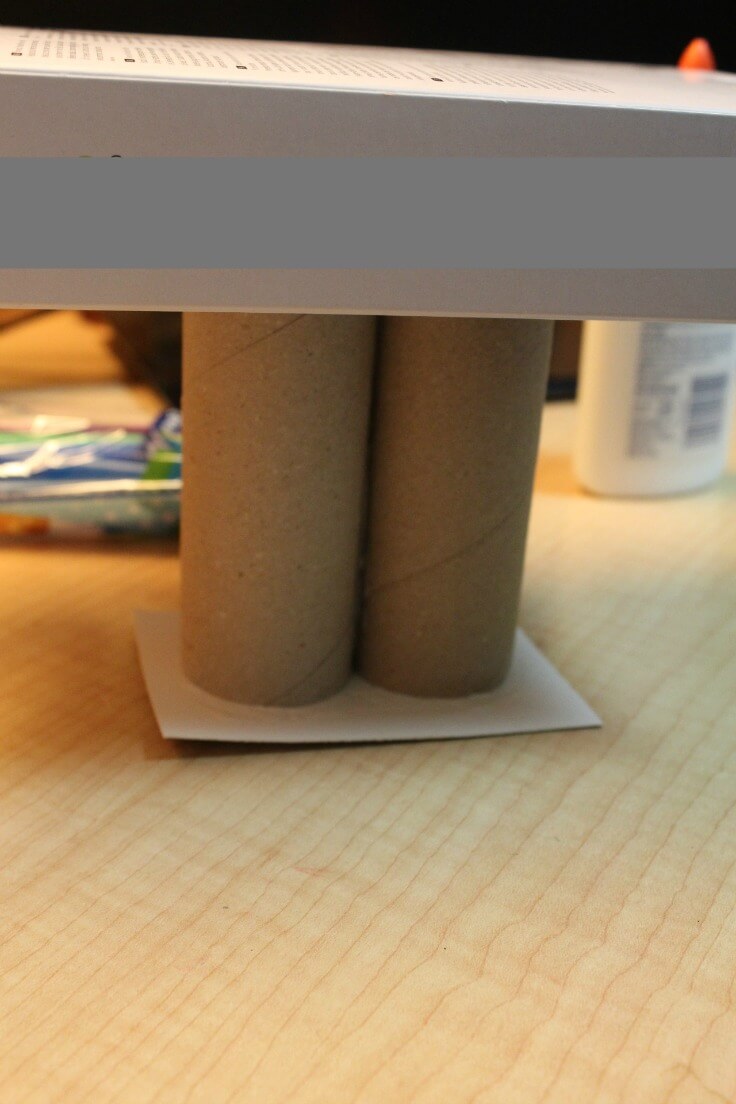
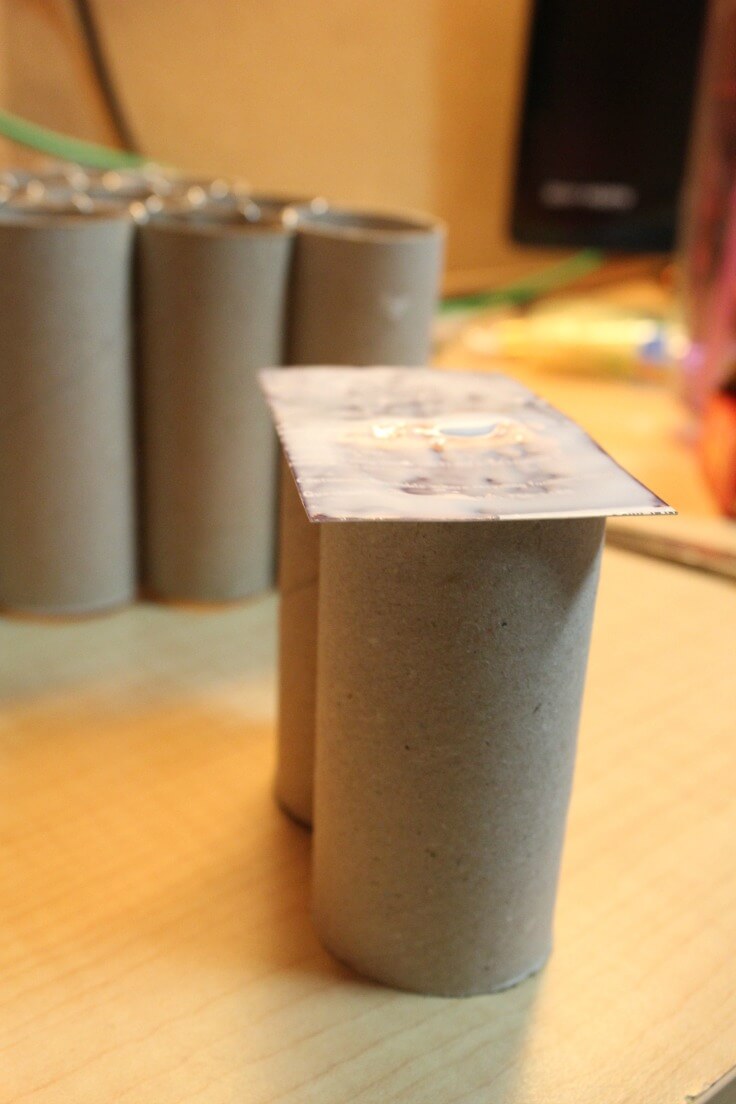
- To make the trunk, glue the trunk tubes together, secure with paper clips at one end, then glue the trunk to the cardboard at the other end. Leave to dry.
- Take another tube and glue it to the base, similar to above. This time though you’ll need to glue the tube in the hollow between two tubes in the base. This row will have to be one tube shorter. Continue this way until you finish your tree; the top will have only one paper tube.
- Apply glue to the back of the cardboard (cut to size according to your tree) and glue it under the base of your tree. Leave to completely dry.
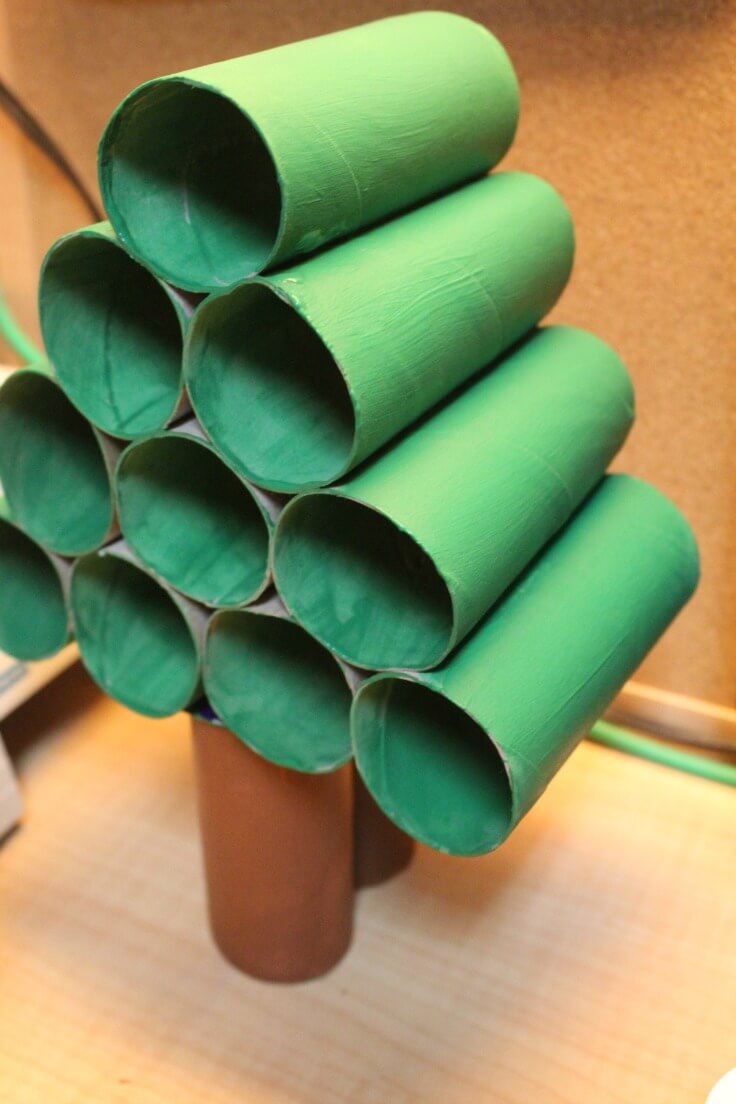
Paint & decorate the tree
- Paint your tree and the trunk. Apply several layers of paint until you reach the desired color, allowing enough time for dying in between applications.
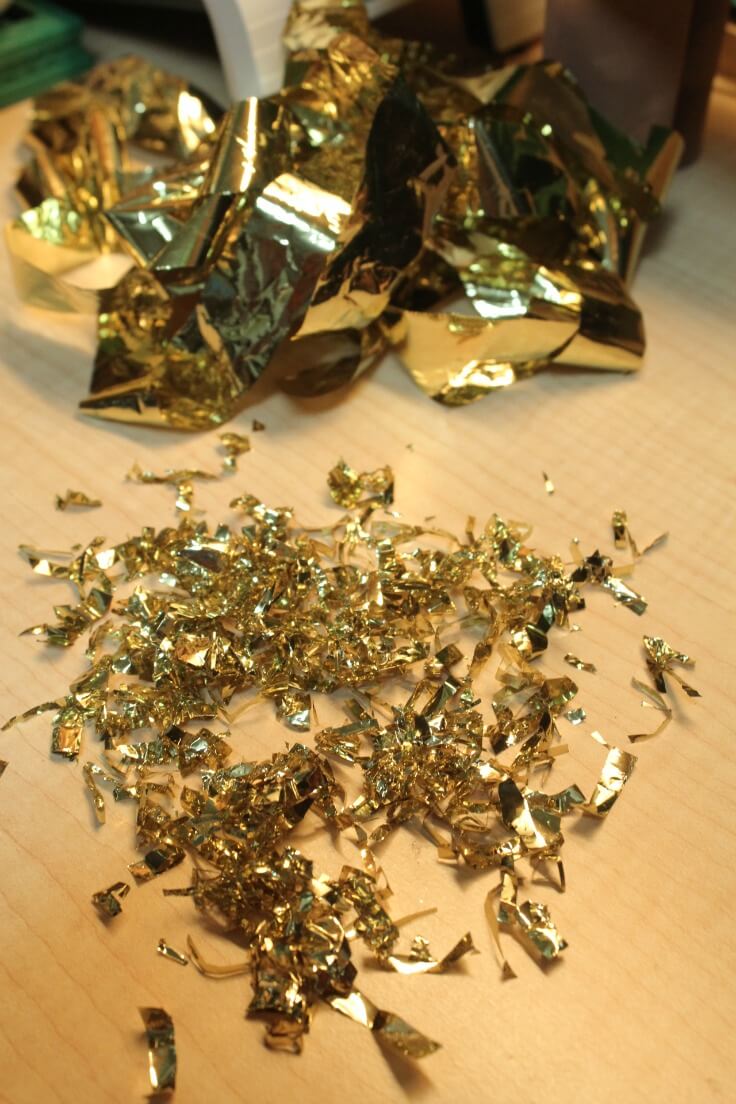
- Get some gold foil and chop in small pieces.
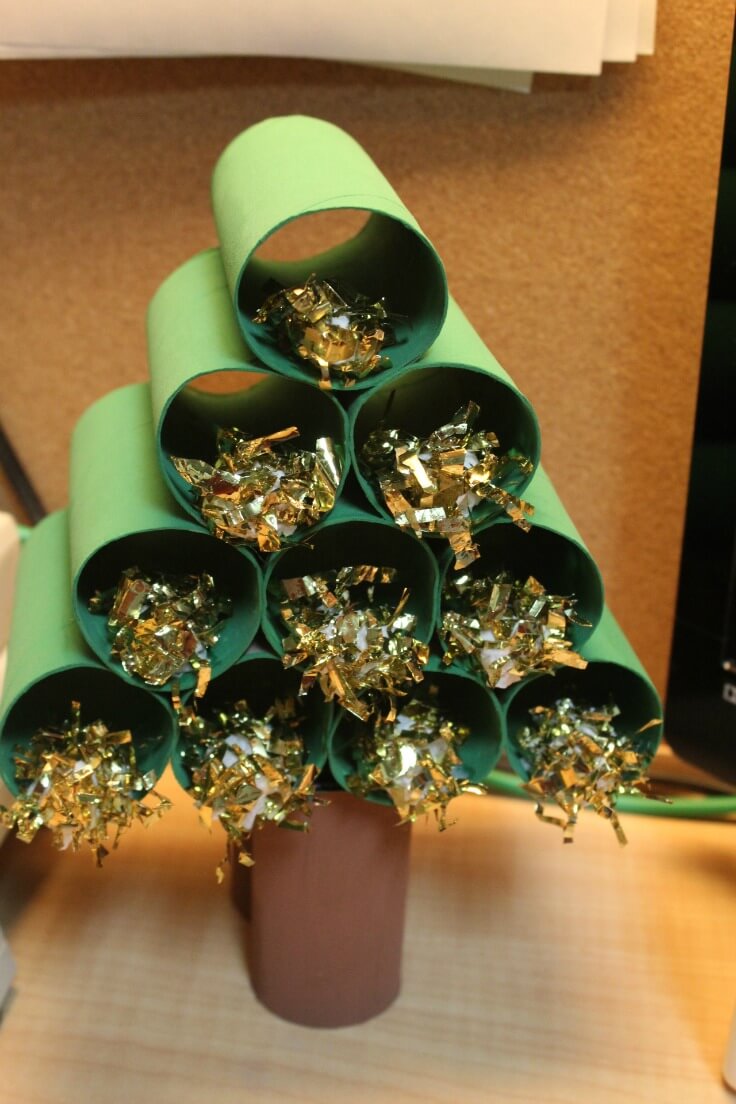
- Get some cotton balls. Cover half of the ball in glue, then dip in the gold foil pieces until fully covered. Apply some glue inside the tubes and attach the cotton balls to the tube, using the end where you didn’t put any foil).
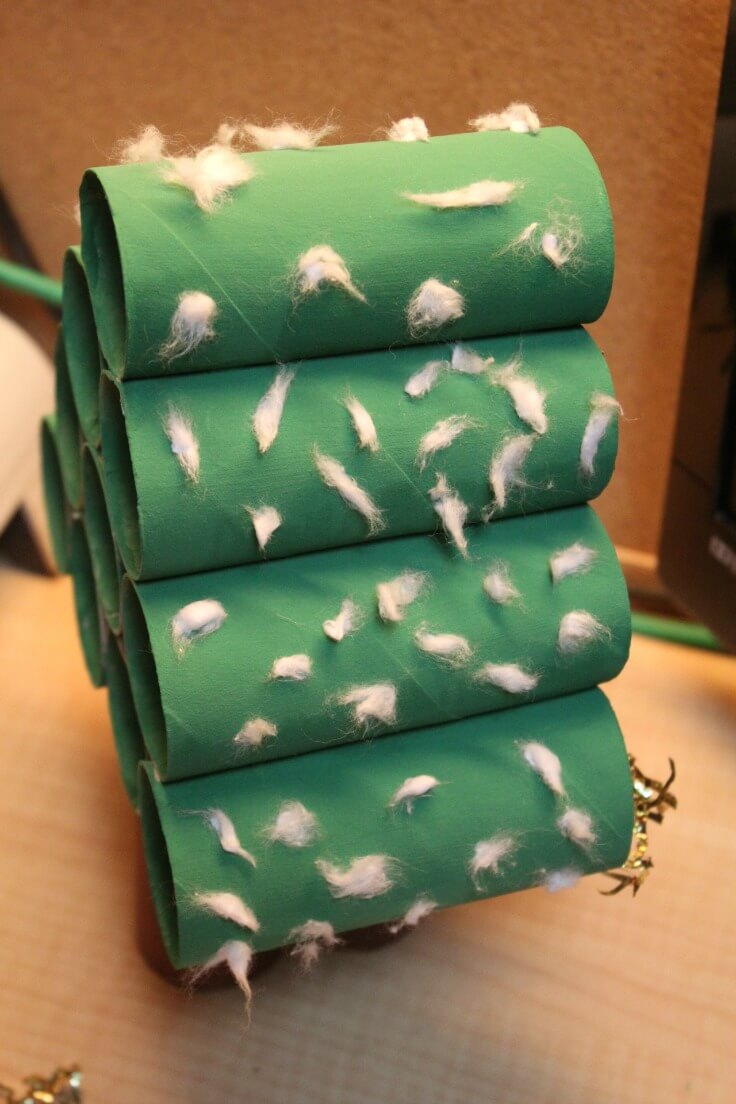
- Take the cotton balls and tear them in very tiny pieces to mimic the snow flakes and apply to the tree with glue.
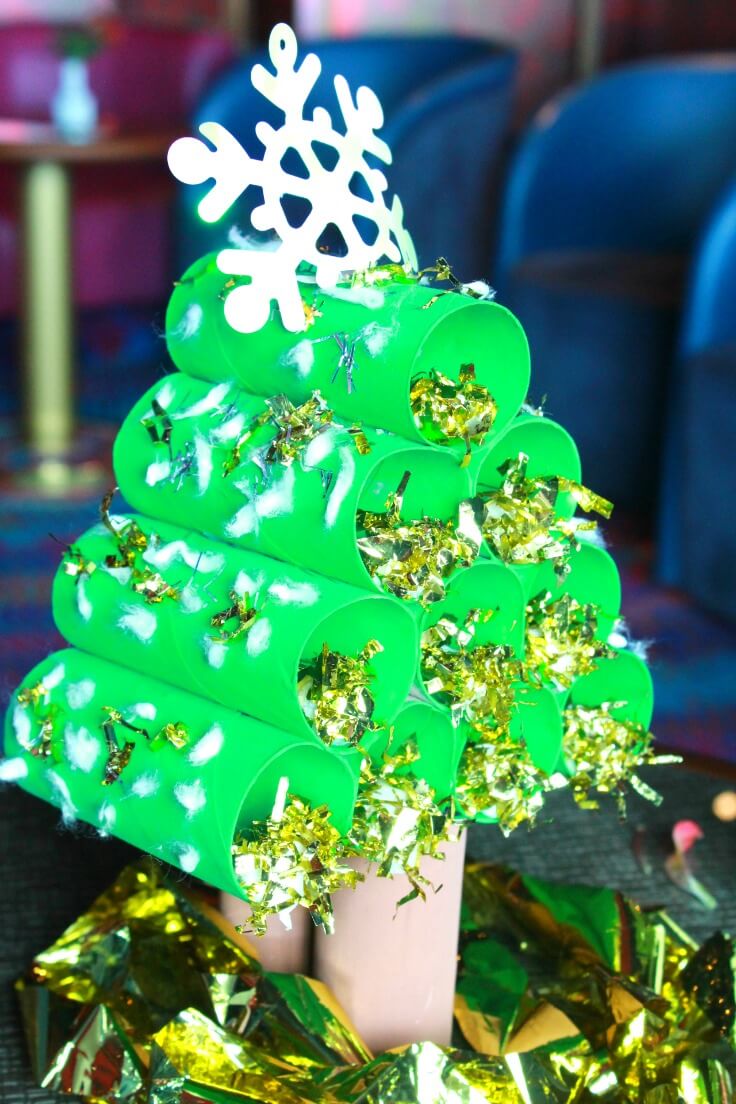
- Apply more gold foil pieces with glue. Take the silver garland and chop in tiny pieces and do the same as above.
- Add the snowflake at the top and you’re done!
Enjoy your paper tube Christmas tree!!
Pin to save for later
Print the craft card

Toilet paper Christmas tree
Materials
- paper tubes I used toilet paper rolls
- washable paint green and brown
- School Glue
- green cardboard
- gold foil ribbon or curling ribbon or a small piece of gold tinsel garland
- tissue or toilet paper or cotton balls for the gold decorations inside the tubes
- cotton balls for the "snow" I used the cotton from a few cotton buds
- small piece of silver tinsel garland
- large snowflake for the top or any other decoration you like
Tools
- scissors
Instructions
- Peel the paper off of your paper tubes thoroughly, making sure no trace is left on.
- Decide how large your tree's base will be and from there work out how many tubes you'll need. The larger the base the bigger the tree. I used 4 for the base so I needed 10 tubes for my tree and used additional 2 for the "trunk".
- Start working at the base. Apply a thin line of glue on one tube then glue the second one and press lightly. Secure with paper clips at both ends.

- Continue for the other 2 tubes the same way. If the tubes seem uneven, apply light pressure while they're drying. Leave to dry for half an hour.
- Meanwhile, work on the trunk. Glue the trunk tubes together, secure with paper clips at one end, then glue the trunk to the cardboard at the other end (where you didn't use a paper clip). Apply small pressure and leave to dry for half an hour.
- Take another tube and glue it to the base, similar to above. This time though you'll need to glue the tube in the hollow between two tubes in the base. This row will have to be one tube shorter, in my case I used three.
- Continue this way until you finish your tree; the top will have only one paper tube. Allow some time between rows, for drying.
- When both the tree and the trunk are completely dry, apply glue to the back of the cardboard (cut to size according to your tree) and glue it under the base of your tree. Leave to completely dry.
- Paint your tree and the trunk (I went for the classic green and brown look but feel free to play around with colors, kids will definitely love the idea!). Apply several layers of paint until you reach the desired color, allowing enough time for dying in between applications.
- Get some gold foil and chop in small pieces.
- Get some toilet paper and make small balls (if you're not living on a ship as I do, chances are you have some cotton balls around the house so better use those). Cover half of the ball in glue, then dip in the gold foil pieces until fully covered.
- Apply some glue inside the tubes and attach the cotton balls to the tube, using the end where you didn't put any glue (aka gold foil up). Do this for as many tubes you like (or all as I did).
- Take the cotton balls and tear them in very tiny pieces to mimic the snow flakes and apply to the tree with glue.
- Apply gold foil pieces with glue.
- Take the silver garland and chop in tiny pieces and do the same as above.
- Add the snowflake at the top and you're done! Enjoy your paper tube Christmas tree!!
Article may contain Amazon & affiliate links. As an Amazon Associate I earn from qualifying purchases at no additional cost to you.
ABOUT PETRO
Hi, I’m Petro, author and founder of Easy Peasy Creative Ideas. Sewist, crafter, avid DIY-er, foodie, photographer, homemaker and mommy to one. I’m an expert at coming up with quick, clever sewing tips, recycling crafts and simple, easy recipes! You can find my ideas featured in reputable publications such as Country Living, Good House Keeping, Yahoo News, WikiHow, Shutterfly, Parade, Brit & Co and more. Thanks for stopping by and hope you’ll stay for a while, get to know me better and come back another time. Stick around for real fun projects! Read more…