

How to gather fabric for even ruffles that won’t shift
Wondering how to gather fabric easily and make perfect, even ruffles? Creating ruffles can be simple and fun with the right technique, and I’ve got the perfect method to help you gather fabric effortlessly. Check out these simple tips below to get started!
Learning how to gather fabric and create perfect, even ruffles that stay in place while sewing doesn’t have to be difficult! If you’re like me, you’ve probably tried making ruffles countless times without much success. But don’t worry, I’ve got the perfect tools and tips to help you master this technique, and I’m excited to share them with you today.
Ruffles are so cute and add fullness to everything: necklines, sleeves, skirts, pillows, hems, and many others. If you’ve been following me for a while, you might have noticed that I love ruffles and pleats and I try to add them to many projects, like aprons, mug rugs or dresses.
When I made this ruffled bed skirt, I promised a quick tutorial on how I gather fabric. I discovered this method by accident, but I’m sure it’s been around for a while, most sewing techniques are just updated versions of old ones!
When I started sewing, I learned how to gather fabric by setting my stitch length and thread tension to the highest settings so my machine would create ruffles automatically. The ruffles looked great, perfectly even and beautiful! But as soon as I sewed them to the main fabric, the presser foot shifted them, and undid all my work.
That method didn’t work for me, so I came up with a better one. In this tutorial, I’ll show you how to gather fabric on a sewing machine to make even, secure ruffles that hold their shape when sewn, without breaking the thread when you adjust them.
How to gather fabric
Materials:
- Fabric Strips – You’ll need two strips of fabric for your project. Choose a fabric type and pattern that suits your design. Whether it’s cotton for a beginner-friendly project or something more advanced like silk, make sure the fabric is pre-washed and ironed to avoid shrinkage later.
- Matching Thread – Pick a thread that matches the color of your fabric for a seamless finish. Opt for high-quality thread to ensure durability and avoid unnecessary breaks while sewing.
- Sewing Machine – A good quality sewing machine is your ultimate tool to speed up the process and achieve clean, professional stitches.
- Scissors – A good pair of sharp dressmaker scissors is essential for precise cuts. Avoid using them for anything other than fabric to maintain their sharpness.
- Pins – Pins are invaluable for holding fabric pieces together before sewing. Look for pins with colored heads to make them easier to find and remove as you sew.
- Pressing Iron – A pressing iron is key to achieving a polished look. Pressing seams and hems as you go will make your project look neat and professional.
Instructions:
A side note
To make things easier to see in this tutorial, I used contrast thread in different colors but on a regular project, please use matching thread. Also since I haven’t included these ruffles into any garment (I only made them for the purpose of this tutorial) I haven’t paid much attention on pressing the ruffles nicely so they don’t look that pretty. Please take the time to press yours properly if you incorporate them into a piece of clothing.
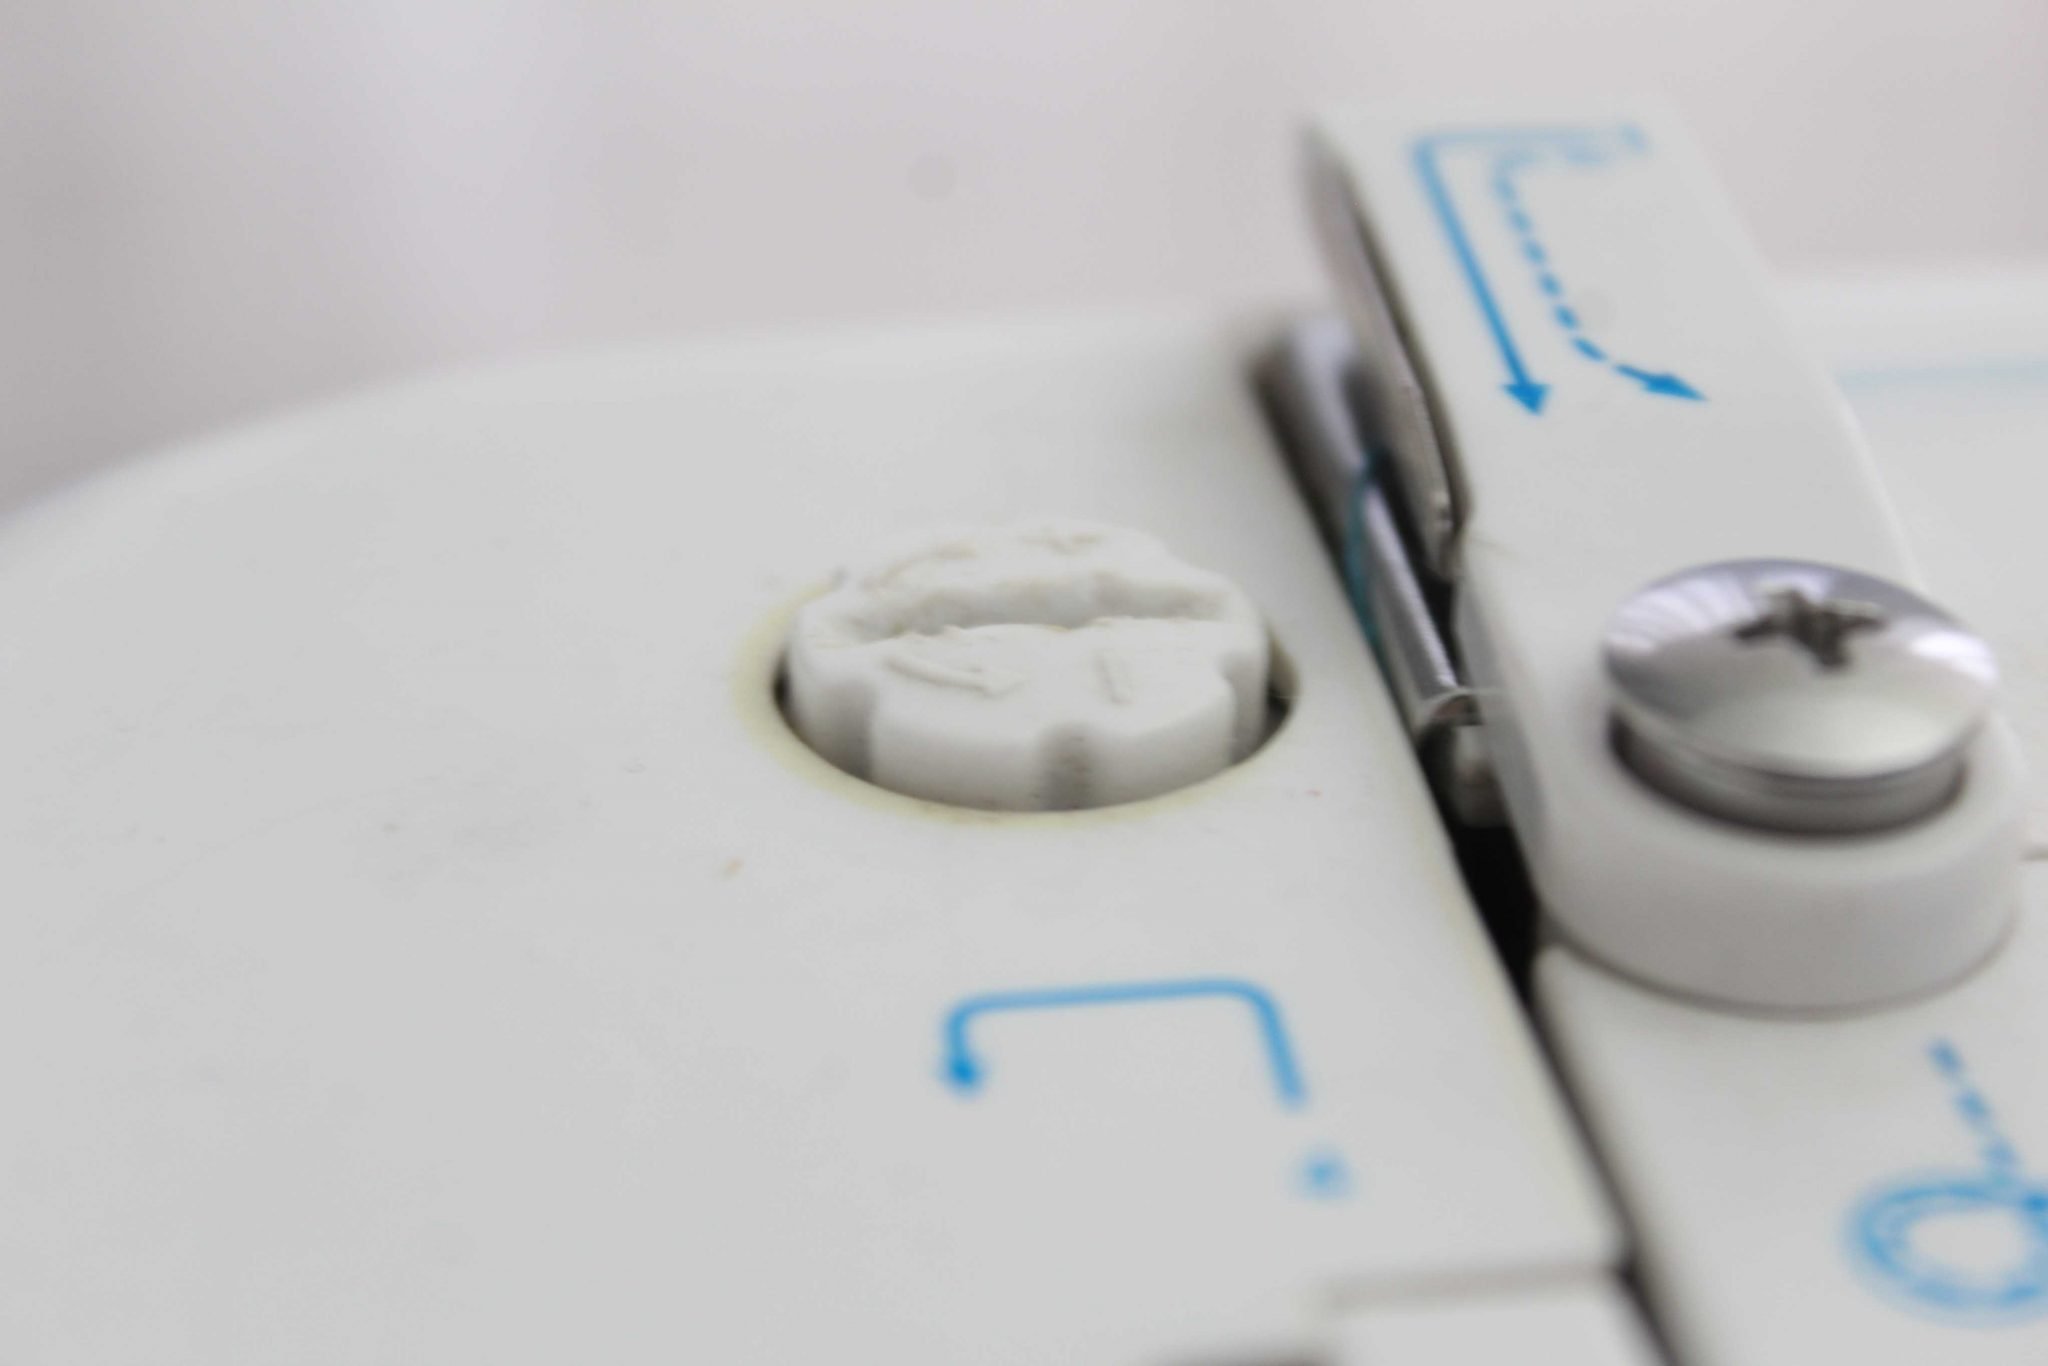
Set up your machine
- Set your machine to the longest stitch length and a regular thread tension. These were mine on a Singer 1507.
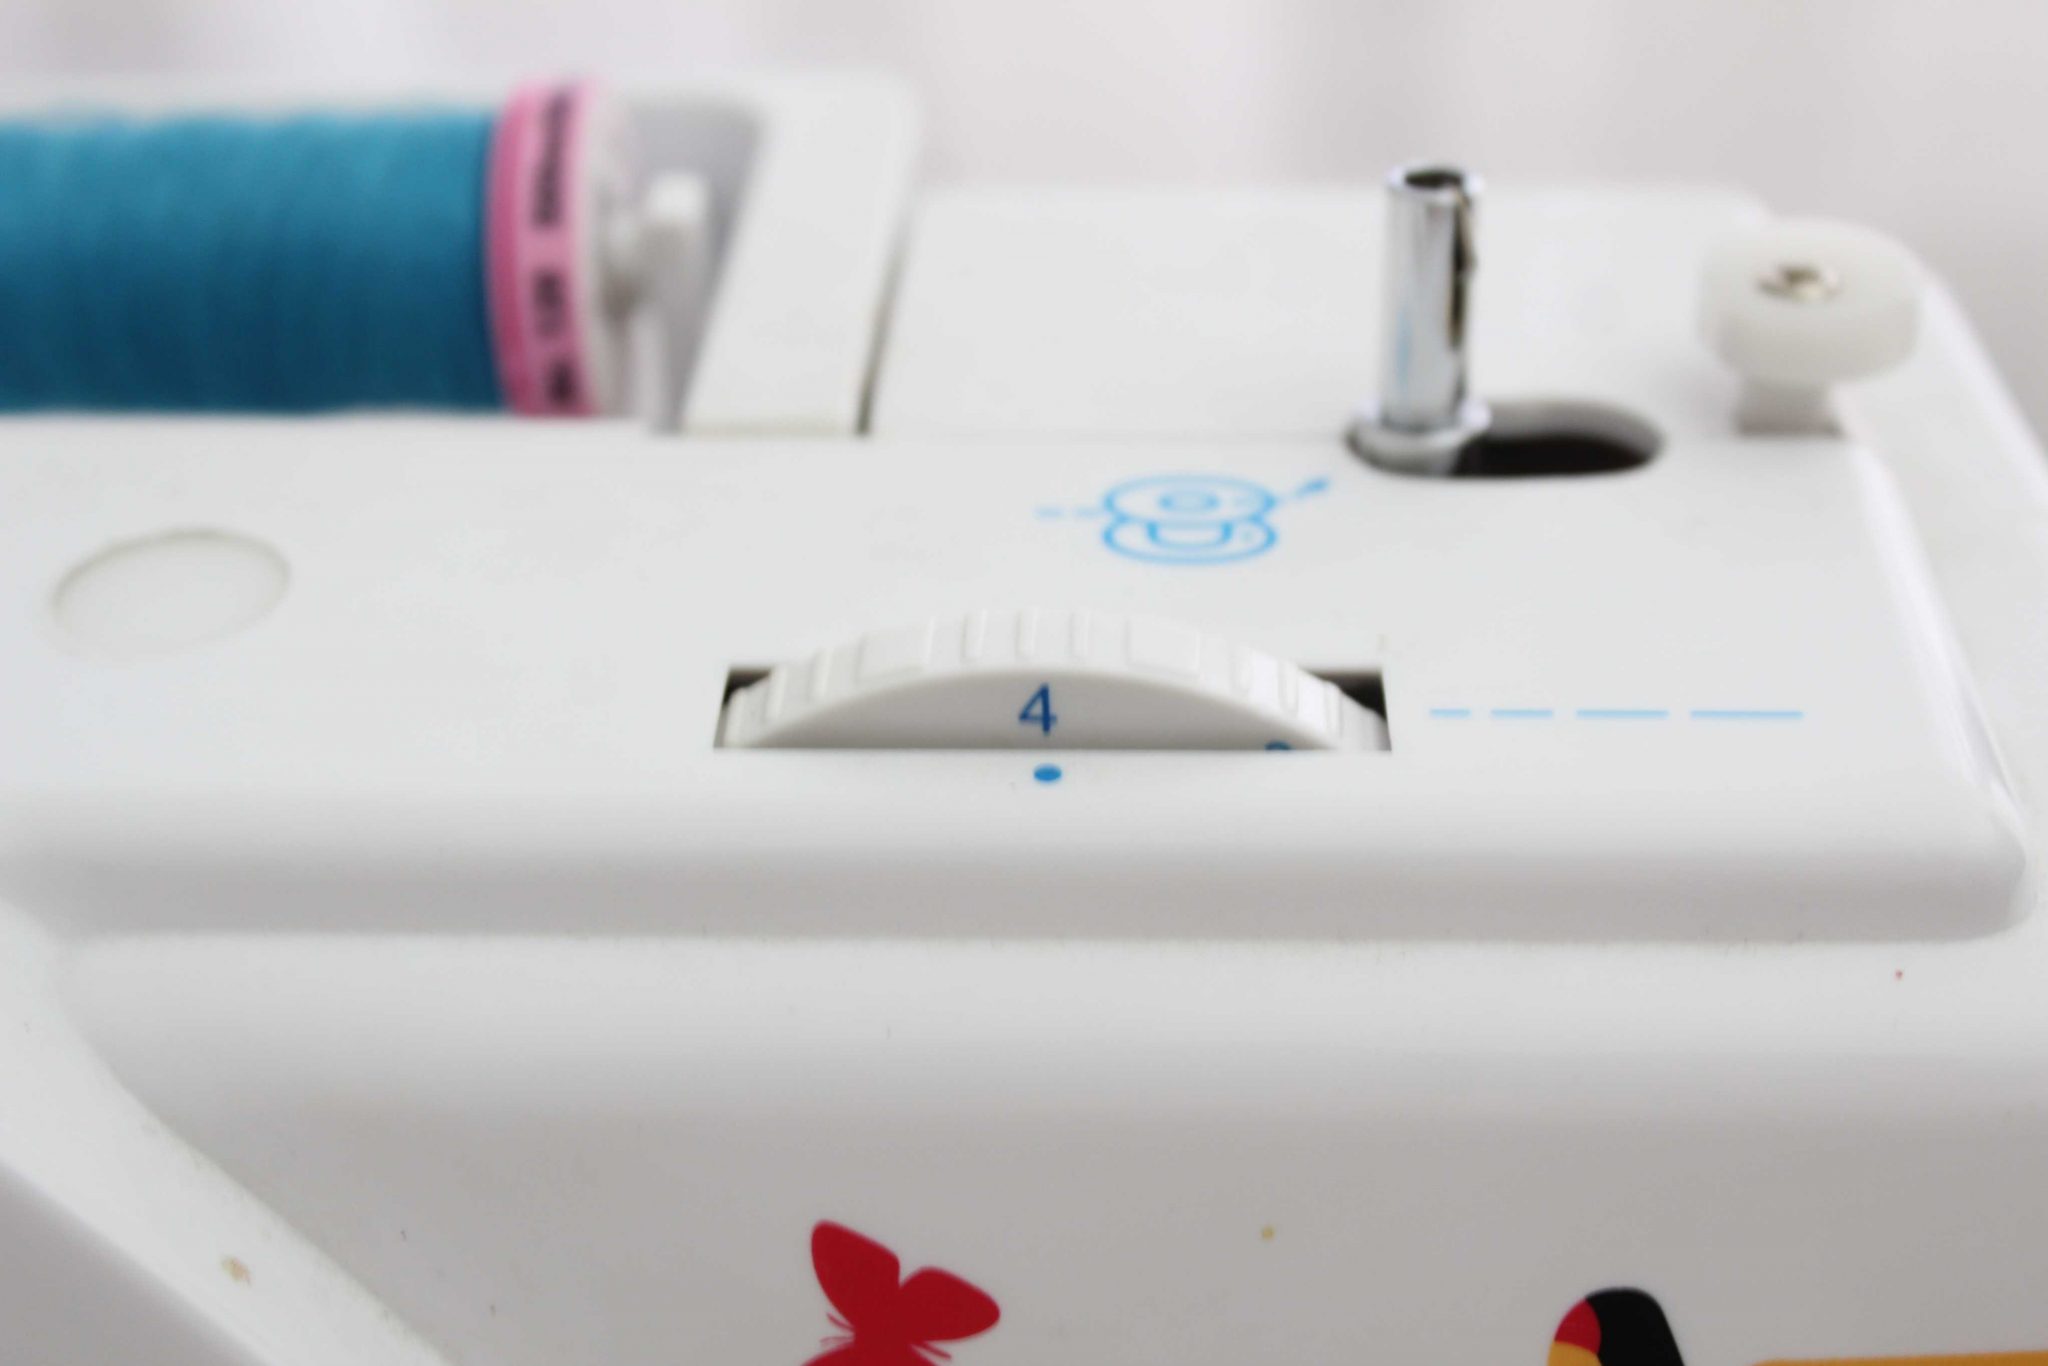
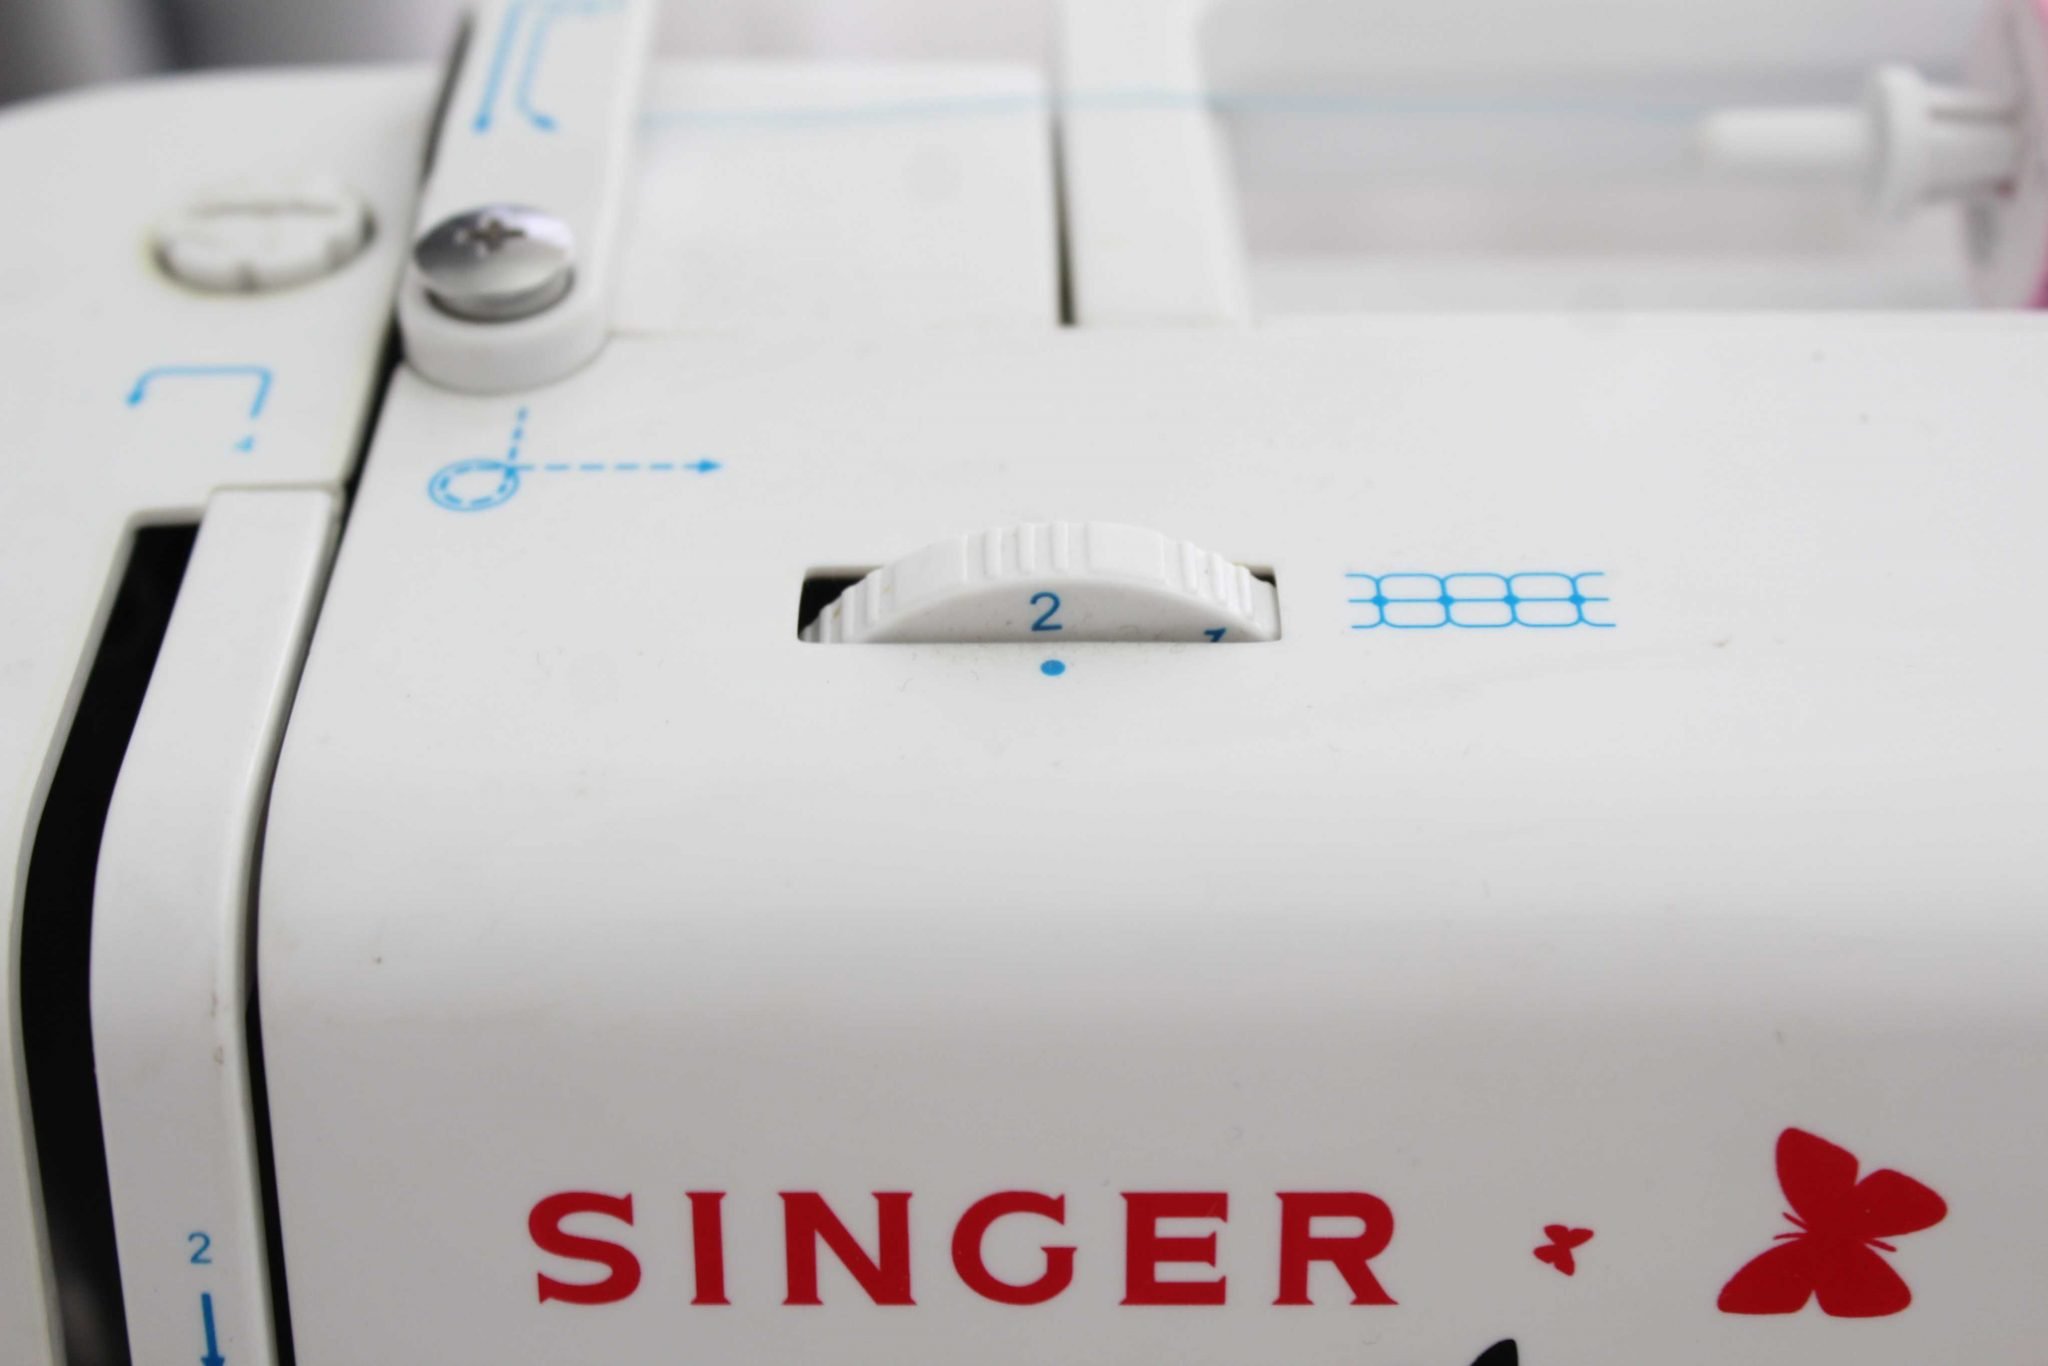
- Switch the presser foot tension to a loose setting.
- Before starting to sew, leave the threads about 5″ long.
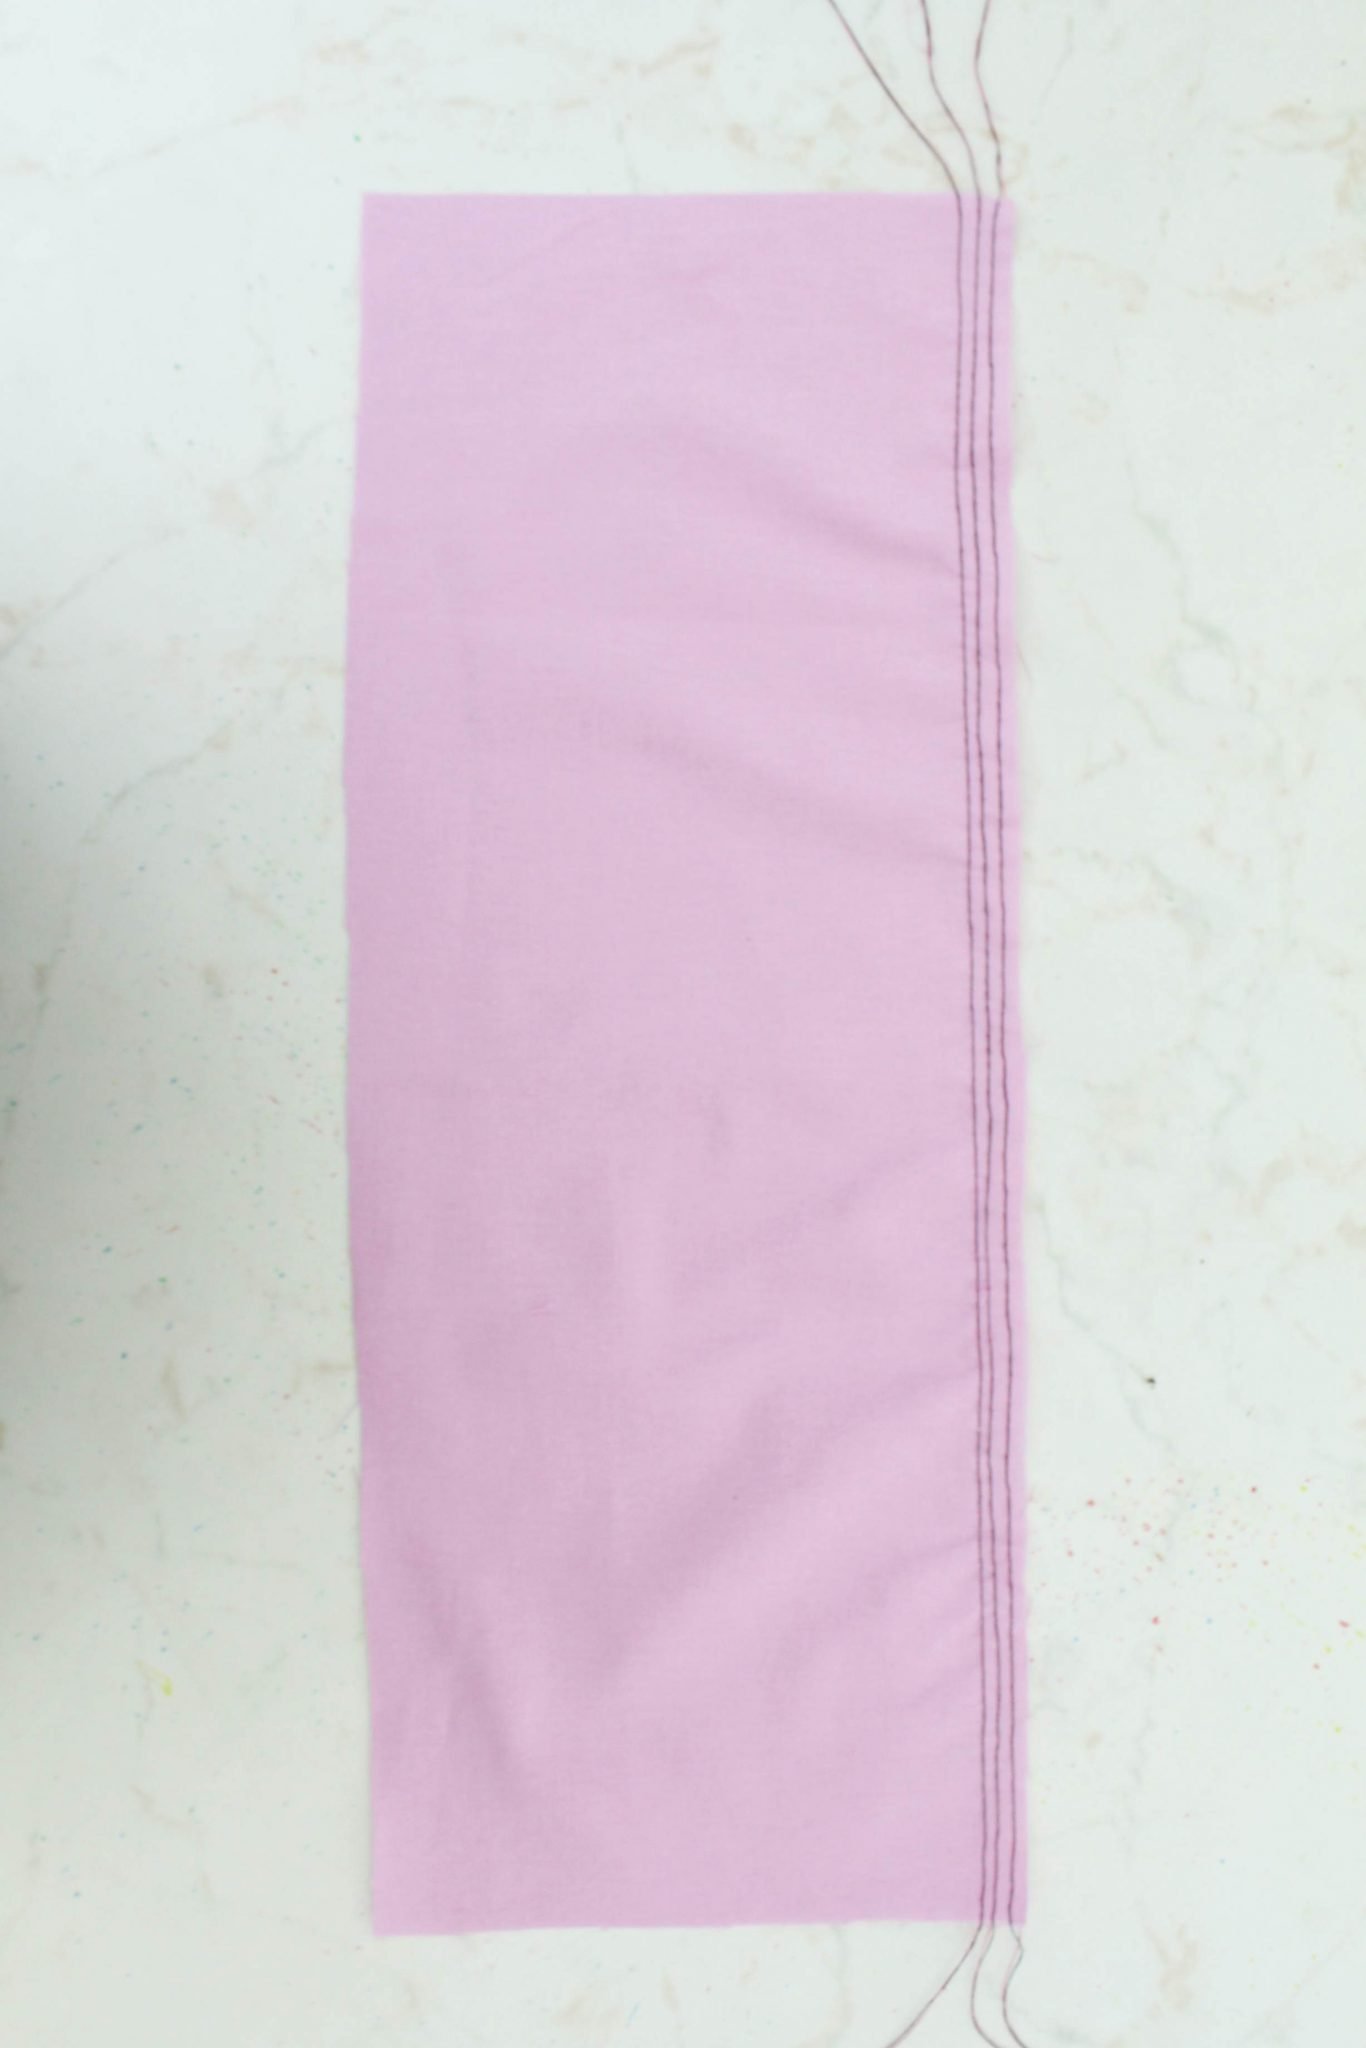
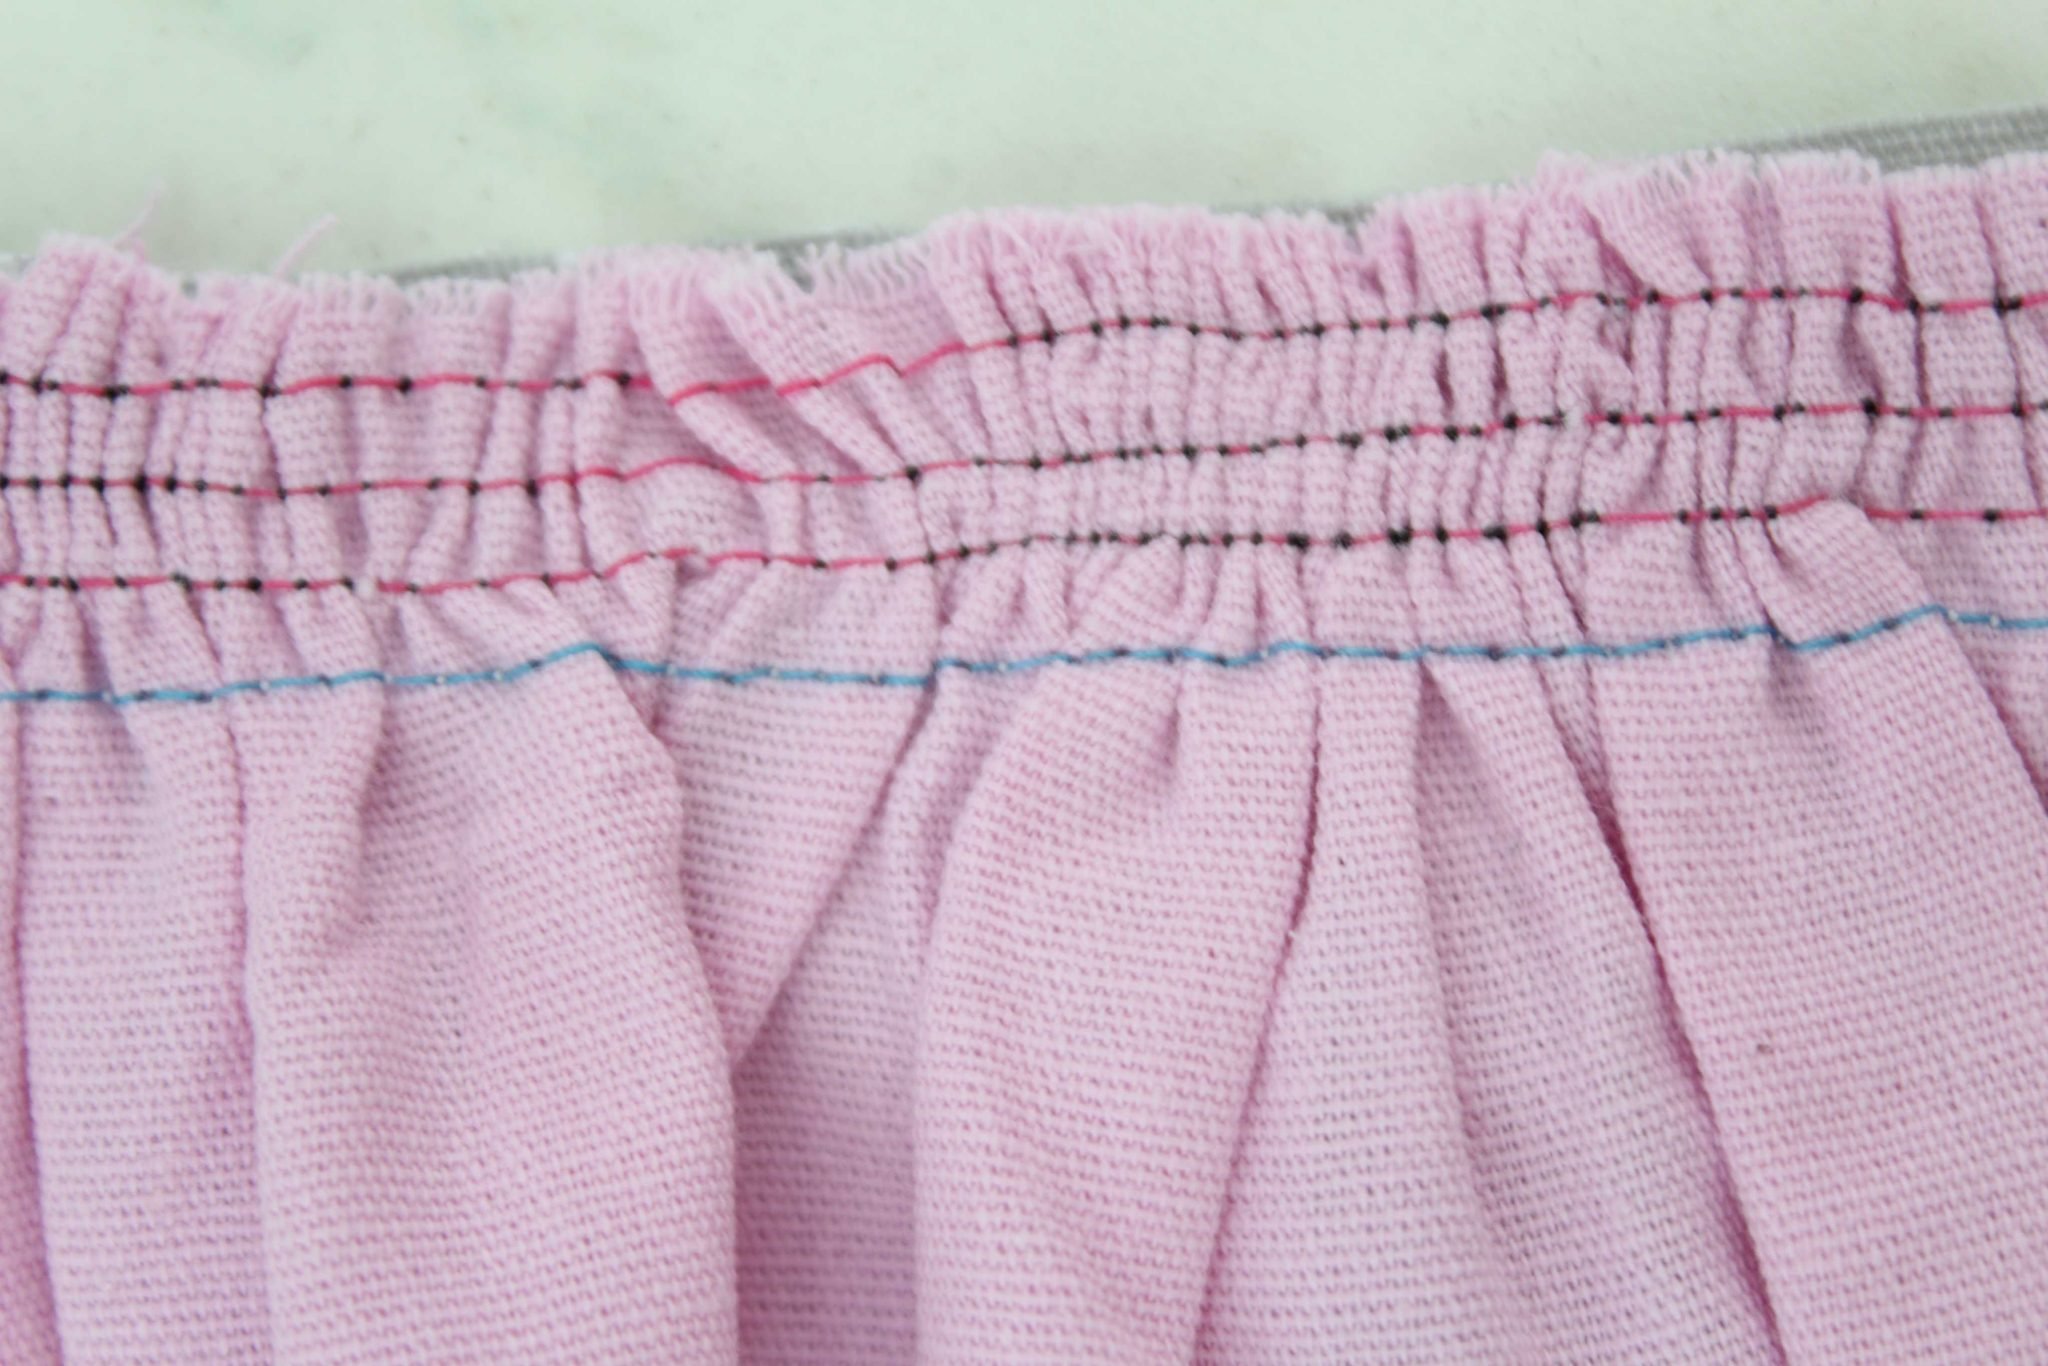
Sew basting stitches
- Sew along the edge where you want to create the ruffles, 1/8″ away from the edge. Leave these threads about 5″ long too.
- Repeat one or two more times creating two additional lines, 1/8″ away from each other. For lightweight fabrics, two lines of stitches should work fine while for thicker fabrics three rows might be needed to ensure the threads won’t break while gathering.
Form the ruffles
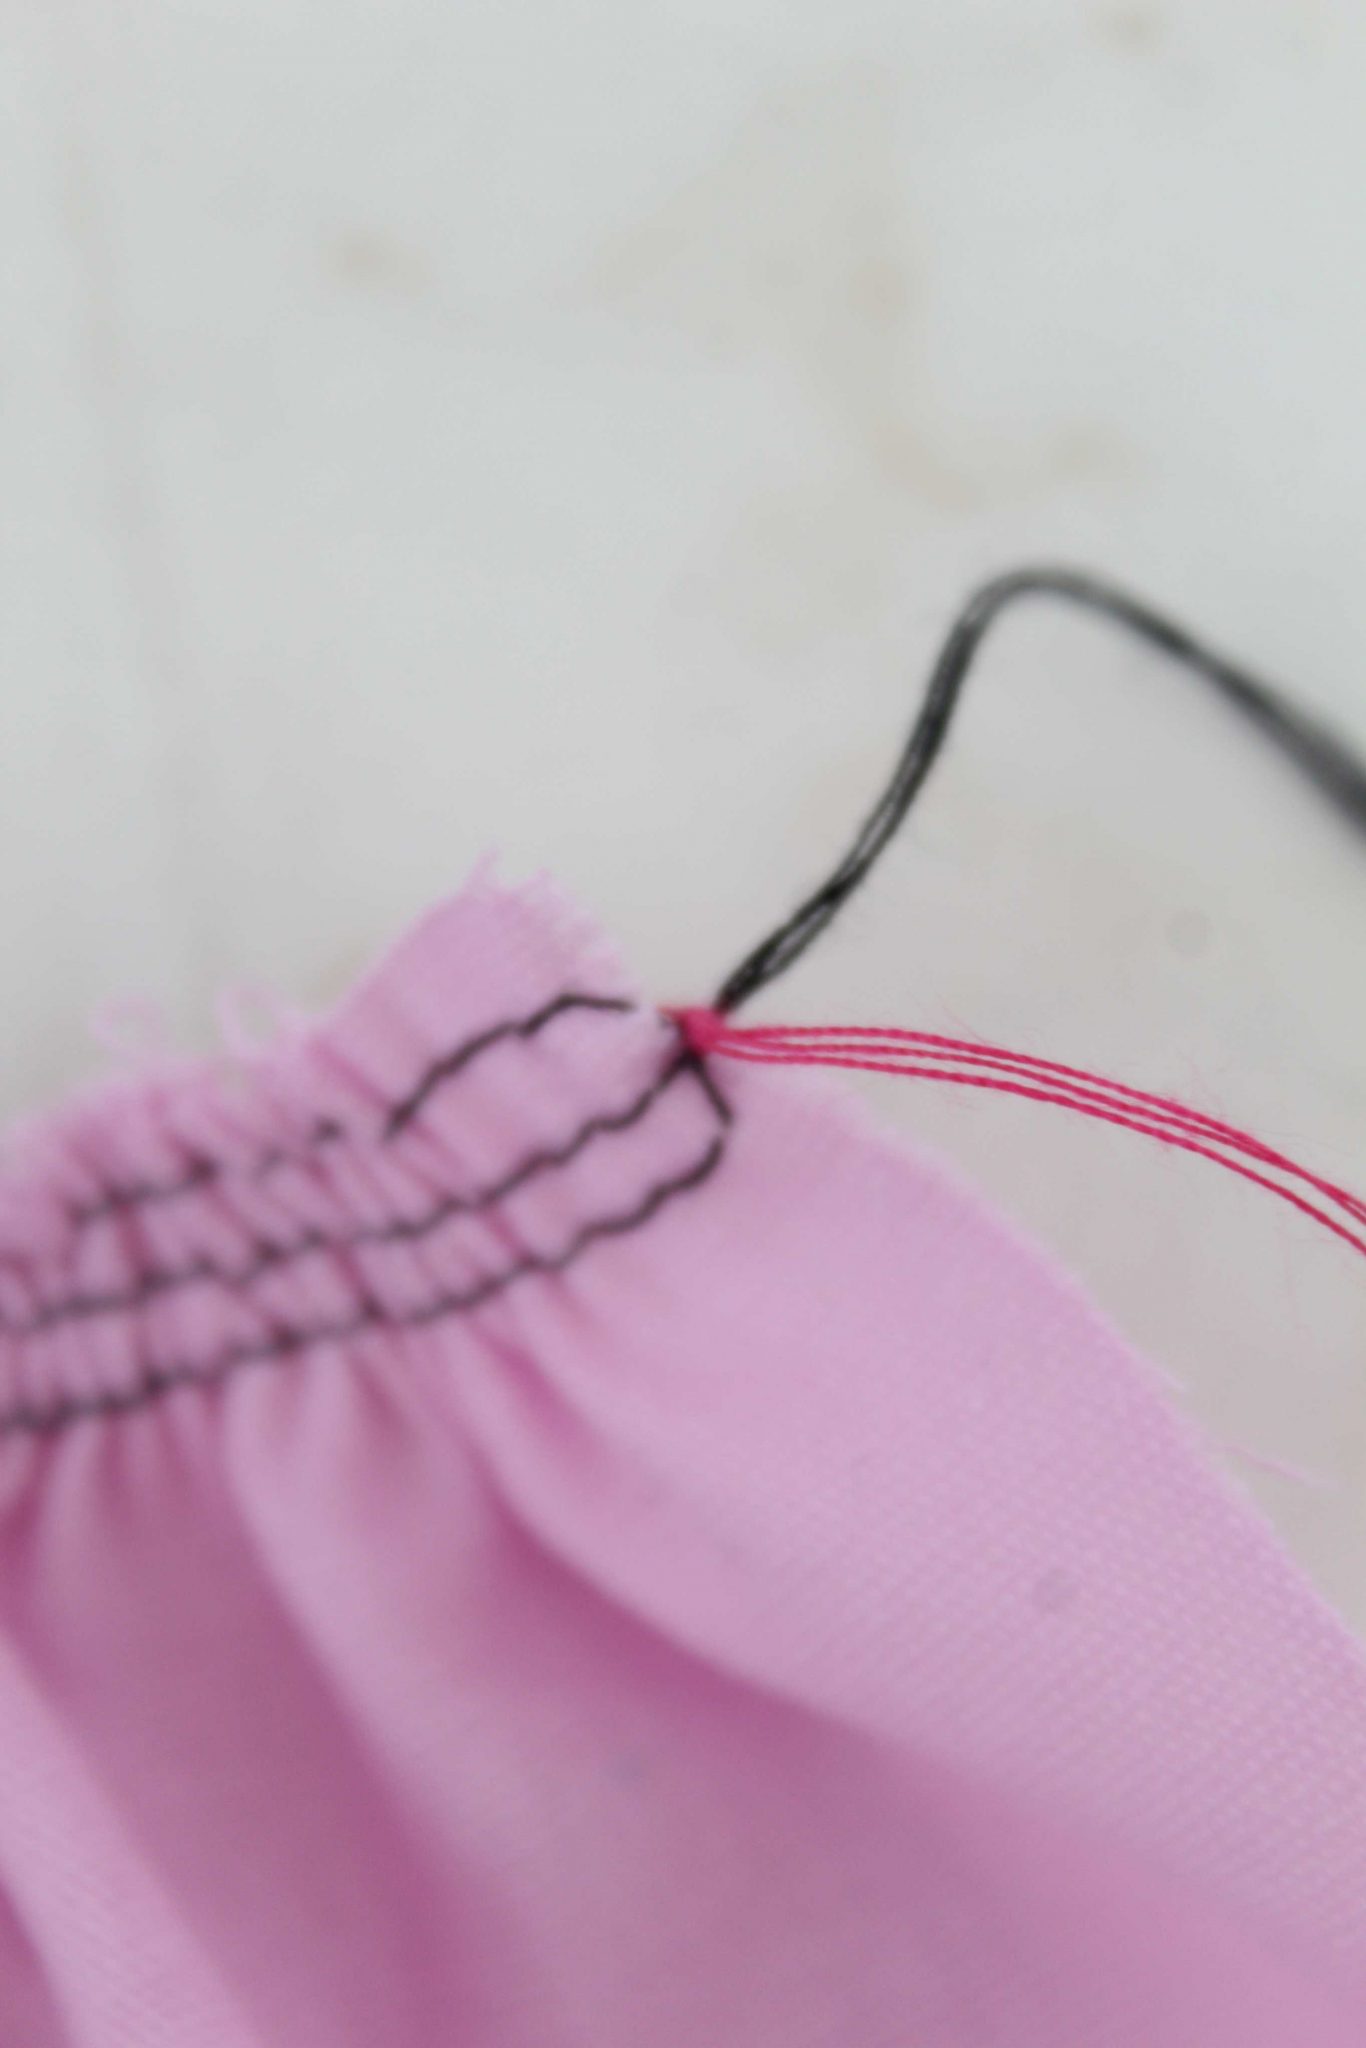
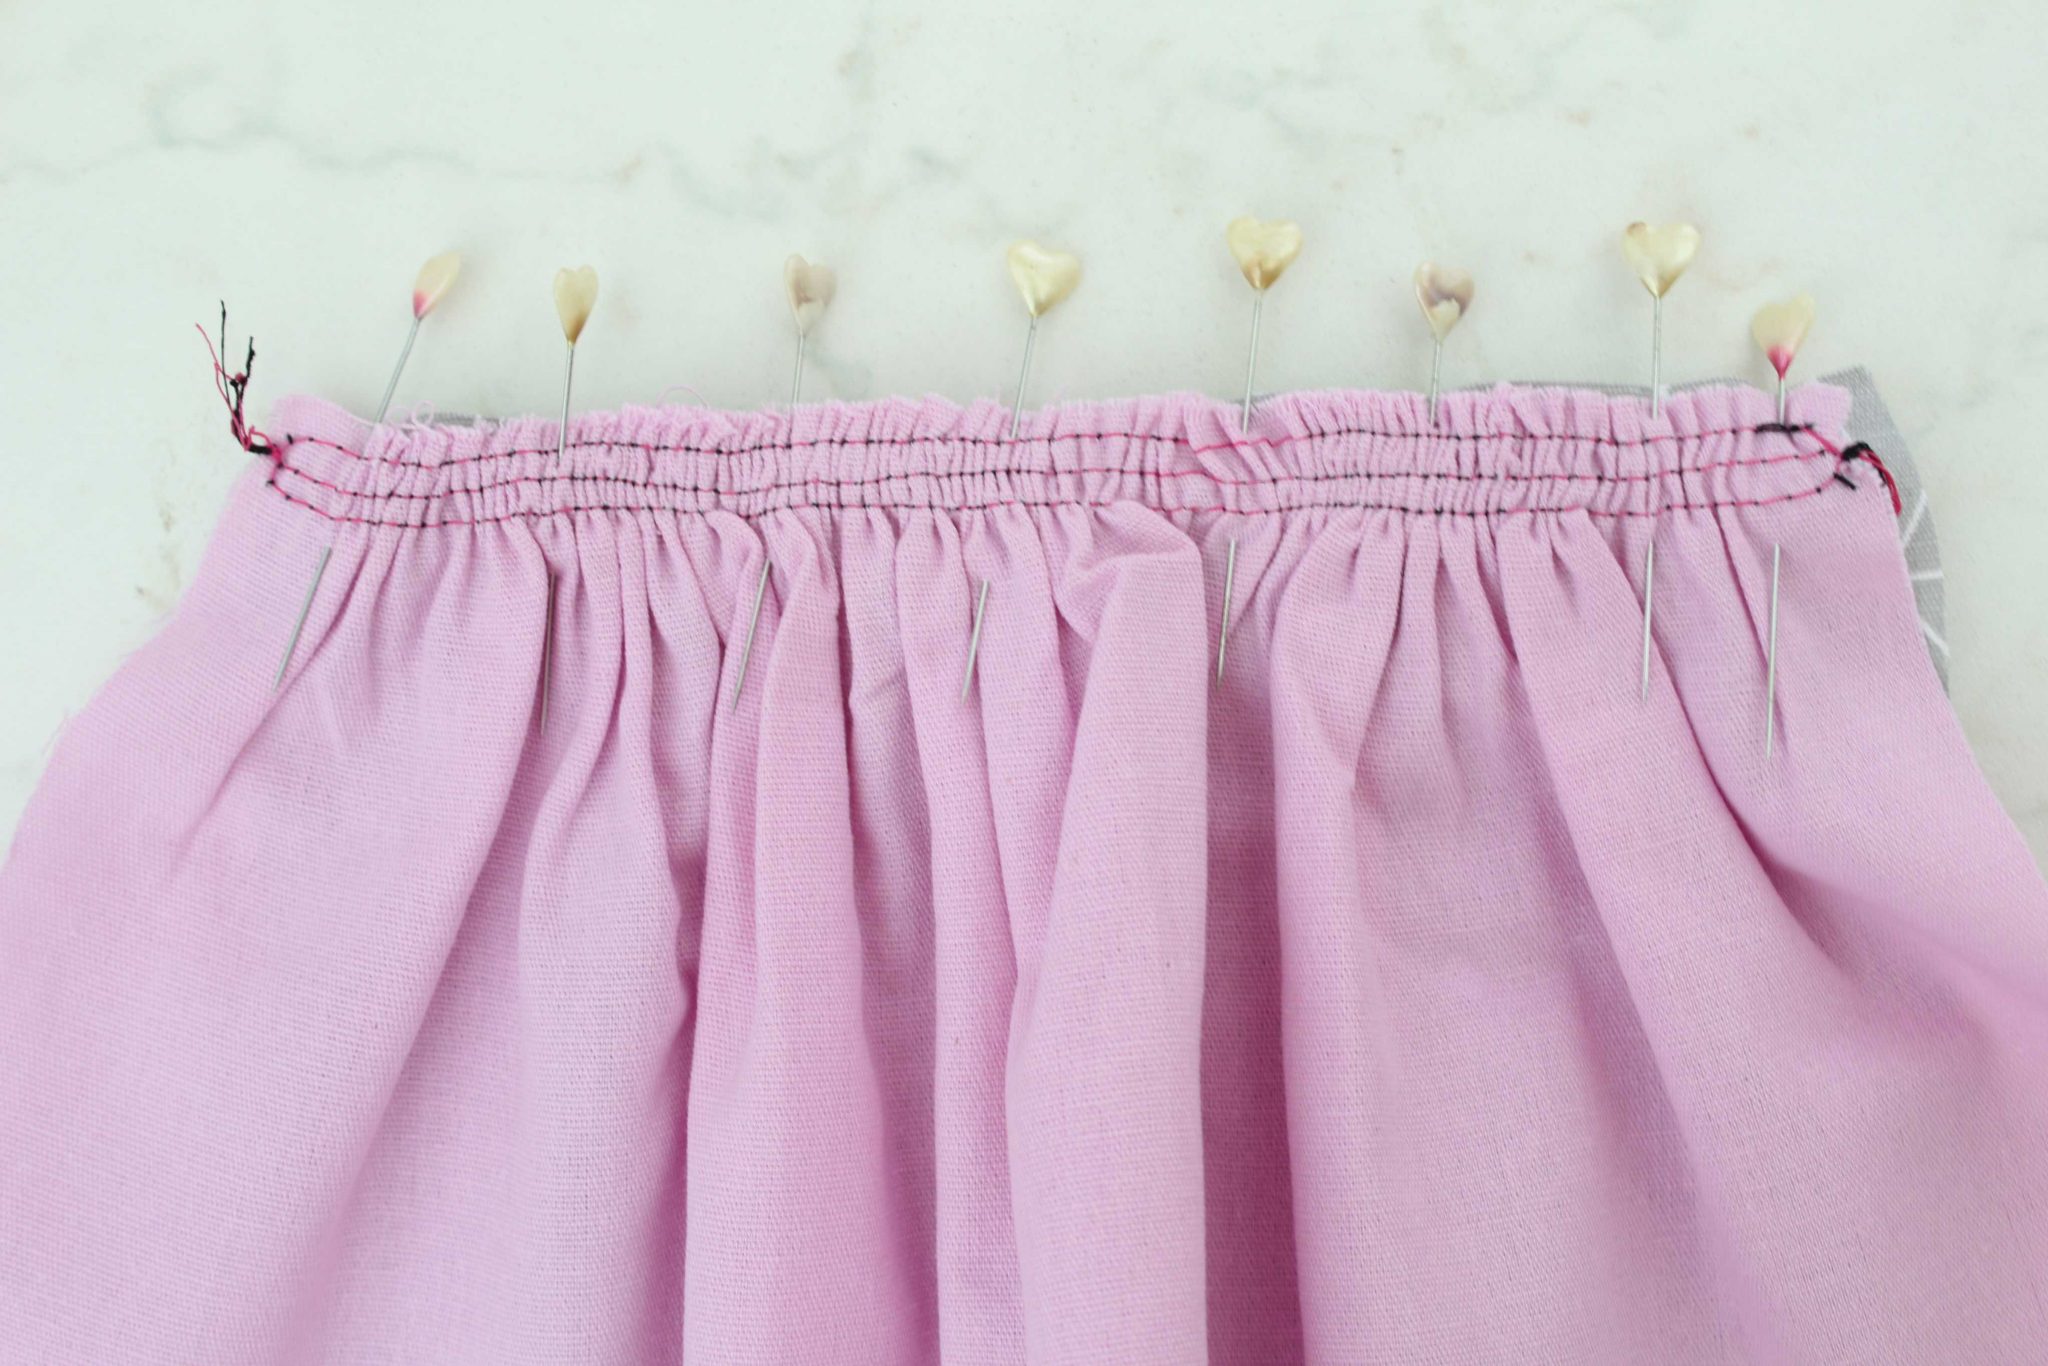
- Using a pin separate the threads of the front stitches from the threads of the back stitches (in my case the back threads from the red threads)
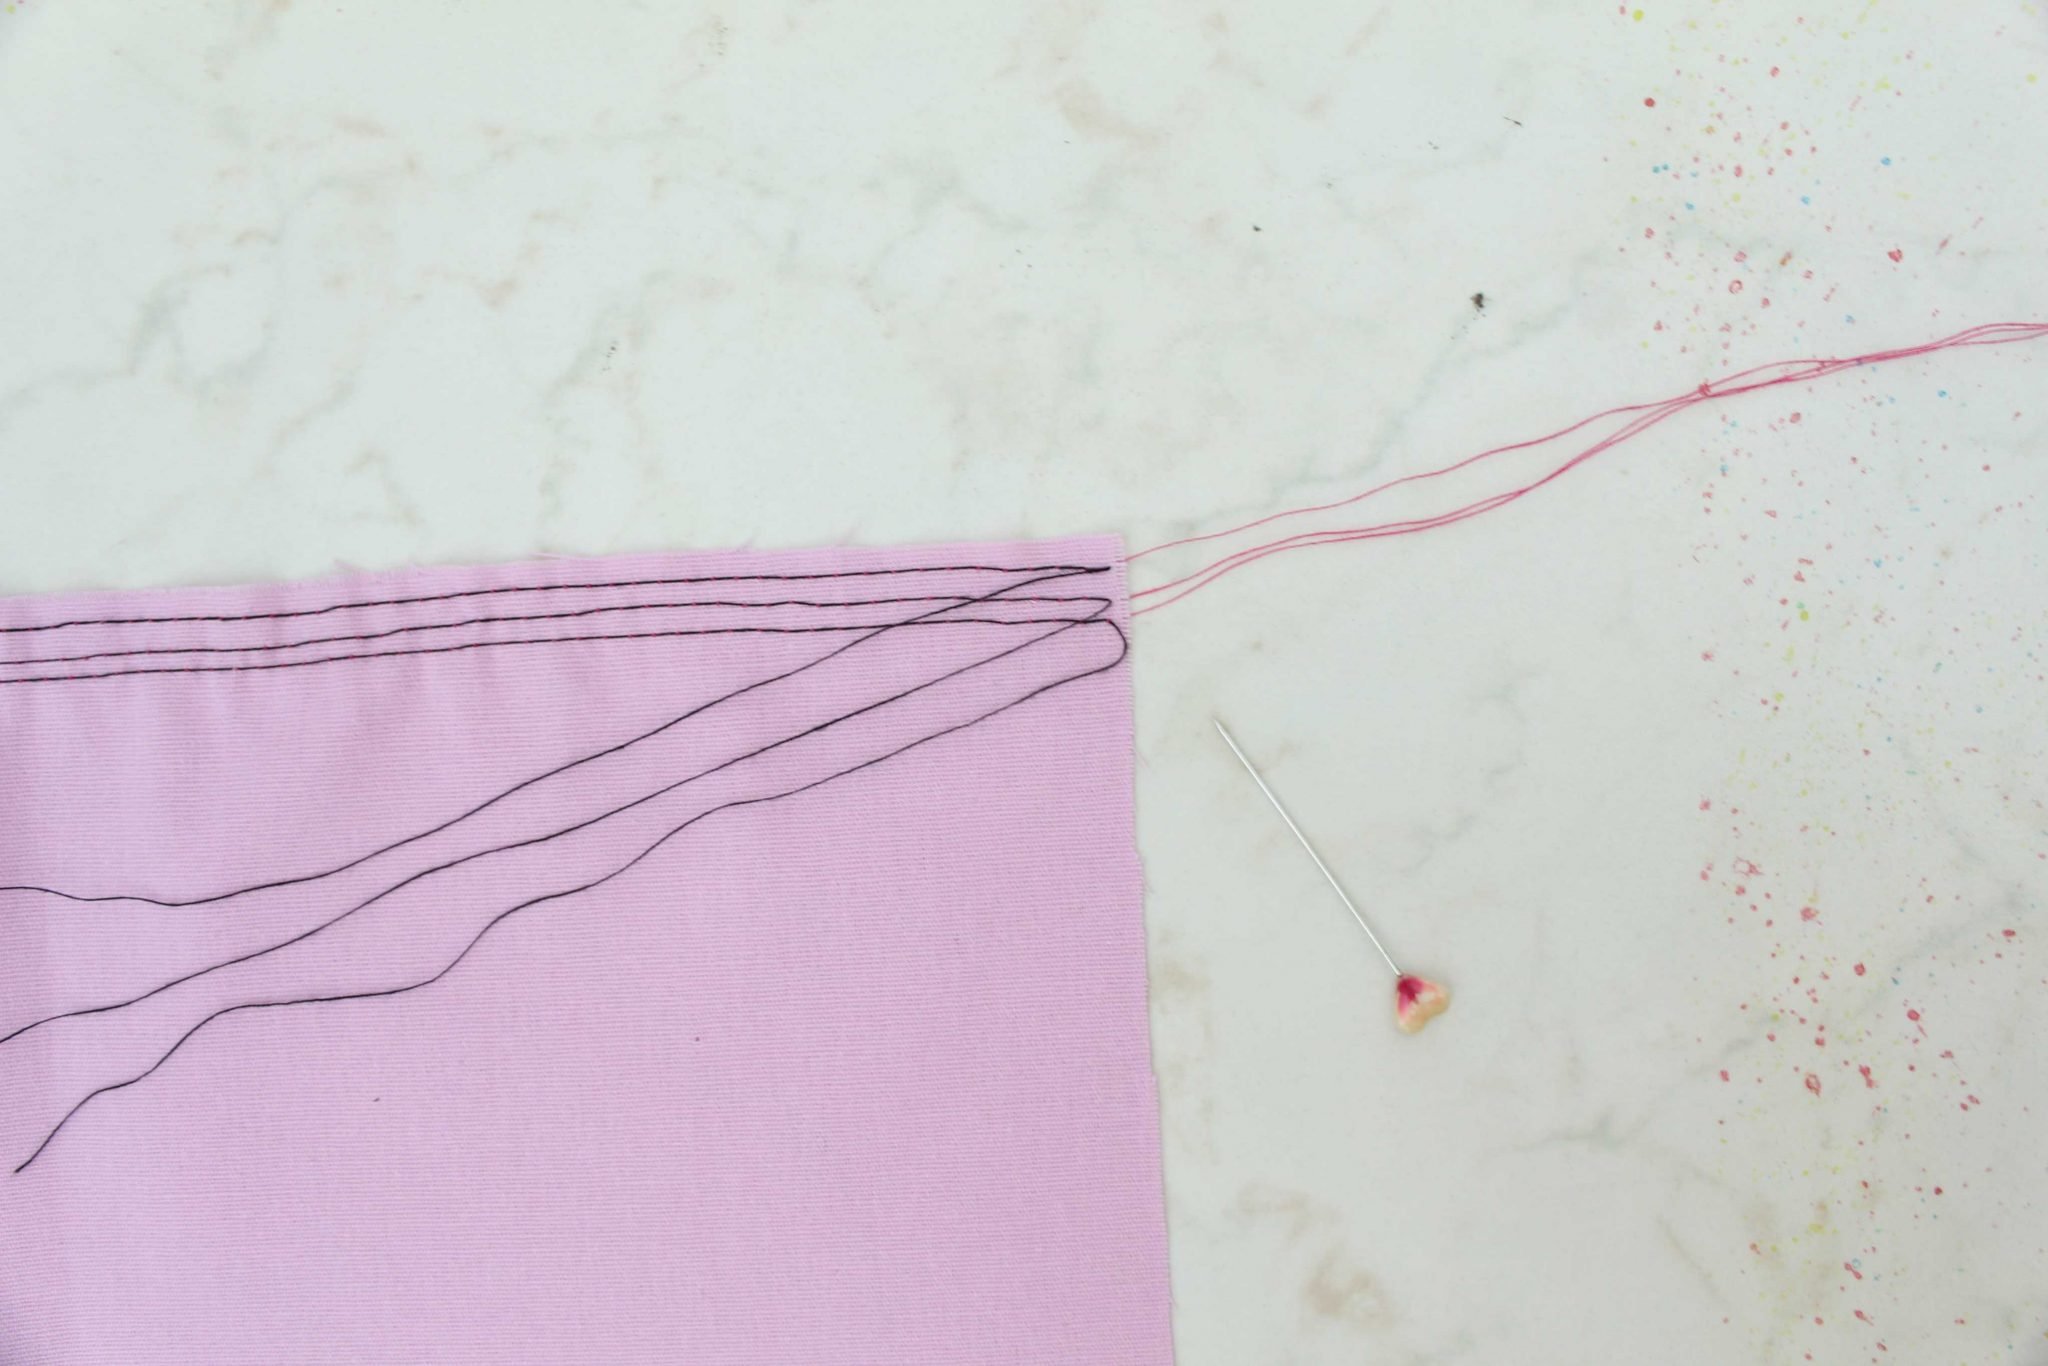
- With one hand grab all threads in the back (red in my case) and with the other hand start pulling the fabric down, gathering the fabric towards the other end of the stitches. The threads won’t break and the gathers will form and spread evenly.
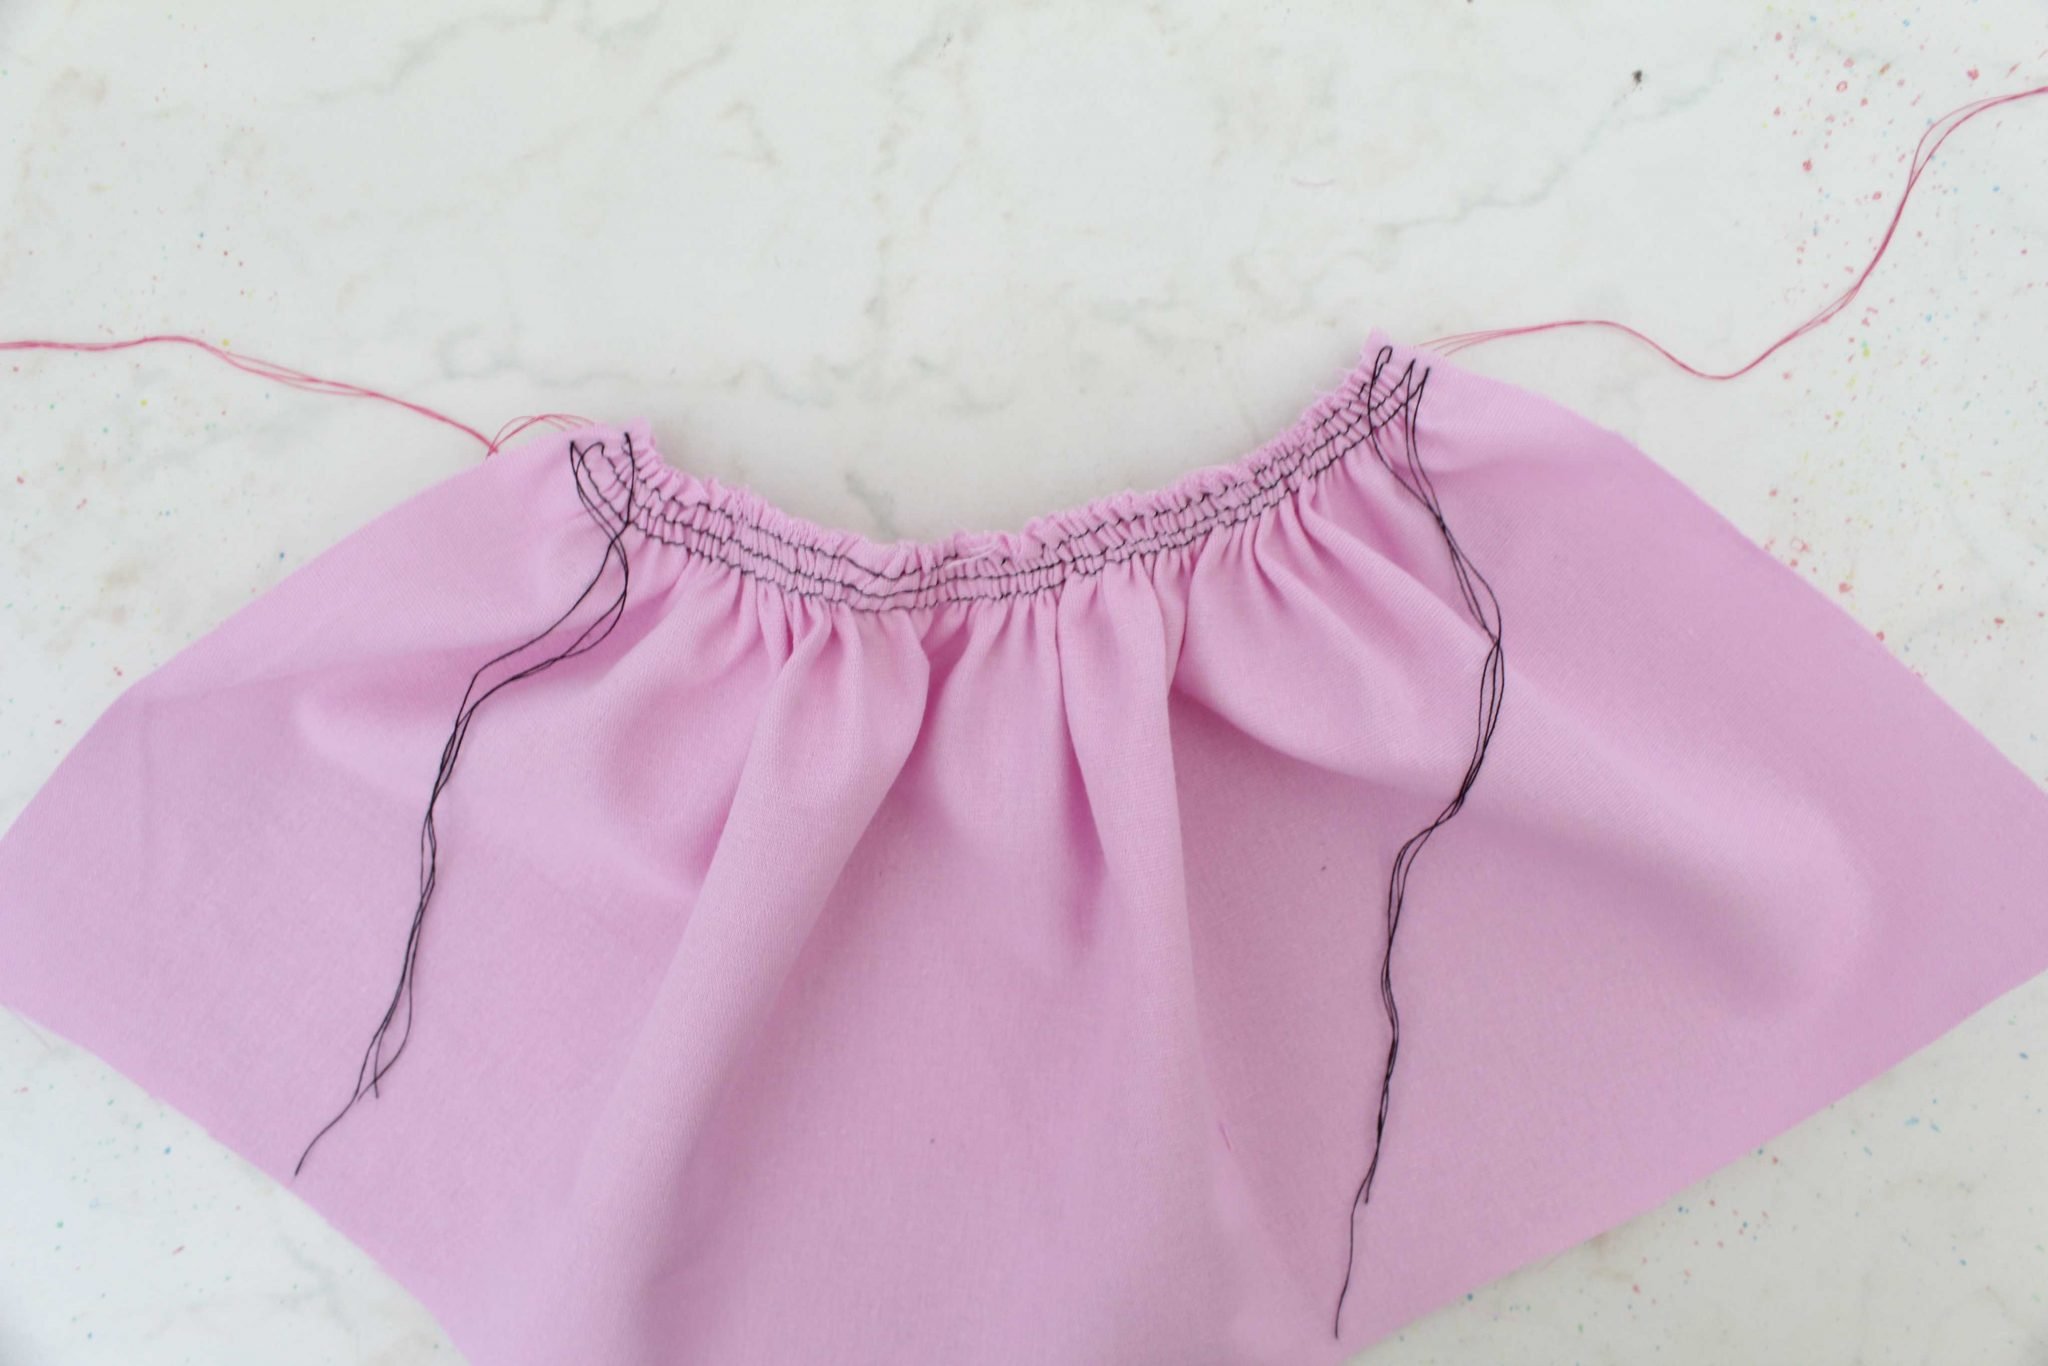
- You can do this process at one end or both ends of the fabric strip.
- The ruffled fabric needs to match the length of the second fabric strip you’re sewing the ruffles onto.
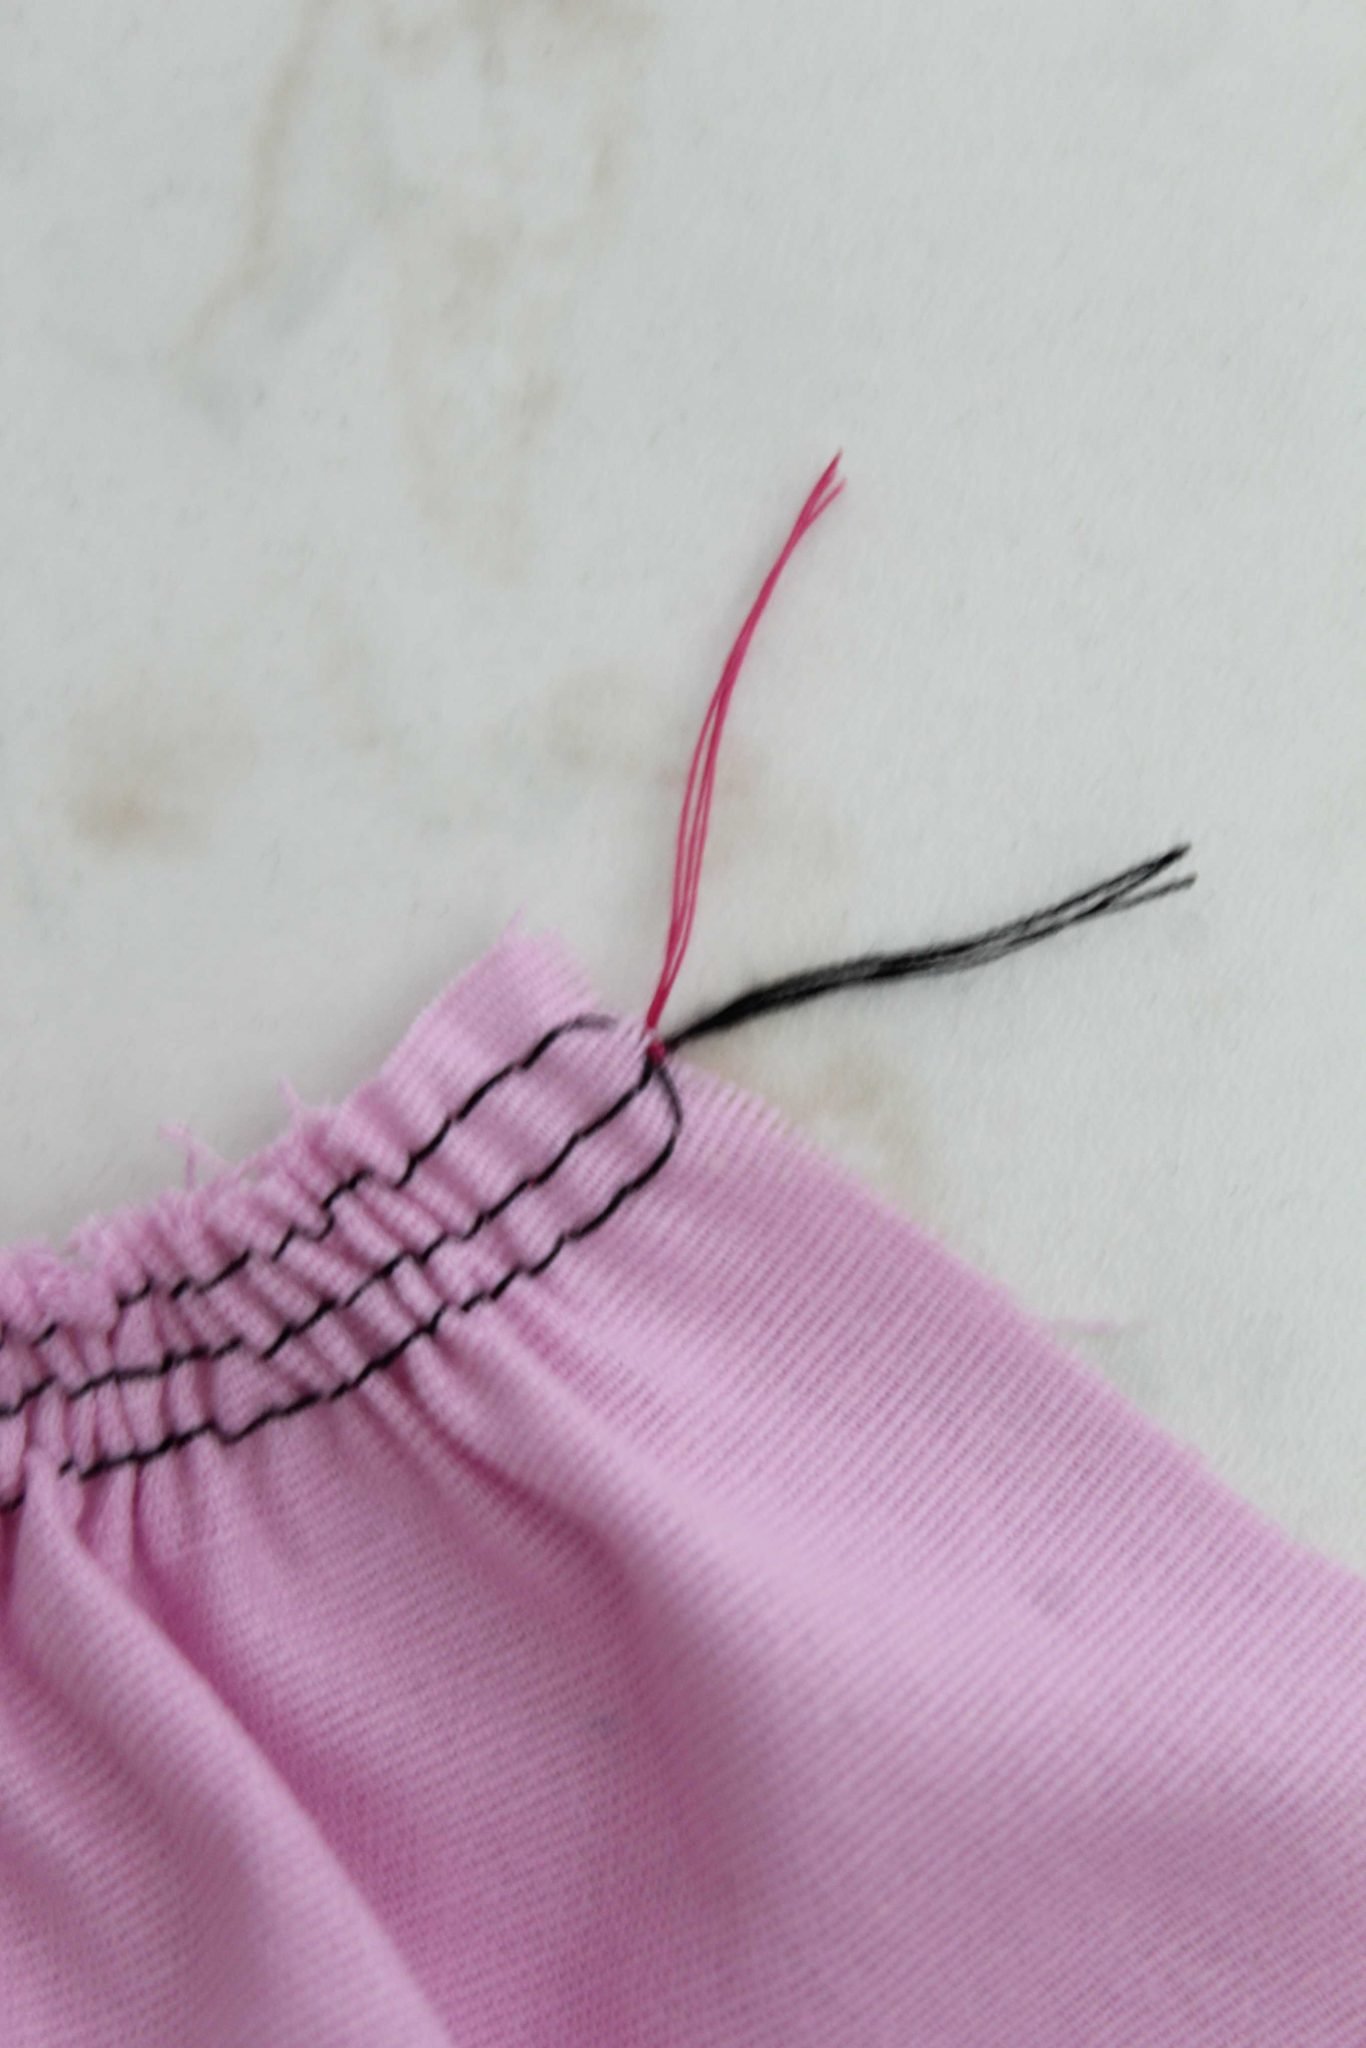
- When happy with your ruffles, tie the threads in a double knot (the red threads tied with the blacks), on both ends.
- Trim the threads too
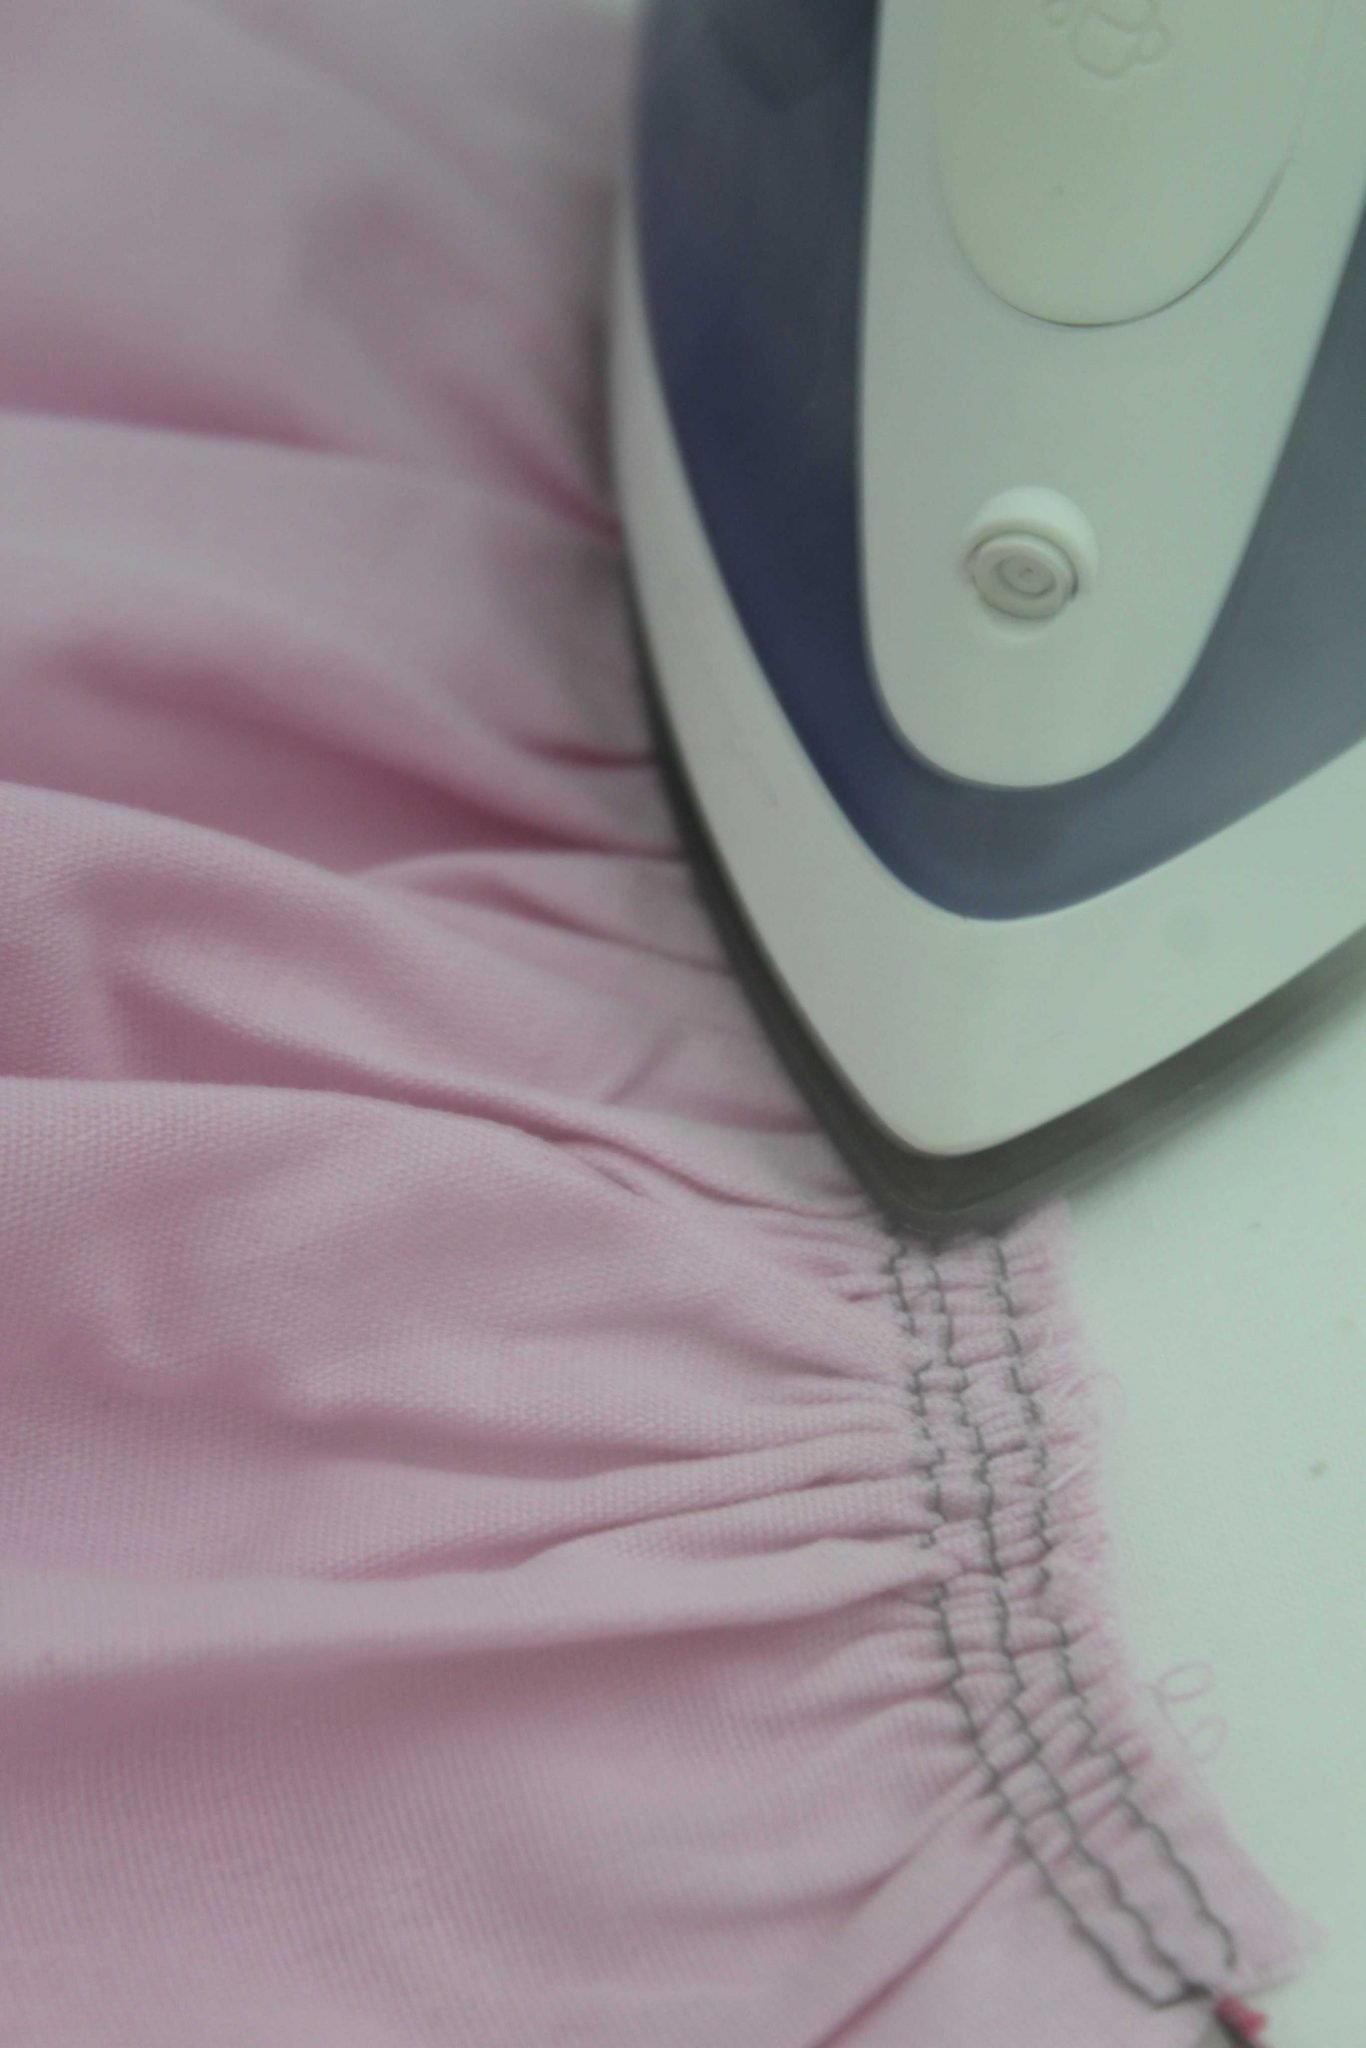
- Set your iron on steam and press the ruffles very well. This is a very important step as it will be a great help when sewing the ruffles.
Stitch the ruffles in place
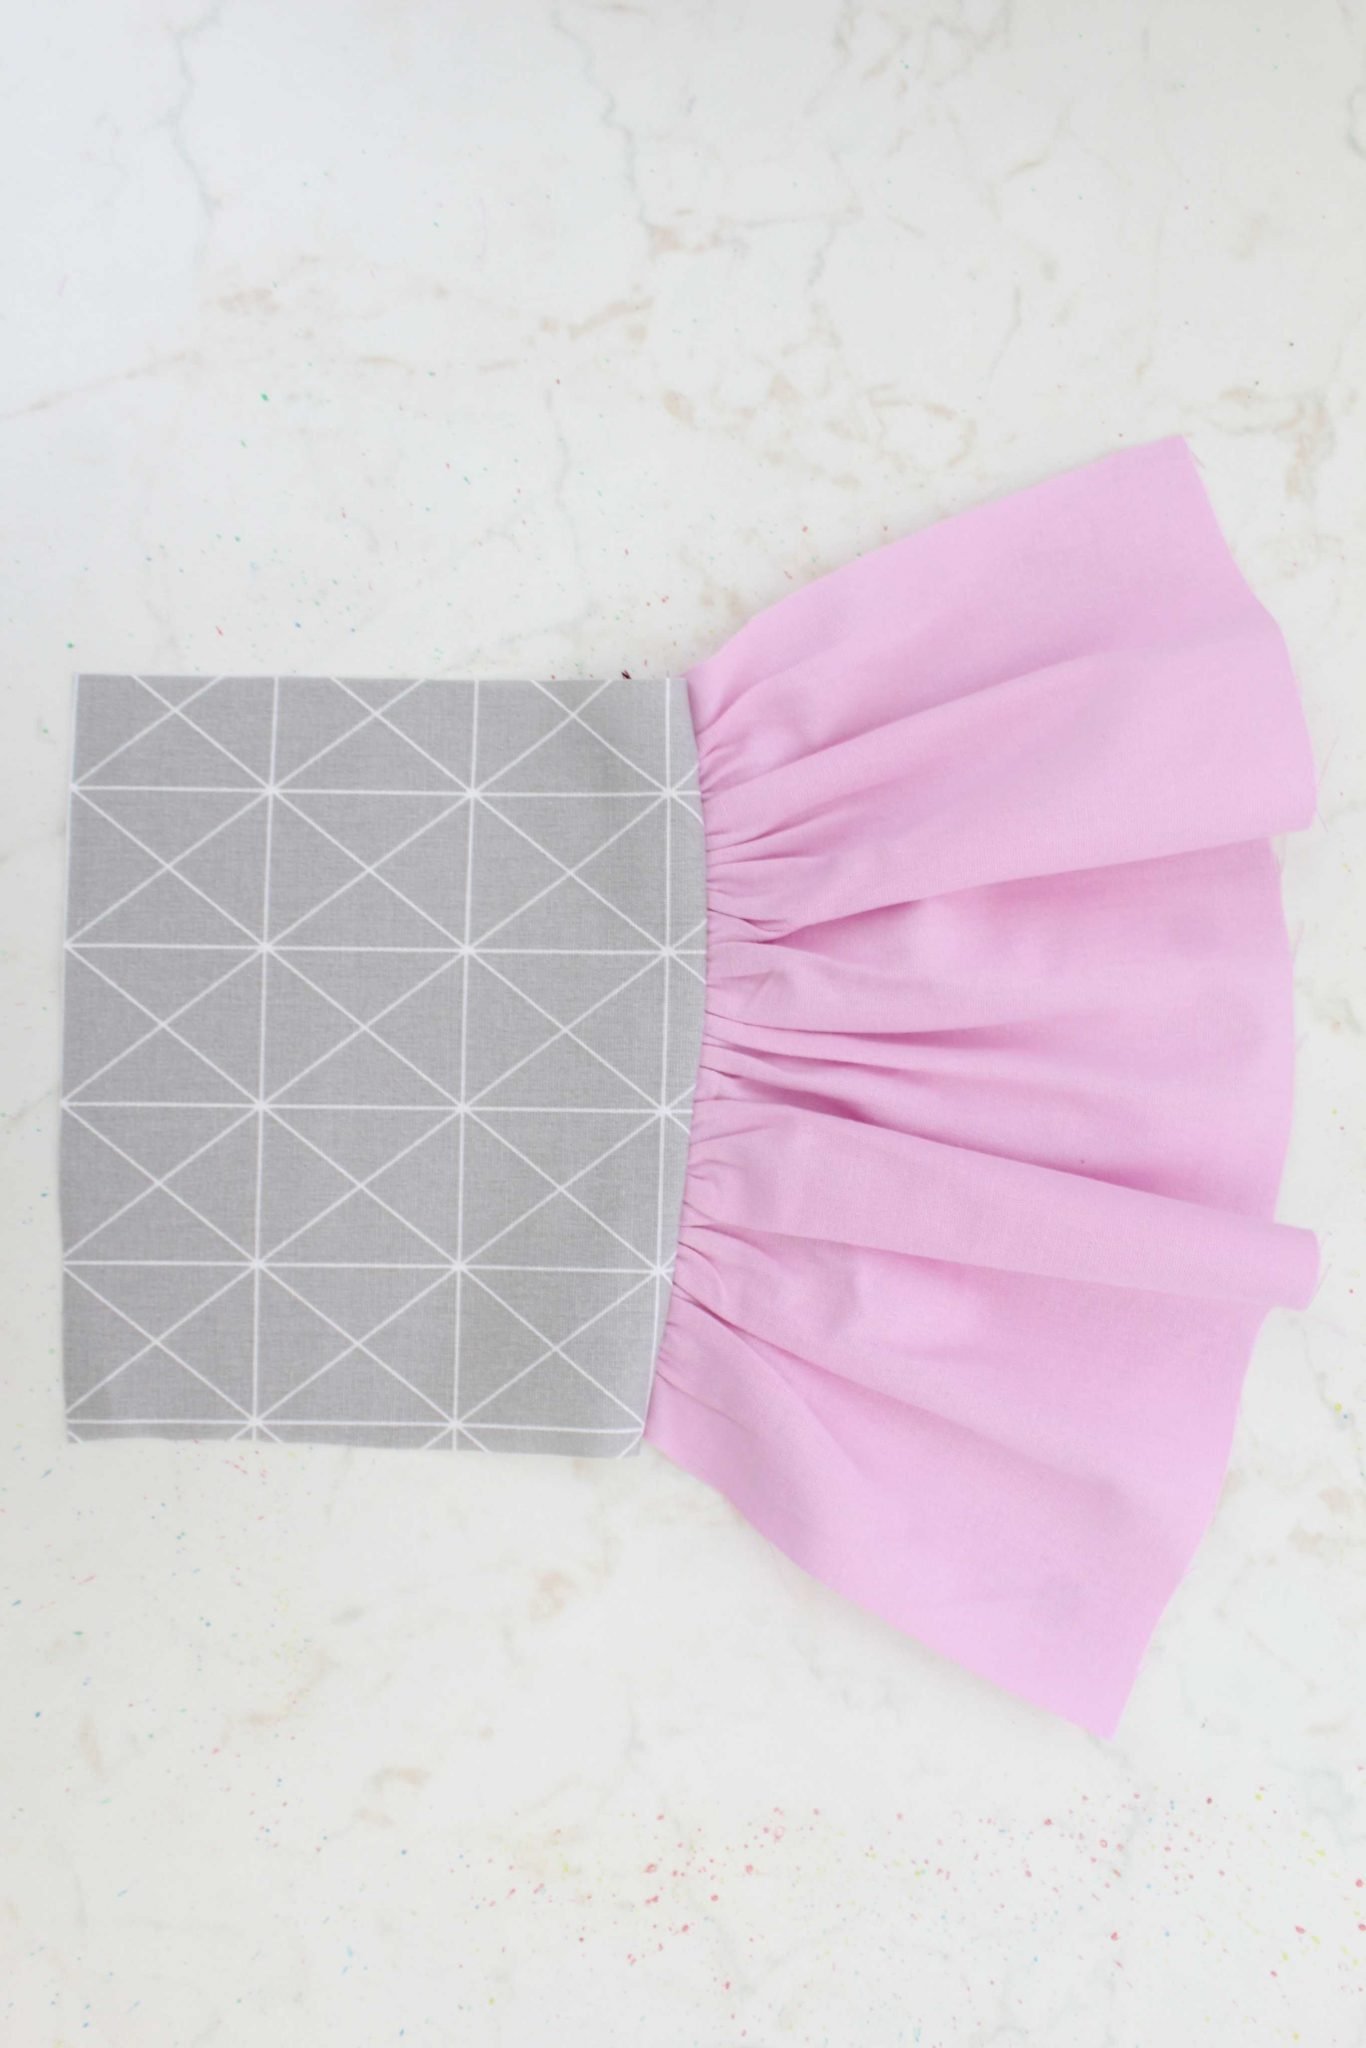
- Place the main fabric strip (the one without ruffles) right side up. Place ruffled strip over, wrong side up.
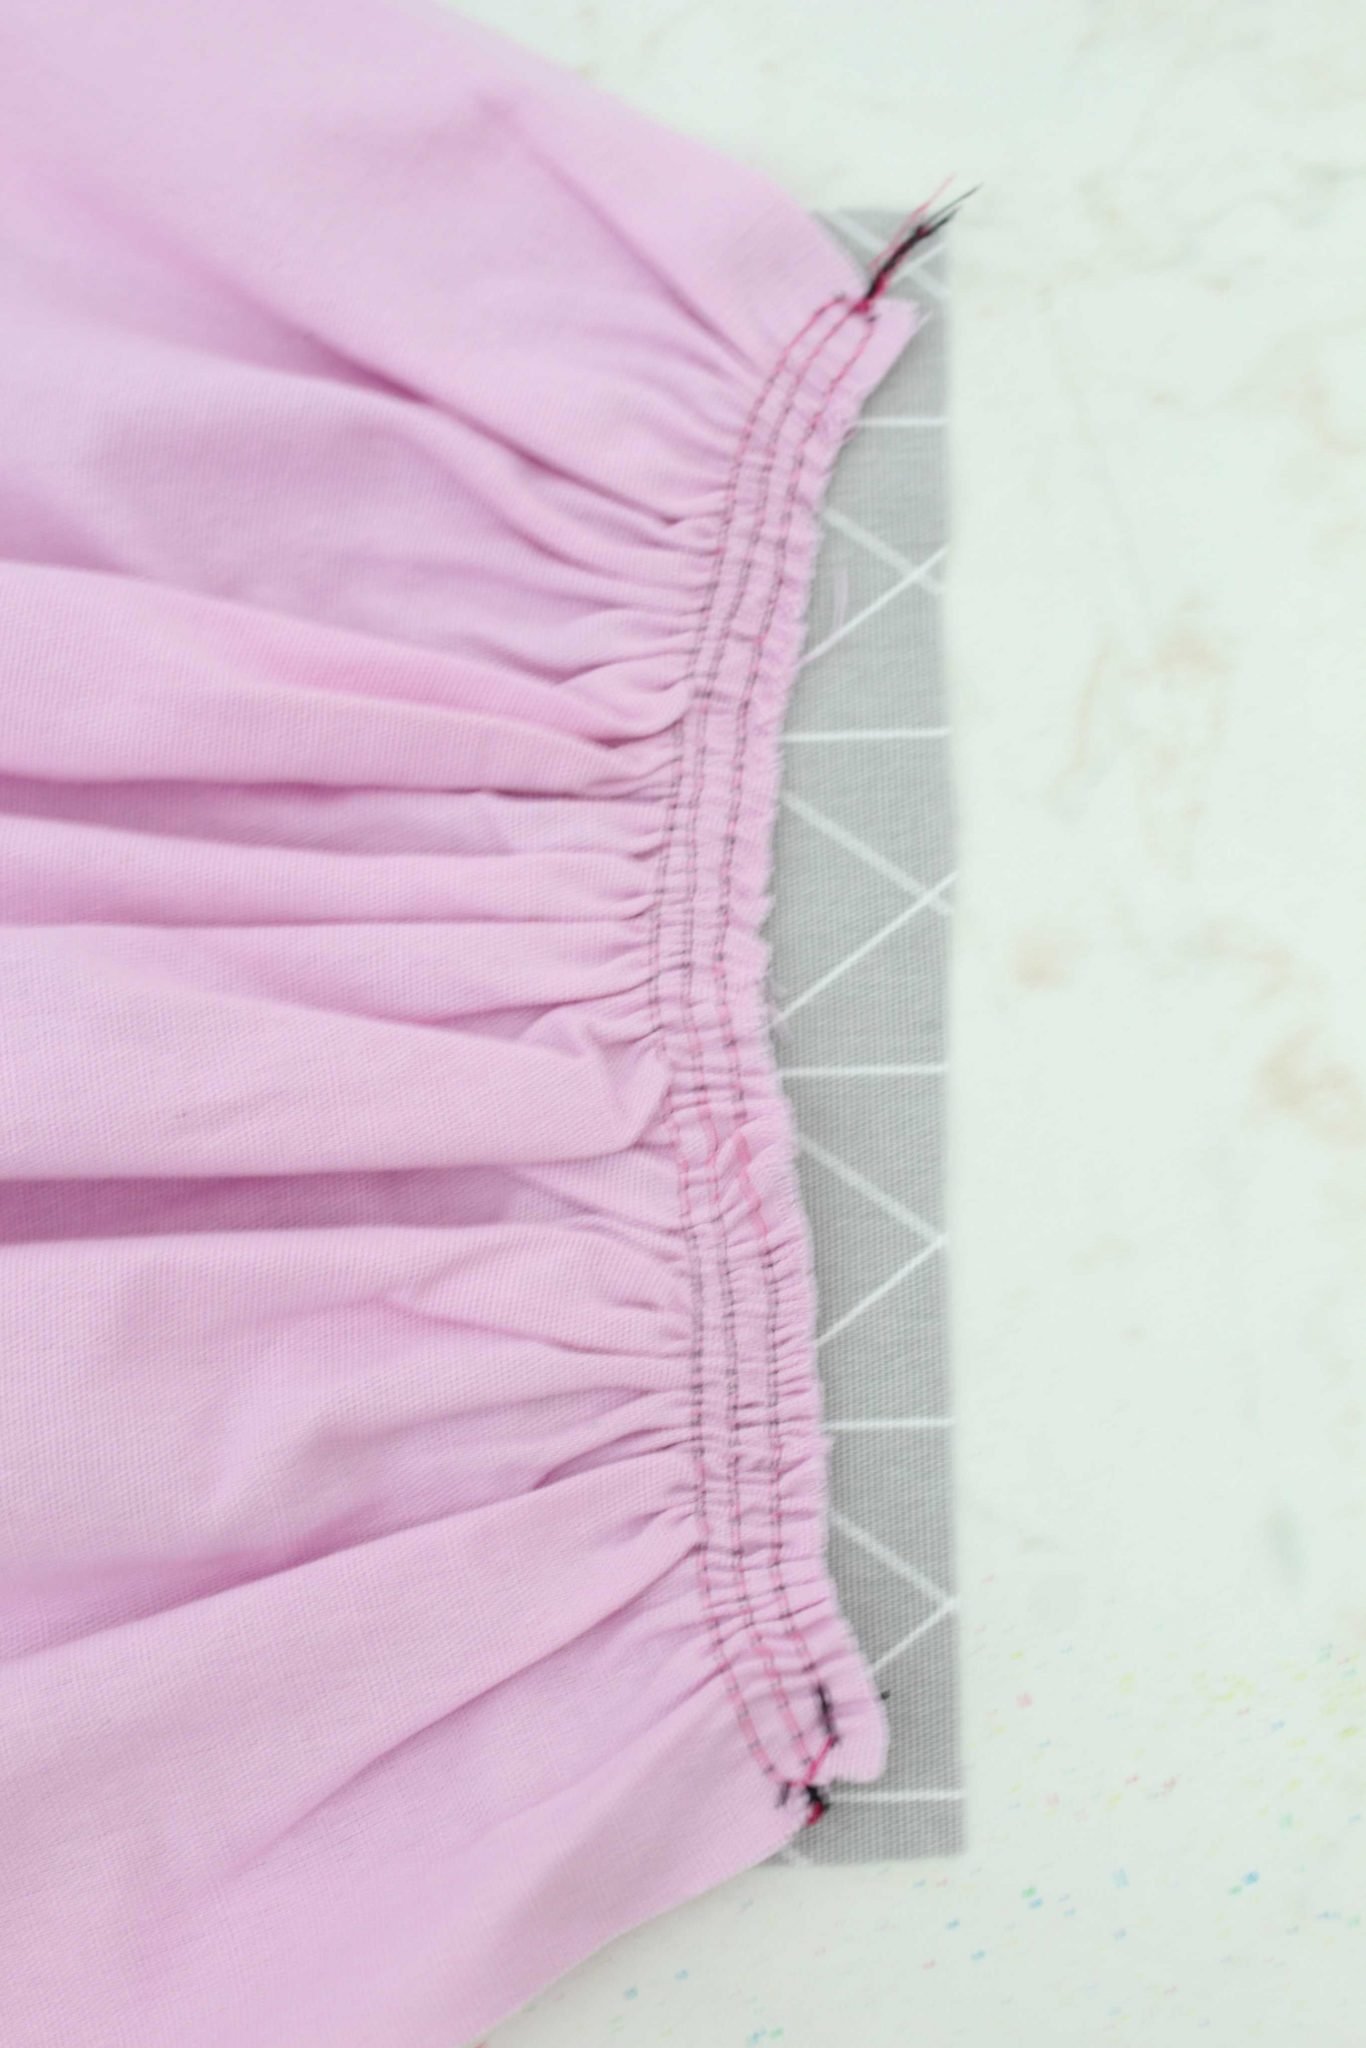
- Pin the two strips together using lots of pins.
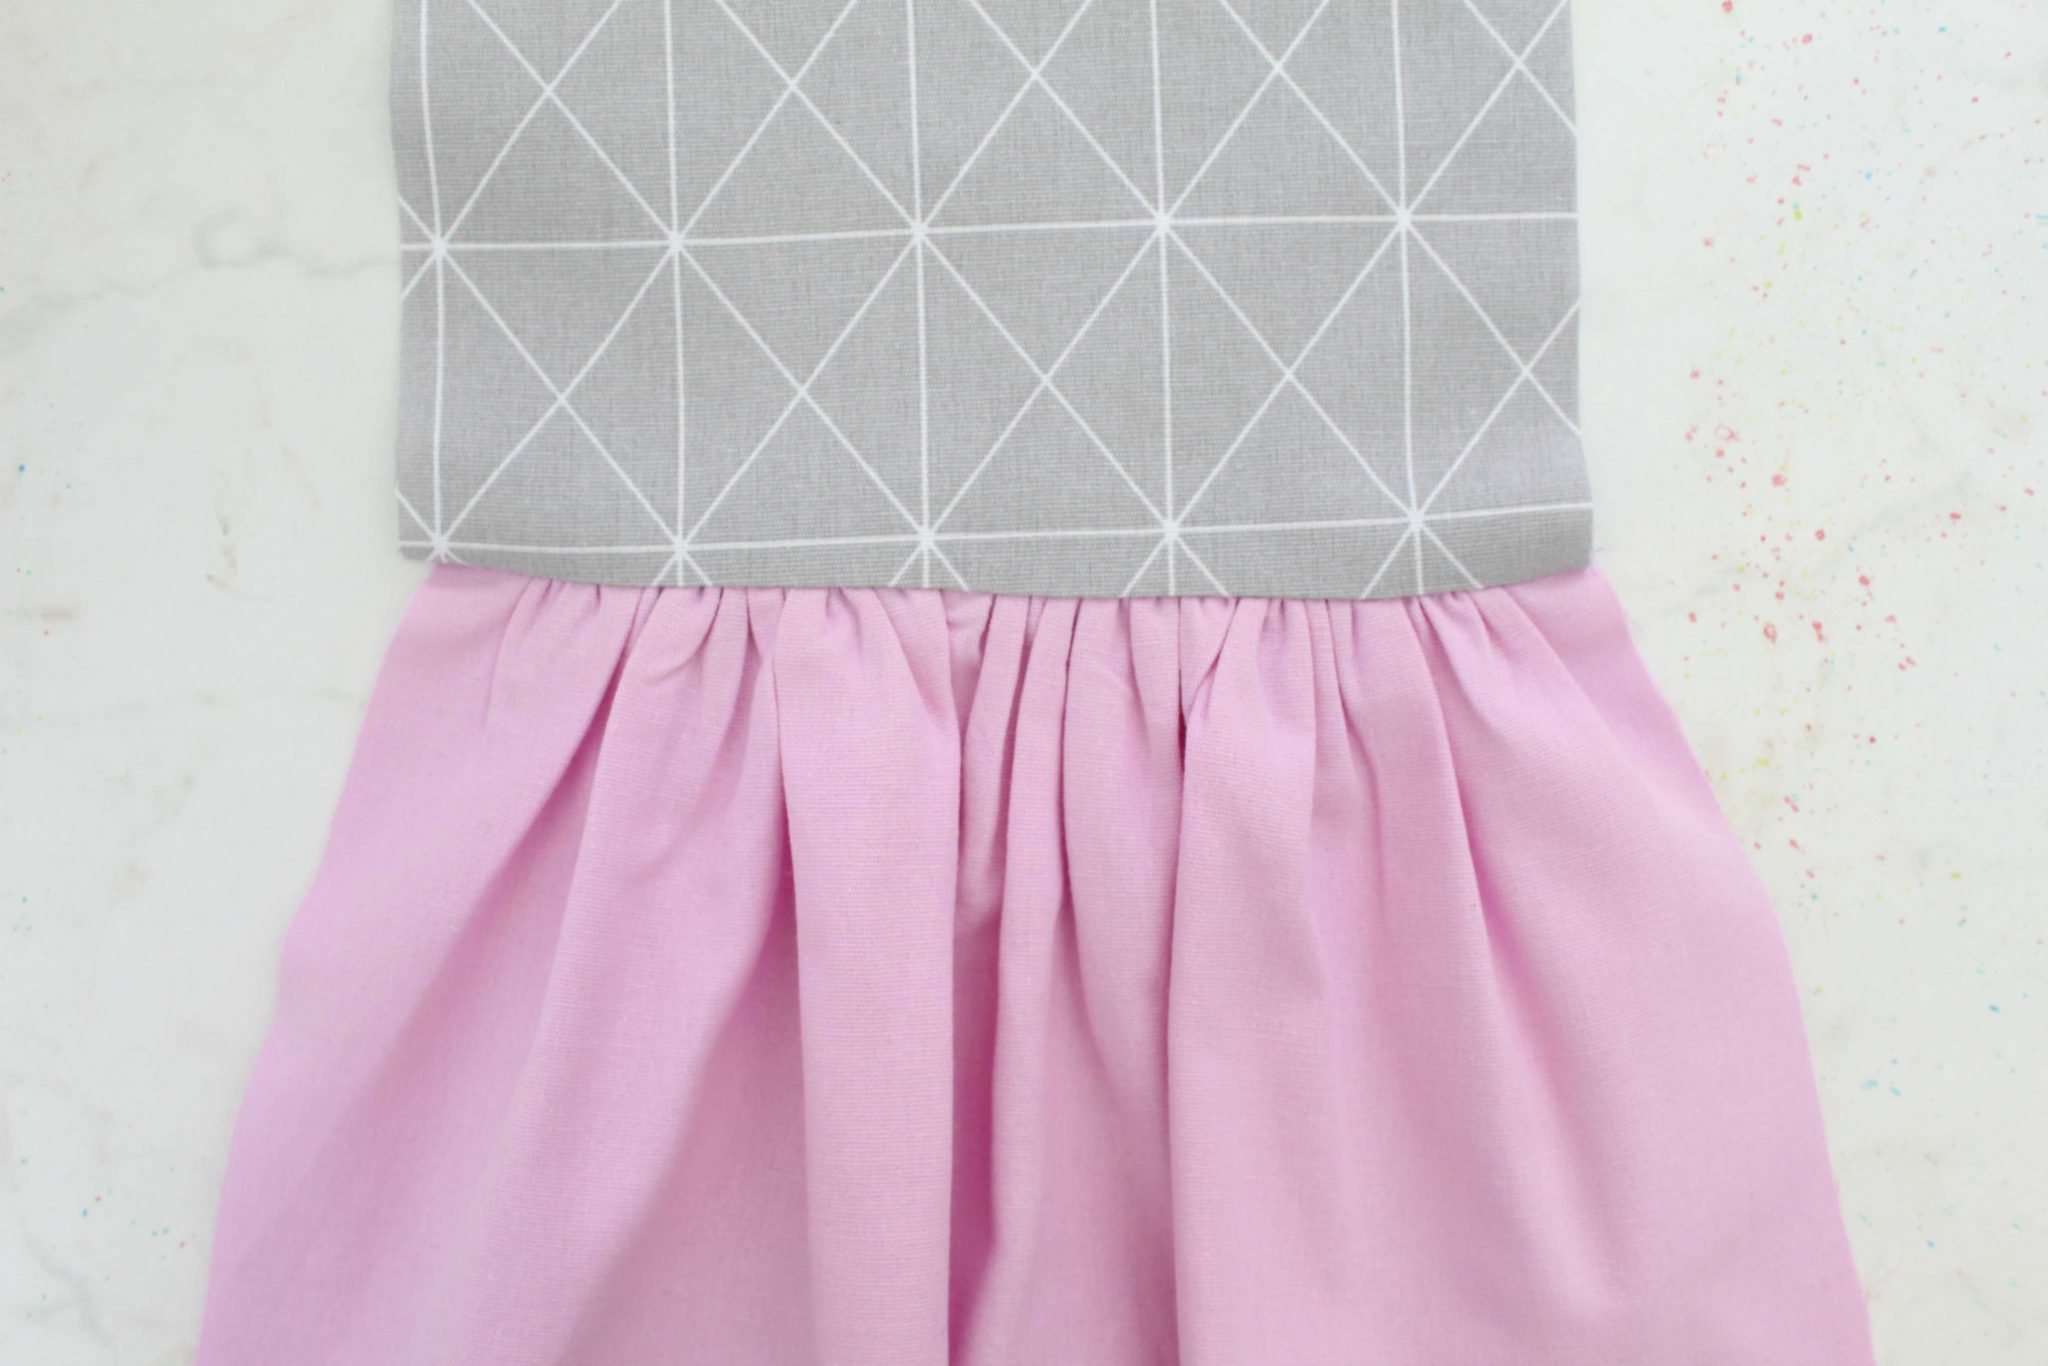
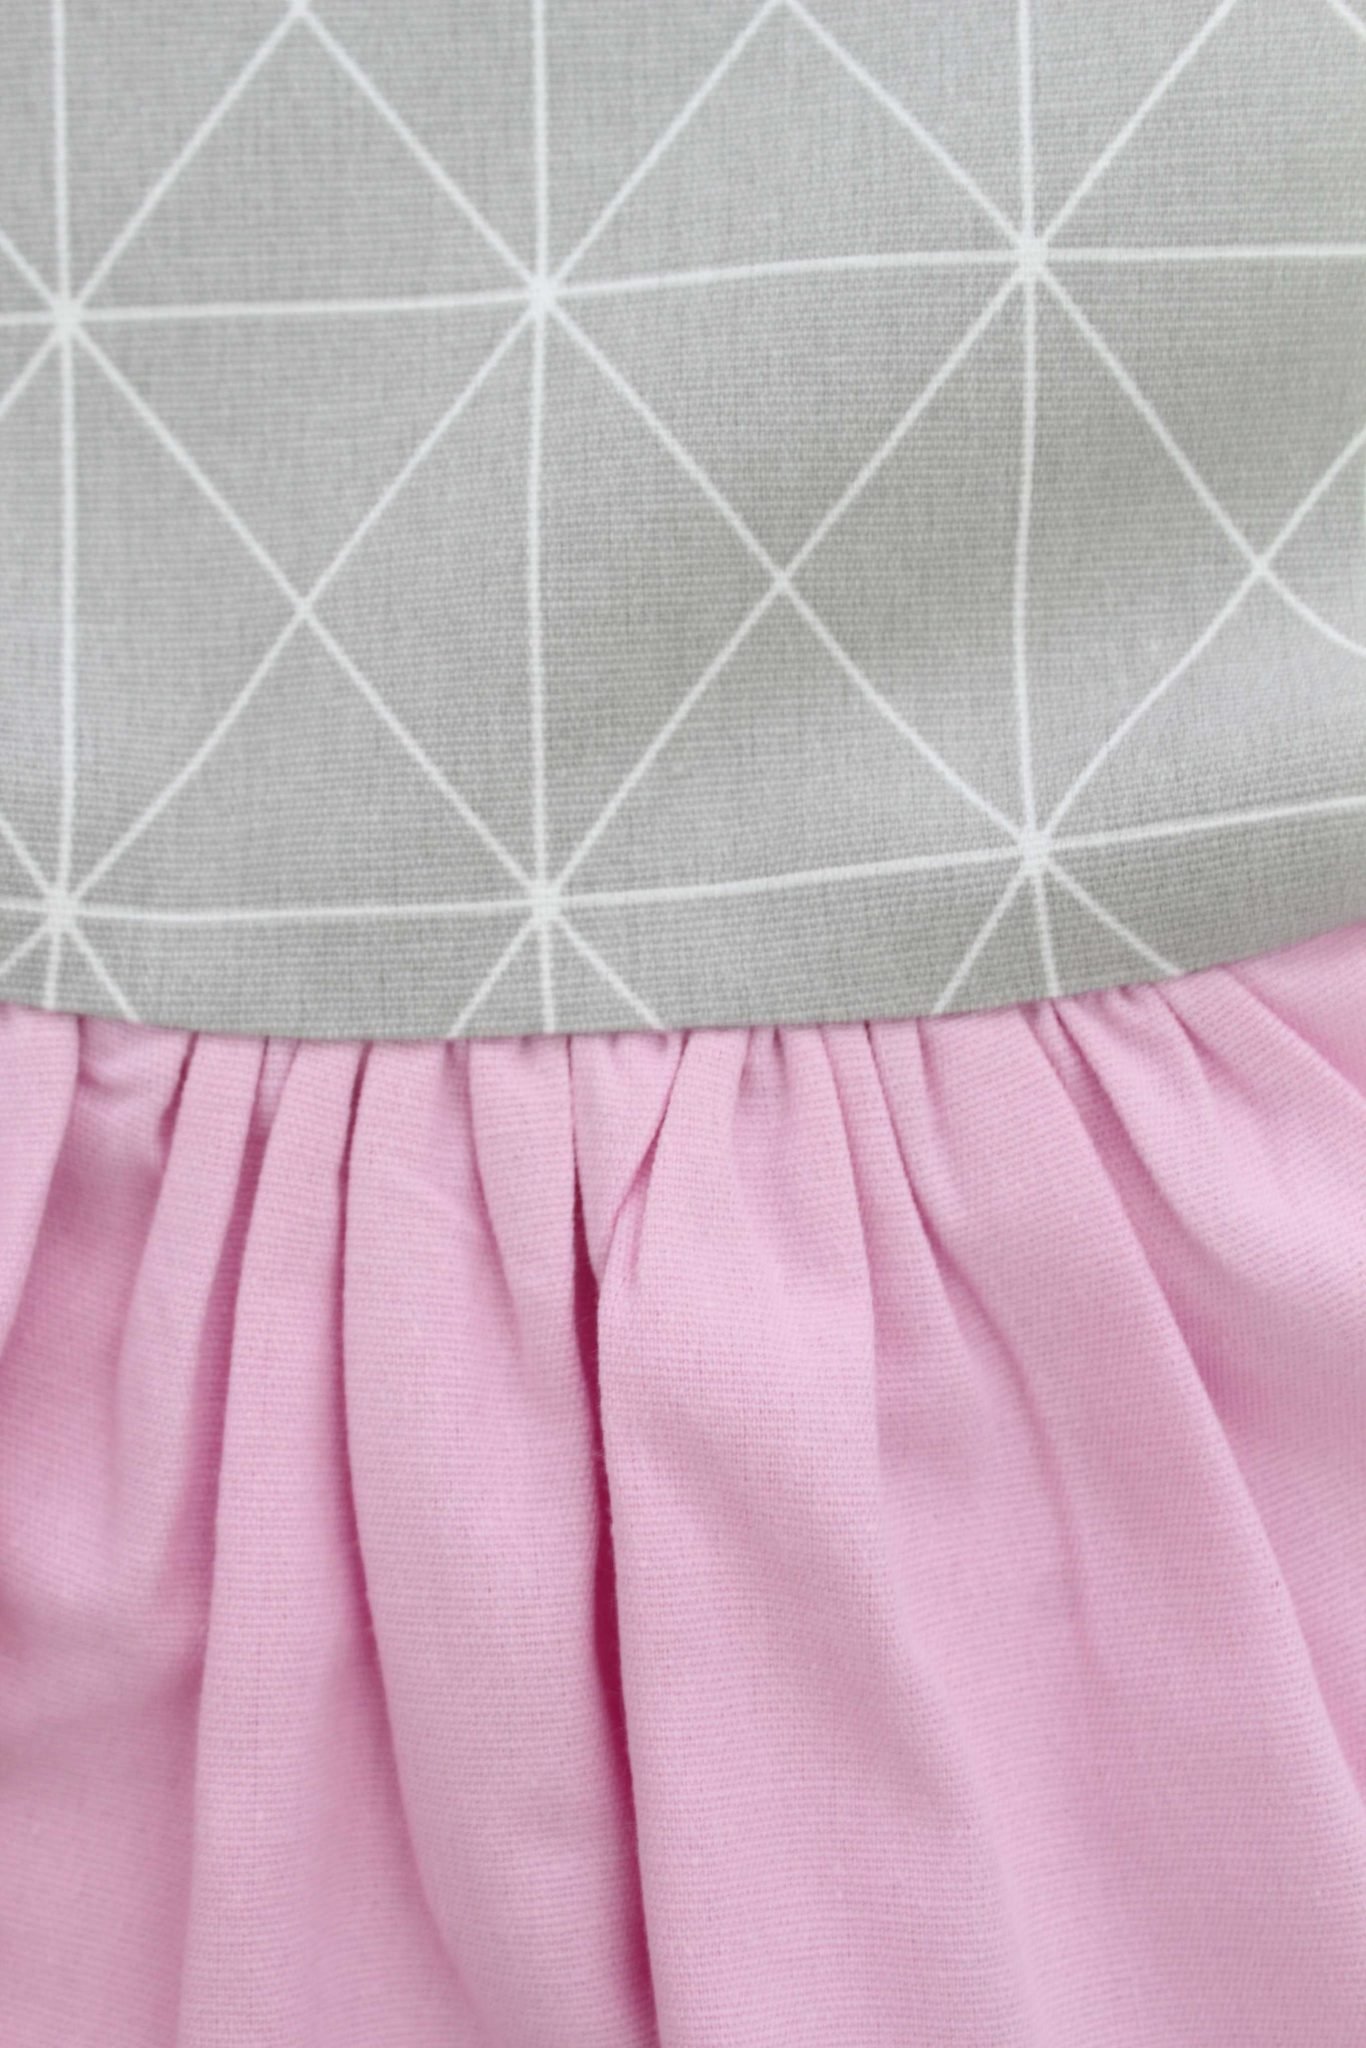
- Sew a straight stitch, 1/8″ below the last row in your ruffled strip. Sewing right on top of the last row would be perfect if you can; this way your ruffles will be perfectly even if you’ve spread them correctly the previous steps!
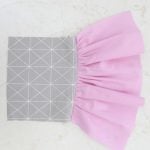
- Flip the ruffled strip up and press!
And…Done! This is how to gather fabric the easiest, fastest and most accurate way!
Tips
- Use a walking foot on your sewing machine if you find the fabric slipping or shifting while sewing. This ensures even feeding of both layers of fabric.
- If you’re working with delicate or slippery fabrics, consider stabilizing them with spray starch or interfacing before gathering. This will make the process much smoother.
- Always test your gathering technique on a scrap piece of fabric before working on your actual project. This ensures that your settings and method are suitable for the material you’re using.
- If you need tighter gathers, increase the tension on your machine slightly and shorten the stitch length. Adjusting these settings can help achieve the desired effect.
Sewing project variations
- You can experiment with different types of fabric to achieve various textures and finishes. For example, lightweight fabrics such as chiffon or organza create delicate, airy gathers, while heavier fabrics like denim or canvas result in more structured and pronounced gathers.
- Changing the thread color or using decorative stitching can also add a personal touch to your project.
- Additionally, incorporating elements such as pleats, or layered gathers can elevate a basic design into something truly distinctive. Don’t be afraid to try new techniques or combine multiple elements to craft a project that reflects your individual style.
More sewing tips you will enjoy
- How to square up and true up fabric
- Hemming sheer fabrics without a rolled hem foot
- How too use a bias tape maker
- Tips for sewing vinyl
- Lettuce hem tutorial
- How to shirr fabric
Frequently asked questions
How do I choose the right fabric for gathering?
When selecting fabric for a gathering project, consider the weight and drape of the material. Lightweight fabrics like chiffon, voile, or organza are often ideal for creating soft, delicate gathers, while medium-weight fabrics such as cotton or linen provide more structure and definition.
For projects requiring bold or dramatic gathers, heavier fabrics like taffeta or brocade can work beautifully. Always test a small section of your fabric to see how well it gathers and ensure that it aligns with your design vision.
What tools do I need for gathering?
To achieve neat and consistent gathers, having the right tools is essential. A sewing machine with adjustable stitch length settings and a gathering foot can speed up the process and provide precision. Other helpful tools include pins or sewing clips to secure the gathers in place, and an iron for pressing the finished work to achieve a polished look.
What is the best way to gather fabric?
By far, this method seems the fastest and easiest method to me, after trying many of them. A gathering foot will only complicate things more, and a ruffler will need too much math and might sound and look a bit scary for a beginner.
Hand basting stitches are also a great way to gather fabric if you prefer hand sewing or if you have a small project and don’t want to use your machine. Also, basting by hand gives you more control over the stitches and is safer to use on canvas or other heavy fabrics that can be hard to run through a regular sewing machine.
When gathering by hand, you can make larger or smaller gathers by adjusting the stitch length. Smaller gathers look better on fine fabrics, while heavy ones will require wider ruffles to achieve that neat look. The only inconvenience is this method is time consuming.
How do you gather fabric easily?
Here are a few tips to make fabric gathering easier and smoother:
- Lightweight fabrics like georgette, silk or organza will get marked by needle punches, so it’s better to hide the stitches in the seam allowance. This way, the holes won’t be visible on the finished project;
- Use about 2.5 times the length of the area you’ll be attaching the ruffle to, to get a nice ruffle. 3 times the length will add even more fullness, but it also depends on the fabric you’re using. Lightweight fabrics require more length, while heavy ones require less;
- Knit fabrics are best gathered with elastic, but this also works well with woven ones. Cut a piece of elastic the size of the smaller piece of fabric and stretch the elastic to match the center and edges with the ones on the larger piece. Sew in a zig-zag while stretched.
- When using the method highlighted in this tutorial, if you’re still not seeing the results you expected (i.e. ruffles are still moving when sewing them in place), use a walking foot instead of your regular foot. This foot will allow even feed of the fabric and will not push it while sewing.
- Additionally, you can do the final stitching inside the basting stitches instead of below as I did. This will truly prevent the fabric from moving as it will be secured on both sides of the needle by the basting stitches.
Gathering fabric is a useful technique to create fullness and add dimension to your sewing projects. With practice and patience, you can master the art of gathering fabric and elevate your sewing skills to the next level. So go ahead and try it out on your next project – you’ll be amazed at the beautiful results!
Happy sewing!
How to gather fabric
Materials
- Fabric Strips
- Matching Thread
Tools
- scissors
- pressing iron
Instructions
- Set your machine to the longest stitch length and a regular thread tension.
- Switch the presser foot tension to a loose setting.
- Before starting to sew, leave the threads about 5" long.
- Sew along the edge where you want to create the ruffles, 1/8" away from the edge. Leave these threads about 5" long too.
- Repeat one or two more times creating two additional lines, 1/8" away from each other. For lightweight fabrics, two lines of stitches should work fine while for thicker fabrics three rows might be needed to ensure the threads won't break while gathering.
- Using a pin separate the threads of the front stitches from the threads of the back stitches (in my case the back threads from the red threads)
- With one hand grab all threads in the back (red in my case) and with the other hand start pulling the fabric down, gathering the fabric towards the other end of the stitches. The threads won't break and the gathers will form and spread evenly.
- You can do this process at one end or both ends of the fabric strip.
- The ruffled fabric needs to match the length of the second fabric strip you're sewing the ruffles onto.
- When happy with your ruffles, tie the threads in a double knot (the red threads tied with the blacks), on both ends.
- Trim the threads too
- Set your iron on steam and press the ruffles very well. This is a very important step as it will be a great help when sewing the ruffles.
- Place the main fabric strip (the one without ruffles) right side up. Place ruffled strip over, wrong side up.
- Pin the two strips together using lots of pins.
- Sew a straight stitch, 1/8" below the last row in your ruffled strip. Sewing right on top of the last row would be perfect if you can; this way your ruffles will be perfectly even if you've spread them correctly the previous steps!
- Flip the ruffled strip up and press!
Video
Most popular sewing projects:
Article may contain Amazon & affiliate links. As an Amazon Associate I earn from qualifying purchases at no additional cost to you.

Thanks so much for this post on how to gather fabric. I found this to have so much useful information explained in easy to understand terms. Loved also to see it as a printable post to have for reference later.
Thanks for your kind comment, Dawn and happy you found my tutorial useful and informative!