

How to sew binding on quilt corners
Learn how to confidently sew binding on quilt corners like a pro with this ultimate guide. Master the art of sewing binding on quilt corners with the knowledge and skills provided in this comprehensive resource. No more frustration or defeat – conquer quilt corners with ease!
Sewing binding on quilt corners
Are you tired of feeling frustrated and defeated when it comes to sewing binding on quilt corners? Do you want to confidently conquer quilt corners like a pro? Well, you’re in luck! In this ultimate guide, I’ll give you all the knowledge and skills you need to master the art of sewing binding on quilt corners.
But hey, before we dive into the nitty-gritty of binding corners on a quilt, let’s take a moment to appreciate the importance of getting it right. Proper binding is not just about aesthetics, it’s about making sure your quilts last long and stay strong. It’s that essential finishing touch that brings everything together and adds that final touch of polish.
Throughout this guide, I’ll also answer some burning questions you may have about the materials needed for sewing binding on quilt corners and the specific techniques involved. So you can walk away from this article feeling confident and equipped to tackle any quilt corner with ease.
Whether you’re a seasoned quilter looking to refine your skills or a novice eager to take on your first project, this quilting miter corners guide is for you. By the end, frustration will be a thing of the past and beautifully finished quilts will be your new norm. So, grab your materials, clear your workspace, and let’s get started on this exciting journey to sewing binding on quilt corners like a true pro. Your quilts will thank you for it.
More quilting ideas you will love:
- Christmas table runner
- Quilted tissue holders
- Pocket potholders with ruffle
- Easy sewing supplies organizer
- Quilted toiletry bag with selvage fabric
- How to join binding ends
The importance of proper binding on quilt corners
The corners of a quilt are often the areas that receive the most wear and tear, as they are frequently handled and pulled. Therefore, ensuring your quilt corners are well-protected and reinforced with a secure and aesthetically pleasing binding is paramount.
A properly sewn binding on quilt corners not only adds strength and durability but also enhances the overall appearance of the quilt. It gives a clean, finished look that elevates your craftsmanship and attention to detail. By taking the time to carefully sew the binding on quilt corners, you’re not only preserving the quilt’s longevity but also adding a professional touch that sets your work apart.
When sewing binding on quilt corners, it’s essential to pay close attention to detail and technique. The way you fold and miter the fabric determines the final outcome of your corners. A well-executed mitered corner creates a crisp, seamless transition that ensures the binding lies flat, avoiding any unwanted puckering or bulkiness. By mastering this skill, you’ll be able to create quilts that not only feel sturdy but also look refined and polished.
Preparing your quilt and binding strip
To properly prepare your quilt and binding strips, it’s important to gather all the materials you’ll need. Start by selecting a fabric for your binding strips that is similar to the fabric used for making the quilt, ensuring it complements the colors and patterns of your quilt top.
Measure the total length of all four sides of the quilt to determine how much binding fabric you’ll need, allowing for a bit of extra length for mitering the corners.
Once you have your binding fabric ready, it’s time to cut the strip. Consider the desired width of your binding and add seam allowance to calculate the appropriate width for each strip. Carefully cut the strips along the fabric’s crosswise grain, as this will provide greater stability and prevent excessive stretching. Remember to join the strips together using diagonal seams, which will help distribute the bulkiness more evenly. Here and here are a couple of tutorials for cutting and sewing bias strips to form a long strip.
With your binding strips prepared, turn your attention to the quilt itself. Ensure that the quilt top, batting, and backing are clean, flat, and properly aligned. Press the quilt top to eliminate any wrinkles or folds, making it easier to work with during the binding process.
Do you sew around edge of quilt before binding?
Some quilters prefer to sew around the edge of the quilt before attaching the binding, while others prefer to sew the binding directly onto the raw edge of the quilt sandwich. The choice is ultimately yours and depends on the desired aesthetic and personal preference.
If you opt to sew around the edge, use a 1/8-inch seam allowance to secure the layers together, ensuring they stay in place while you work on binding the corners.
Troubleshooting tips for perfect quilt corners
One common issue that quilters face when sewing binding on quilt corners is bulky or uneven fabric buildup. This can occur when the binding is folded over the corner and sewn down, creating bulk and uneven areas that disrupt the smoothness of the quilt edge. To prevent this, it’s important to trim away excess batting and fabric from the quilt edges and corners before attaching the binding strip. Use a ruler and rotary cutter to carefully trim the excess fabric, ensuring that the corners remain crisp and neat.
Another challenge that may arise is achieving sharp, clean corners without any gaps or folds in the binding. When folding the binding over the corner, it’s crucial to create a mitered fold that lays flat and aligns perfectly with the adjacent sides of the quilt. To achieve this, take extra care while folding the binding, ensuring that the mitered fold is precise and straight. You can use a straight pin or a fabric marker to mark the fold line if needed or a pressing iron to help the fabric lay flat and form a crisp line when folded.
Lastly, when sewing the binding to the back of the quilt, it’s essential to use small, discreet stitches that blend seamlessly with the fabric. This will ensure that your binding remains securely in place while maintaining a polished, professional appearance. In the tutorial below I used an edge stitch on the front of the quilt which is quite visible in the back. But that is only because later I added a decorative stitch to that seam which looked beautiful on the front and the back of the quilt.
What materials do you need for binding a corner on a quilt?
Here are the items you’ll want to gather before getting started:
1. Binding Strips: Determine the desired width of your binding strips depending on your project. You can either make your own binding using coordinating fabric or purchase pre-made binding strips. Make sure you have enough length to go around all the corners of your quilt.
2. Quilting Ruler and Rotary Cutter: A quilting ruler and rotary cutter will help you accurately measure and cut your binding strips as well as trimming the edges of your quilt.
3. Iron and Ironing Board: Pressing your binding strips before sewing will help create crisp folds and make your corners easier to work with. Invest in a good iron that can reach high temperatures and set up a sturdy ironing board to create a smooth surface.
4. Sewing Machine and Matching Thread: You’ll need a strong sewing machine equipped with a straight stitch setting to attach the binding strips to your quilt. Use a thread color that matches the fabric or opt for a coordinating thread for a decorative touch.
5. Pins or wonder Clips: Use pins or binding clips to hold your binding strips in place as you sew. These will help prevent shifting and ensure your corners are neatly secured.
6. Seam Ripper: Mistakes happen, and having a seam ripper will come in handy if you need to undo any stitching or make adjustments along the way.
7. A walking foot: this is not necessary but it’s helpful when sewing thick layers. I used the presser foot that comes with my Brother machine but it allows me to adjust its height depending on the thickness of the layers.
How to sew bias binding around corners
Sewing the binding at corners
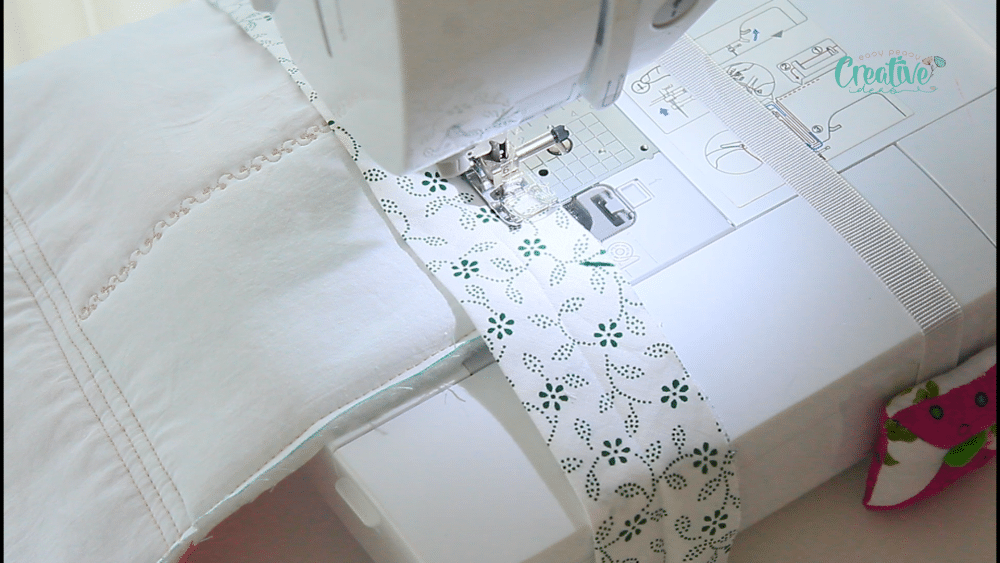
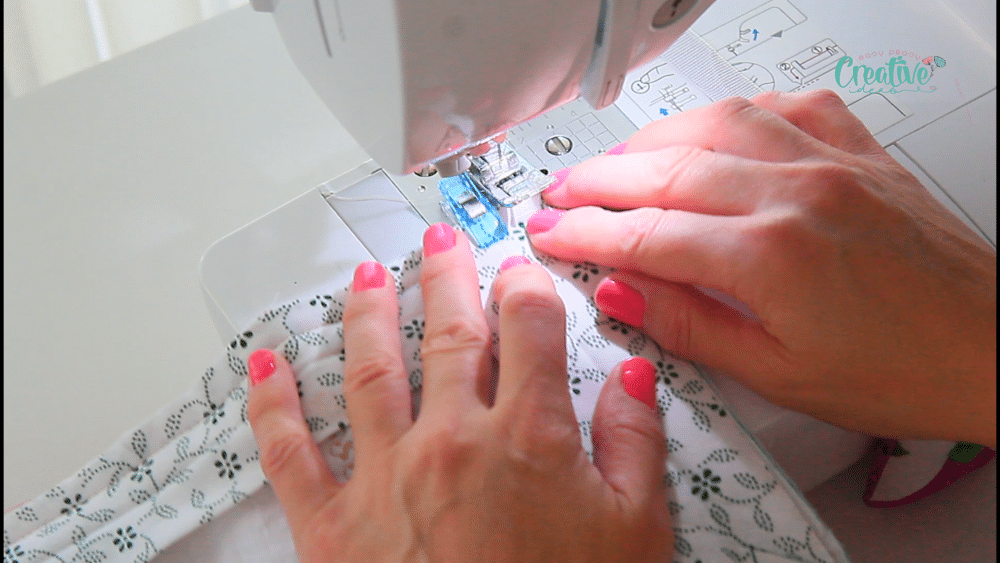
- To start, lay the binding strip flat along the edge of your quilt, aligning the raw edges.
- Begin sewing about 3 inches from the strip’s end, using a ¼ inch seam allowance. If your binding strip is wide you can use a larger seam allowance. For my quilt I used a 3/8″ seam allowance.
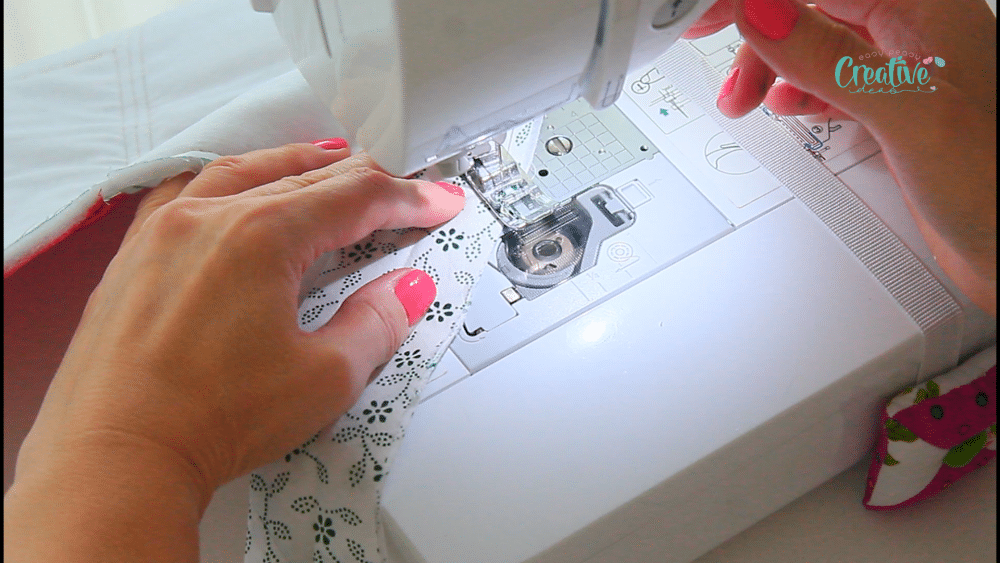
- Sew the binding until you get close to the corner. Stop about 2 inches away and mark a diagonal line in the corner, in the size of your chosen seam allowance, at a 45-degree angle.
- Continue sewing the binding until you reach that marking, pivot the needle then sew the marked line.
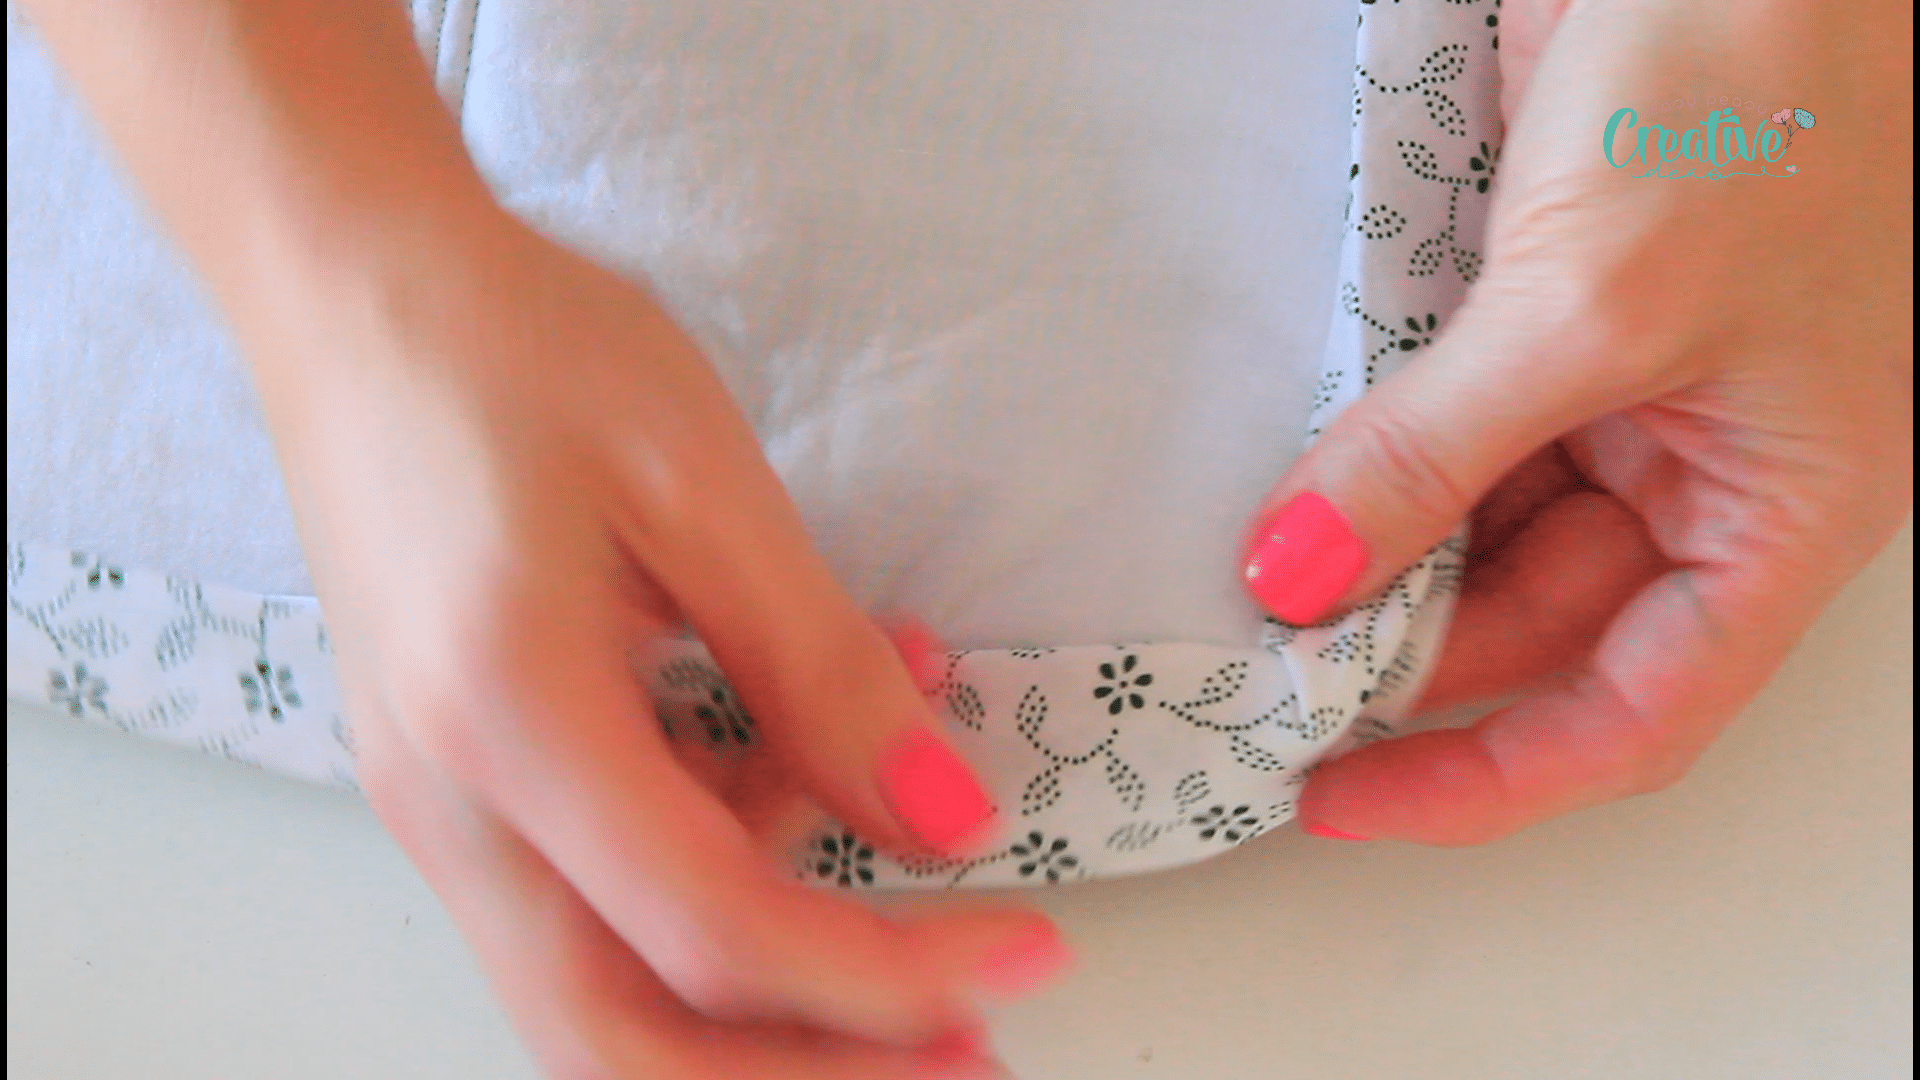
- Next, fold the binding strip up in a 45-degree angle, using the corner stitch as a guide.
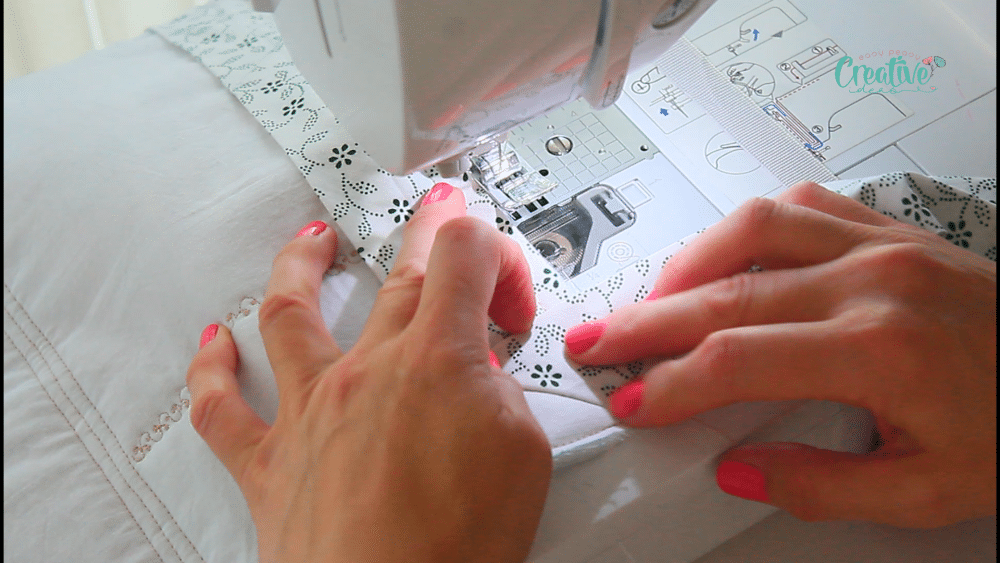
- Finger press then fold the binding down, aligning the folded edge of the binding with the edge of the next side of the quilt. Be sure to align the raw edges of the binding and the quilt for a tight fit.
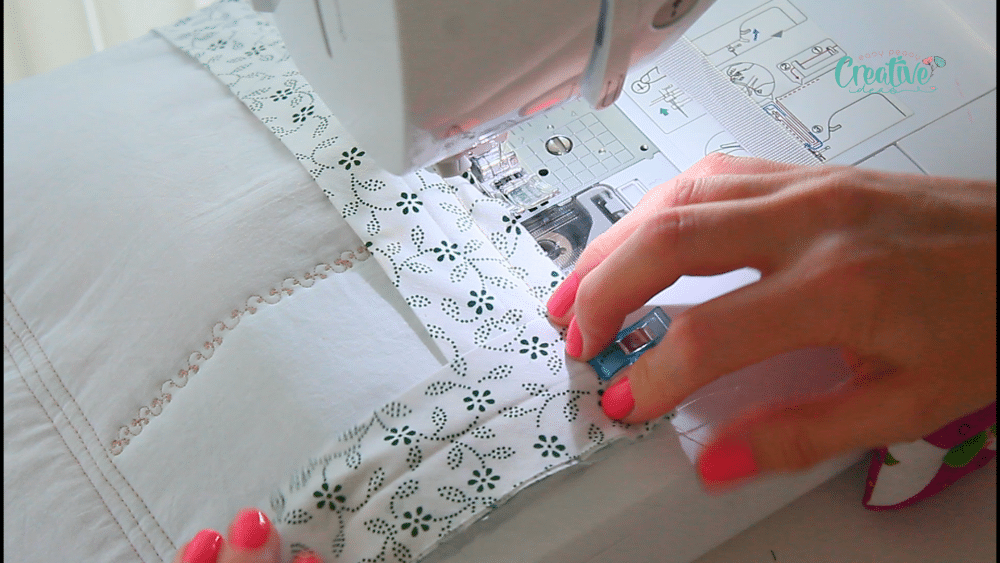
- With the binding strip securely in place, continue sewing along the edge towards the next corner. As you approach the corner, stop sewing with the needle down in the fabric. Repeat the steps above to sew the second corner.
- Keep doing these steps until you finish sewing all four corners.
- When you are about 3 inches away from your starting point, it’s time to join the ends of the binding.
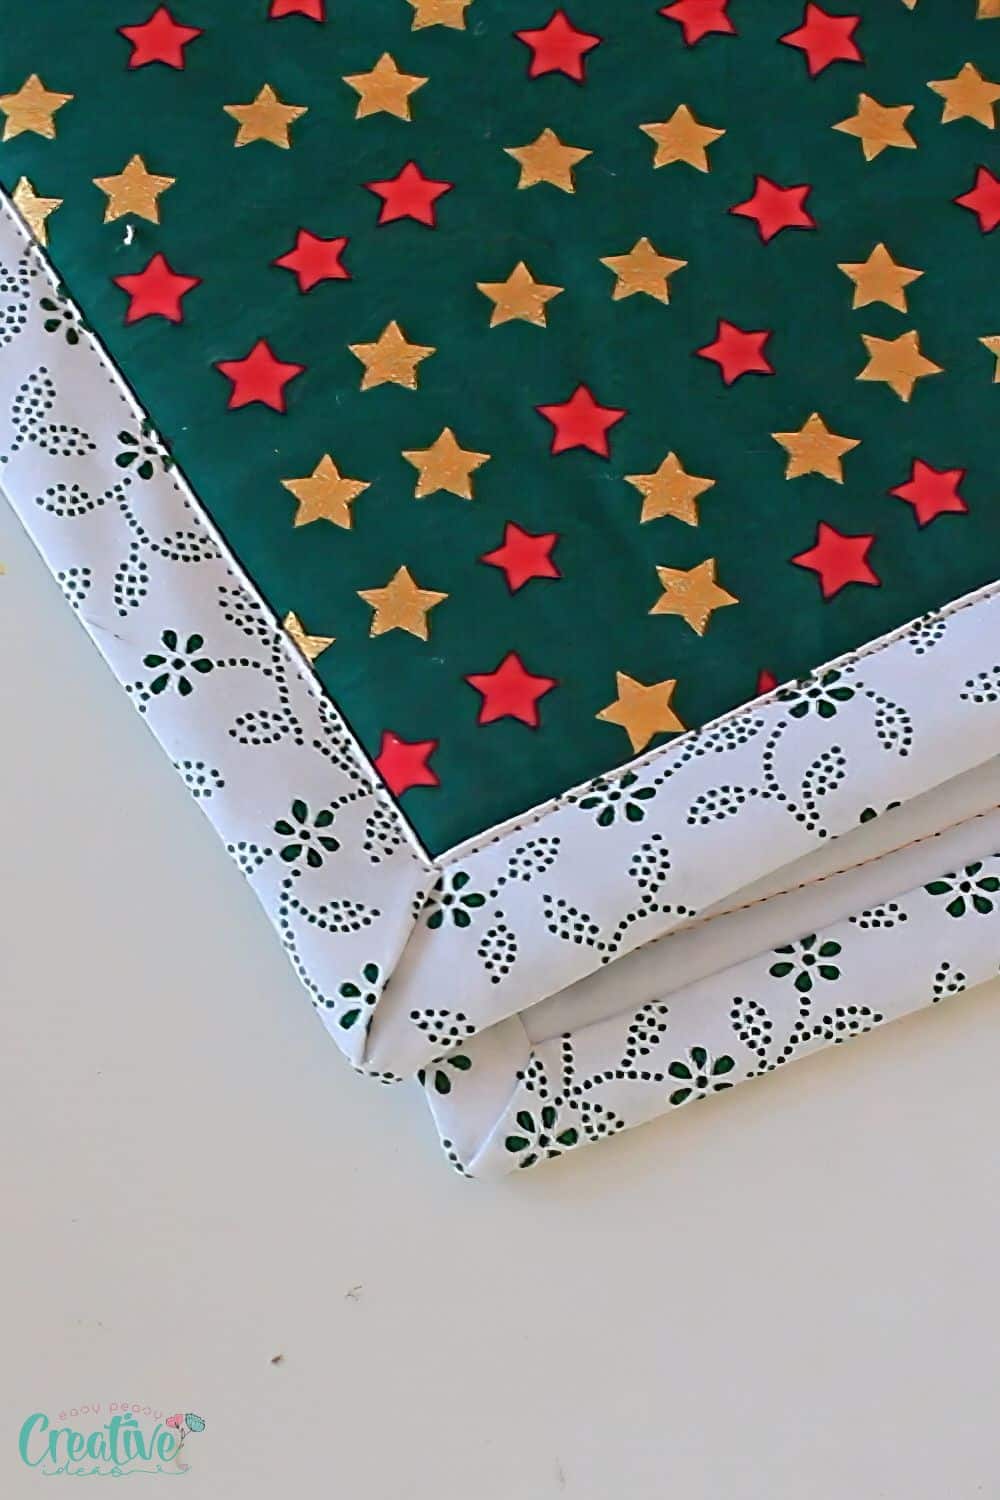
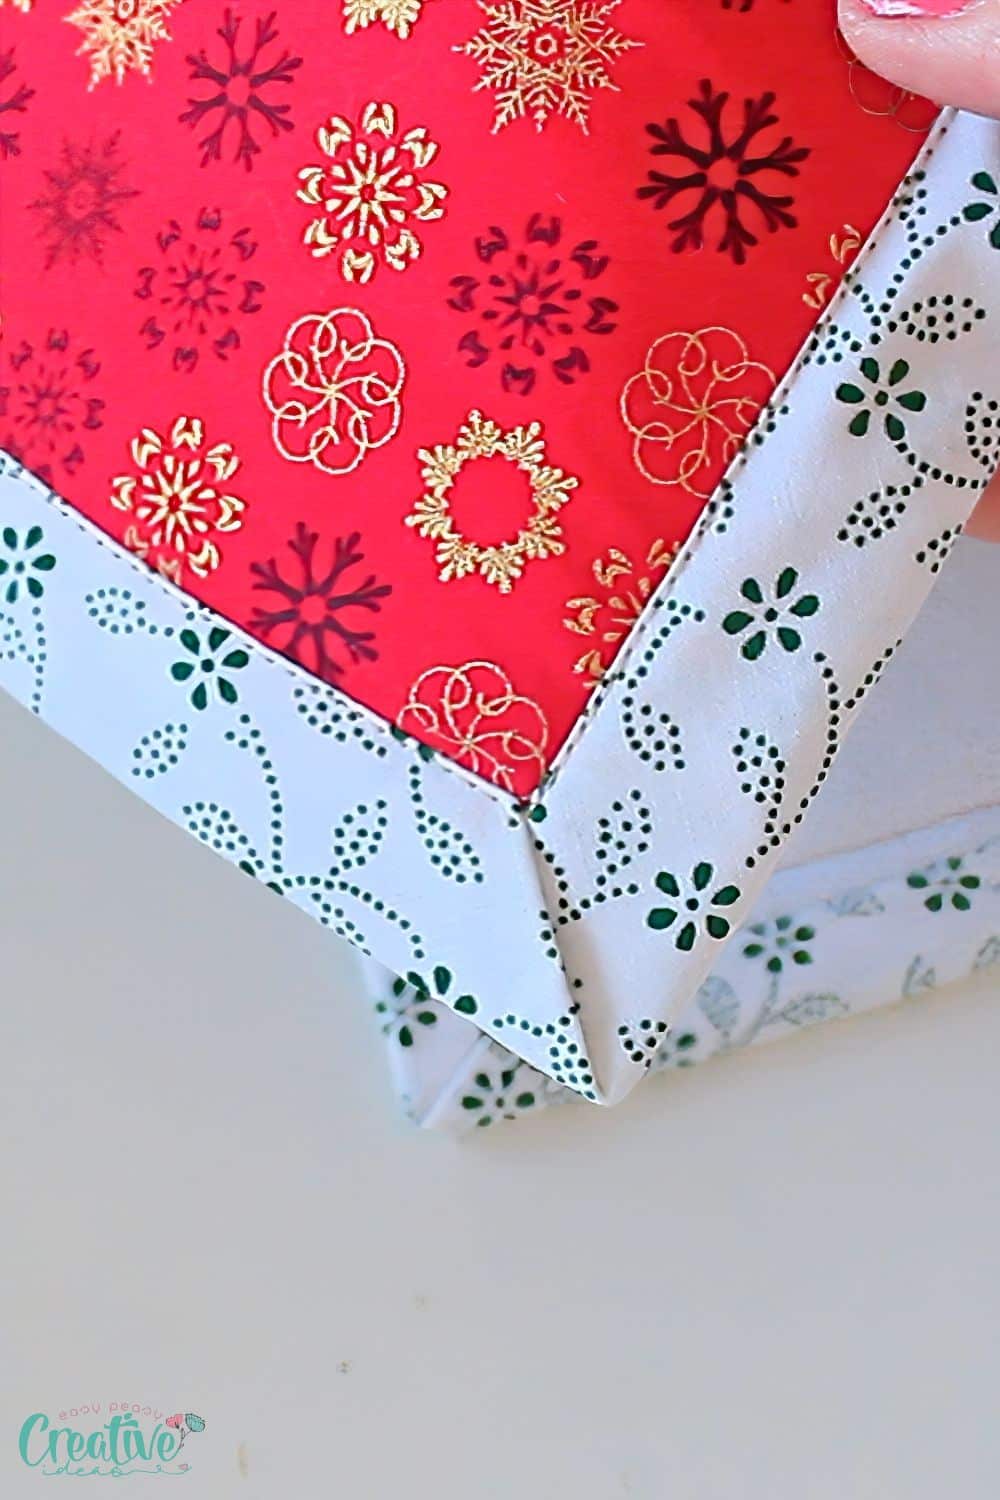
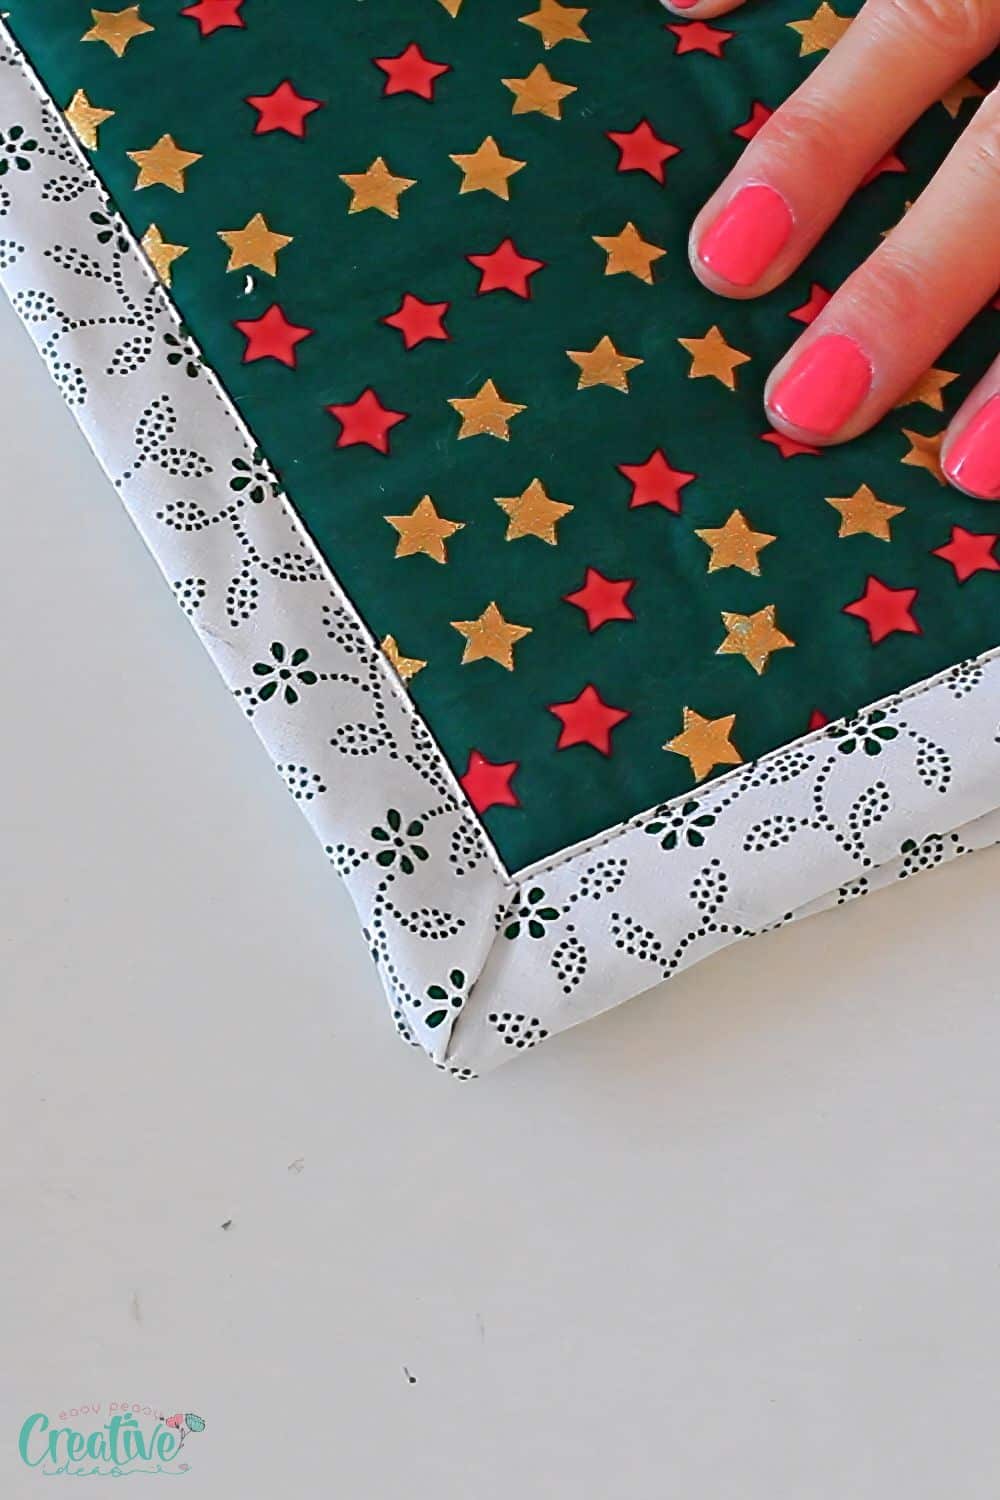
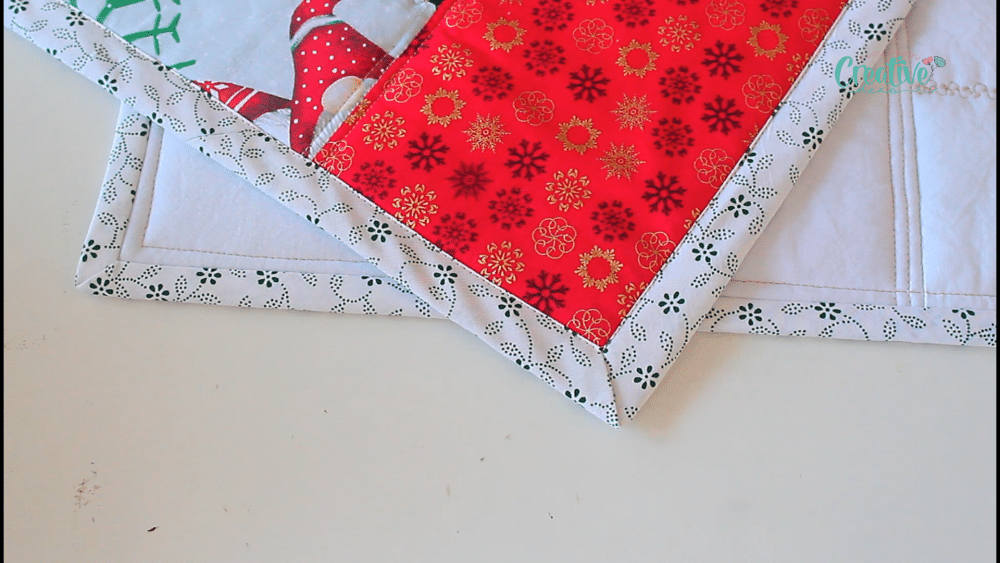
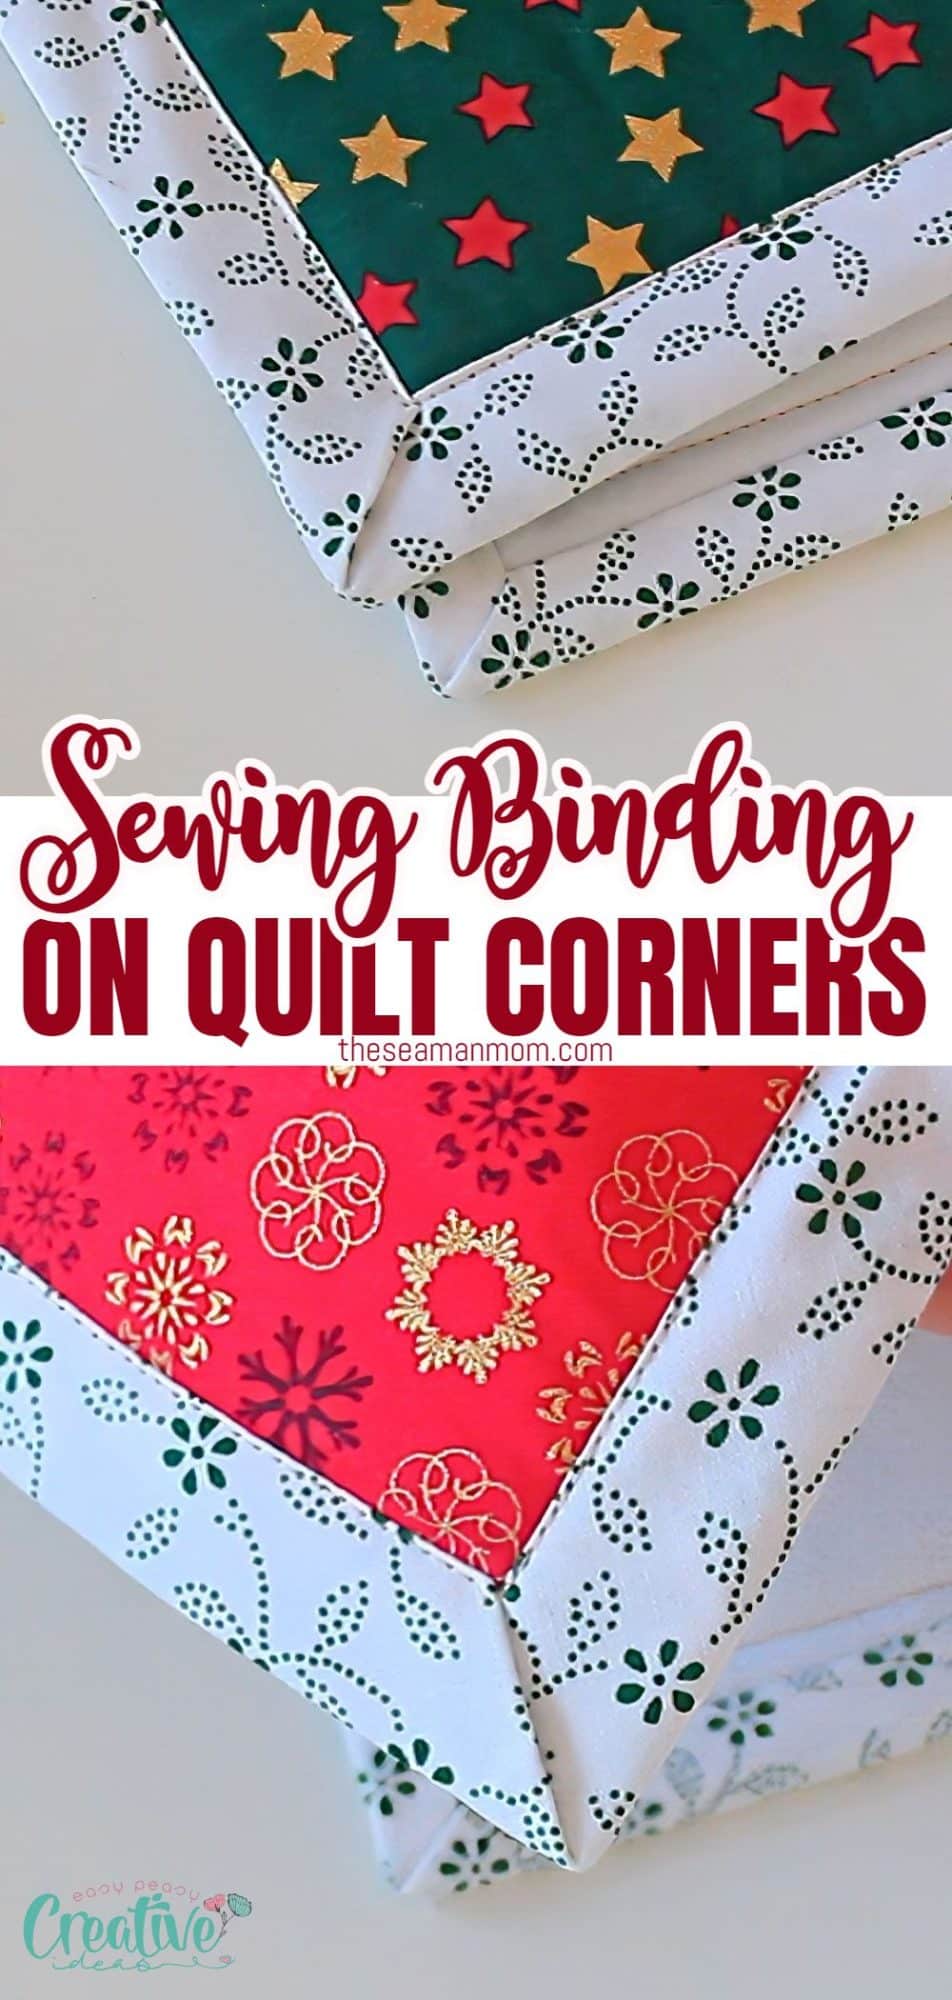
Forming the mitered corners
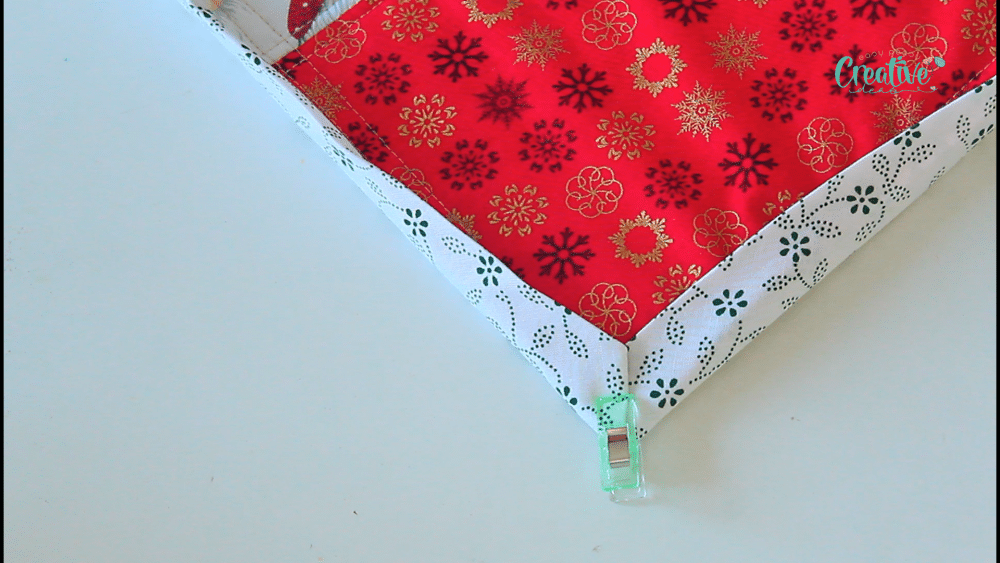
- Next fold the binding to the other side of the quilt. Use clips to keep the binding folded in place.
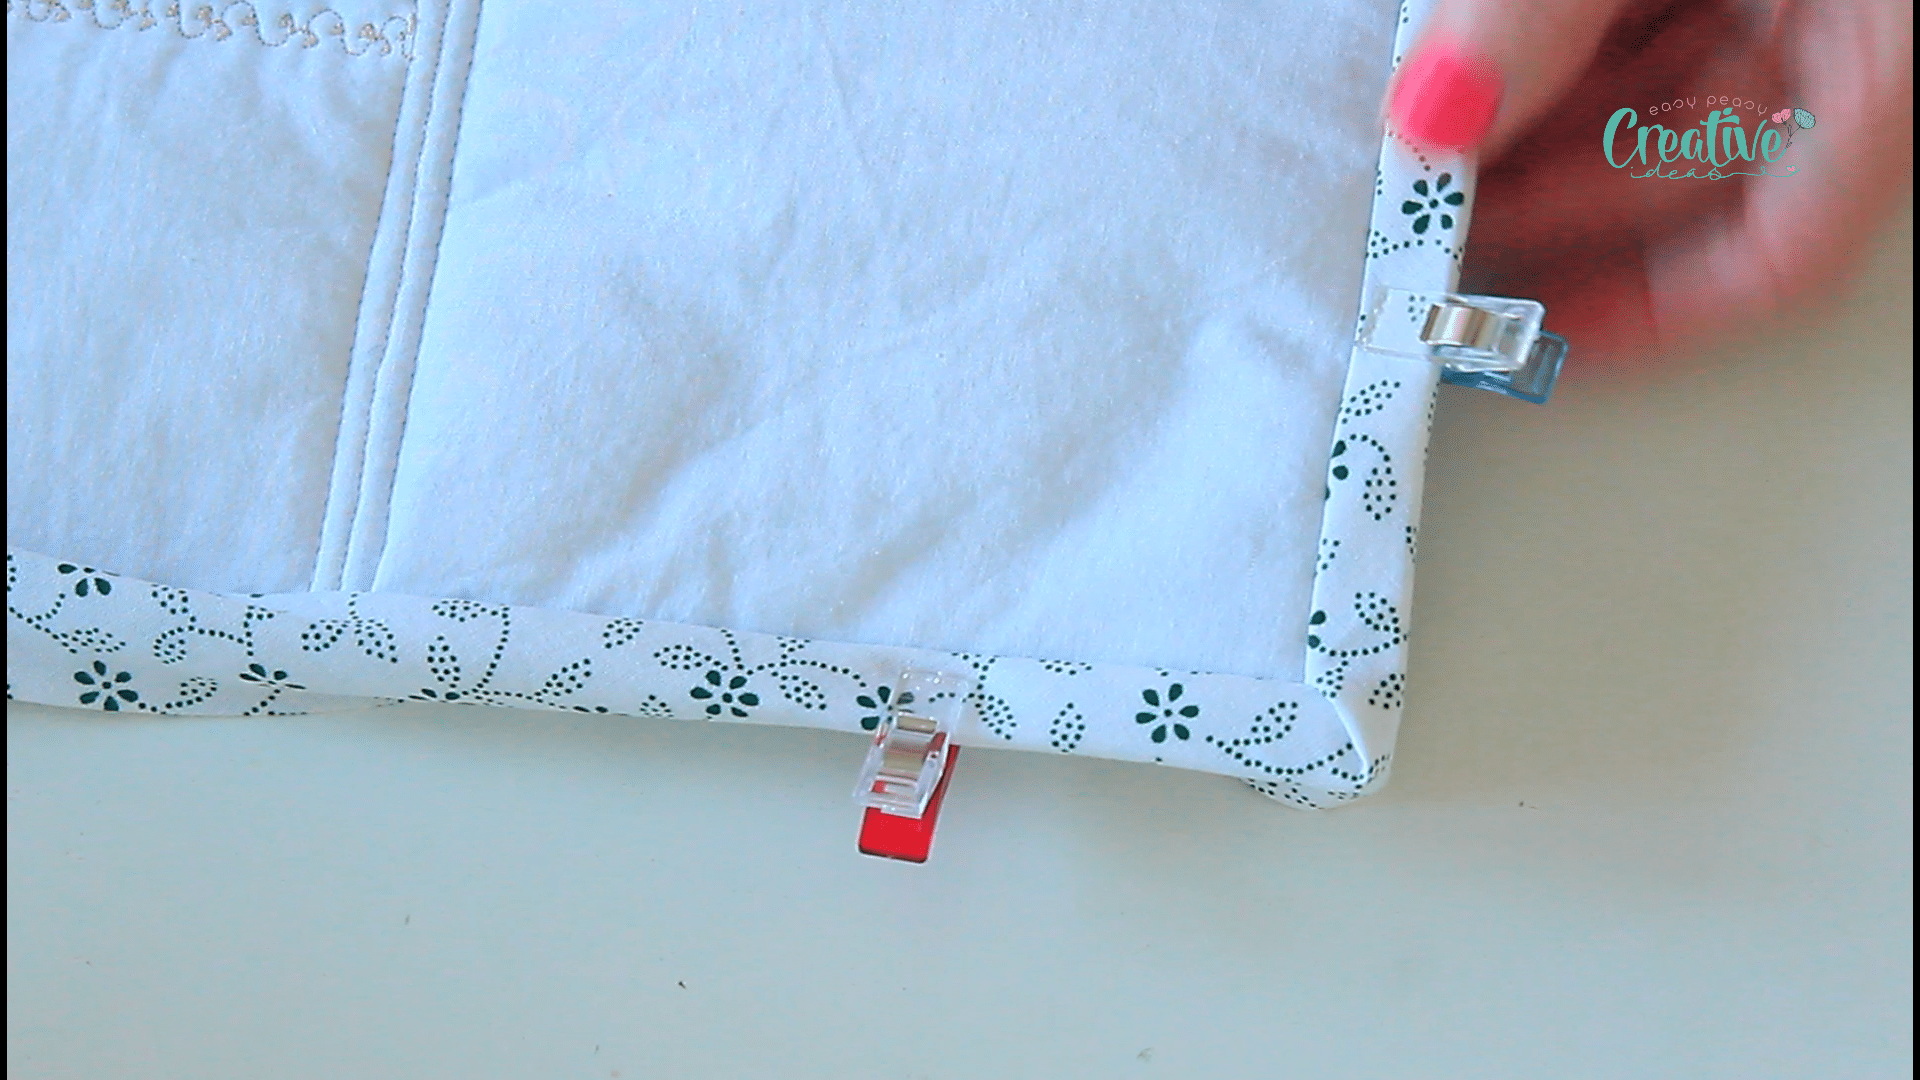
- Flip the quilt to the other side.
- Arrange the corners so the fabric forms 45-degree angles and that the edges of the binding match perfectly in every corner. You can use an iron to press the binding and form crisp corners.
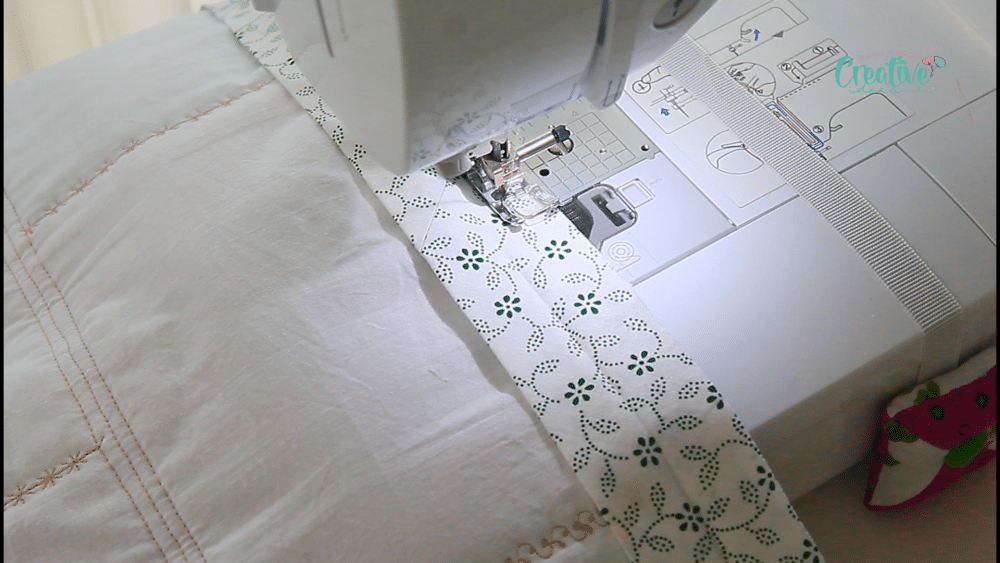
- Edge stitch the binding to finish your quilt. You can also use a hand-stitch or a stitch in the ditch on the back side of the quilt, if you attached your binding starting on the front first.
By following these steps, you will be able to turn corners on quilt binding with ease. Take your time and ensure that each fold is crisp and precise. The attention to detail will result in a professional-looking finish that will enhance the overall appearance of your quilt.
And remember, practice makes perfect! So, go forth and sew with confidence and precision. Your quilts will thank you for the care and attention you give to even the smallest corners. Happy quilting!
Pin to save for later
Print the craft card
How to sew binding on quilt corners
Materials
- Quilt
- Binding Strips
- Matching thread
Tools
- Iron
- Ironing Board
- Seam Ripper
- A walking foot
Instructions
- To start, lay the binding strip flat along the edge of your quilt, aligning the raw edges.
- Begin sewing about 3 inches from the strip's end, using a ¼ inch seam allowance. If your binding strip is wide you can use a larger seam allowance. For my quilt I used a 3/8" seam allowance.
- Sew the binding until you get close to the corner. Stop about 2 inches away and mark a diagonal line in the corner, in the size of your chosen seam allowance, at a 45-degree angle.
- Continue sewing the binding until you reach that marking, pivot the needle then sew the marked line.
- Next, fold the binding strip up in a 45-degree angle, using the corner stitch as a guide.
- Finger press then fold the binding down, aligning the folded edge of the binding with the edge of the next side of the quilt. Be sure to align the raw edges of the binding and the quilt for a tight fit.
- With the binding strip securely in place, continue sewing along the edge towards the next corner. As you approach the corner, stop sewing with the needle down in the fabric. Repeat the steps above to sew the second corner.
- Keep doing these steps until you finish sewing all four corners.
- When you are about 3 inches away from your starting point, it's time to join the ends of the binding.
- Next fold the binding to the other side of the quilt. Use clips to keep the binding folded in place.
- Flip the quilt to the other side.
- Arrange the corners so the fabric forms 45-degree angles and that the edges of the binding match perfectly in every corner. You can use an iron to press the binding and form crisp corners.
- Edge stitch the binding to finish your quilt. You can also use a hand-stitch or a stitch in the ditch on the back side of the quilt, if you attached your binding starting on the front first.
Video
Most popular sewing projects:


- Tips for sewing a round hem
- Corded bag handles
- Flutter sleeve dress pattern
- How to laminate cotton fabric
Article may contain Amazon & affiliate links. As an Amazon Associate I earn from qualifying purchases at no additional cost to you.

Hello again! I am binding the edge of a single layer of lush plush fleece with a wide single folded double-side satin ribbon binding. Opinion… Should I sew the first side as though it is double-fold, keeping a scant allowance and using your miter method? (Once the first side is done, folded up and pressed, it will be a hidden seam.) Then, for the finishing side, the extra width ~from not being folded under like the first side~ would allow for plenty of “ditch clearance” so it can be well-secured with a solid machine stitch and not wander on and off the ribbon binding’s beautiful edge on other side. Does this make sense? It’s clear as a cloudless sky to me but I’m not sure how it translates outside my head. HA!!